
FOOD PHOTOGRAPHY - FEW POINTERS !!!
>> Tuesday, March 13, 2012 –
about food pictures,
color theme for food photos,
food photo tricks,
food photography,
food photography tips,
food styling,
photography tips,
props for food photography,
reflectors for food photos
Photography is more of an Art than Science. Photography is a great hobby and can help to
express yourself. Each and every person look pictures in
different ways so it absolutely depends on their liking and their nature of
interest.
Few months back Lubna of "Yummy Food" asked me to
do a guest post on food photography for her blog. It was good opportunity to share my thoughts
on which I am learning it everyday and still in learning process :)
. I am reposting it here just for my
record. Here are few pointers which I follow every
time.
Without writing more Introduction lets jump right into the
meat of it.
Get to know your Camera:
For a starter, it does not really matter about what kind of
camera you have. Having to have a DSLR
to get a great picture is a MYTH.
Regardless of the type of camera, first get to understand and feel
comfortable with your camera. You need
to spend time to read your camera manual and to understand what it says and
play around with the camera. This will
help you to understand what the manual says and how to do it with the camera.
There are two kind of major camera types – Point and Shoot
and. Most of the Point and Shoot
camera’s in the market today have different modes. Each mode is for a particular purpose;
understand the purpose of the modes as well as the options available in each
mode. Then play around with taking
pictures of the same subject in different modes, this will help you understand
the outcome in each of the modes. After
you do this kind of exercise on different types, you will have a feel for the
modes and it will be intuitive to you as to what mode has to be used based on
the subject, lighting, day or night.
Once you have mastered the different modes available in the
camera, the next thing is to break the rules and go with your creative ideas to
use different modes regardless of the subject and lighting. This will help you discover new things which
will not me mentioned in the books or manual.
Evolution of my Food Blog:
When I Started:
When I started my food blog I did not have props or a
DSLR. I started with point and shoot camera
and with what was available to me in terms of utensils. Based on those my way of photographing was to
take the raw ingredients of the food and make them stand out with my Garnishing.
With my point and shoot camera and my simple plating:

Later:
I got my DSLR and started exploring it, but I was shooting
in Auto mode along with creative modes. Even
though it was Auto mode and other modes using a DSLR made a lot of difference
to the pictures, then I started to use some props for my pictures and using the
props and DSLR took a different direction my style of pictures compared to the
initial days.

Until Now:
Then I started to take pictures in full manual mode and this
opened a world of possibilities and I started learning and exploring manual
photography. I fell in love with taking
pictures in manual mode.
My latest picture

Food Photography:
Let’s get into specifics of food photography now.
In Food Photography “Food” should be the star in the picture
and nothing other than food.
I am not going to touch about photography basics like
Aperture, ISO, shutter speed, white balance because there is lot of literature
about this available in the Internet.
I am going to give you some take away points that I follow
while taking food pictures.
1.Light:
When you see the word Light a lot of people would think
about Flash, that’s correct. But in the
world of food photography “Natural Light” is the key source for good
pictures. Natural light will bring out
the real colors of the subject. I only
use Natural light source for my food pictures with table setup beside a window. Light from different directions and different
angles has the ability to change the personality of a photograph. So Play with different angles, light and
composition. .
2. Fresh Ingredients:
Food is best when the ingredients are fresh. Fresh ingredients also have a vibrant color
to it. Using Fresh ingredients along
with food in the pictures makes the picture speak out.
3.Composing the Subject:
With any kind of photography composing the subject is
analogous to the blueprint of a building.
Planning is the key to a successful photo; don’t get afraid that it’s a
long process. Trust me a small planning
would go a long way. When I say planning
I would visualize what all the things which would be the subject as well as how
they have to be placed for the photo.
Once you place it in the way you visualized, snap a picture or two and
look at it, this will help to make some small changes. Finally when you keep the food on the plate
then the whole stage is set for it.
4. Reflector:
Reflectors come in different colors (Gold, Silver, and White
etc). I use a white foam board as a
Reflector to bounce the light back on to the subject and also to avoid
shadows. White foam boards are not very
expensive.
5. Composition:
Earlier I have written about composing. Composing is about planning on how the things
should be placed for the picture.
Composition is specific to the pattern of placing the food in the
picture. You can use the square in the view
finder of the camera as a guideline and plan to keep the food in the center of
the square. I try to do this to the
possible extent.
Food Styling:
Food styling is one of my favorite things in food
photography. This does not require an introduction as to what this is, the word
speaks for itself. Food styling is an
ocean. With imagination, the
possibilities are endless in food styling.
You can create different moods in the picture based on your styling.
I am going to touch a few things which I do in food styling.
1. Garnishing:
As I have mentioned in the evolution part, in the starting
days of my blog, garnishing my food went a long way. Garnishing is about adding the feather to the
cap. Be it a simple or a complicated
dish, garnishing makes the dish very appealing and inviting to the eyes.
Keep it simple and neat.
Things I would use for Garnishing:
a.Raw ingredients used in making the food
b.Herbs and Spices
c.Accompaniments which pair well with the food
d.A Simple carved vegetable like lemon wedges, sliced chilli
etc
Whether you use the above or some other items, keep it
simple and elegant.
2. Theme:
Theme is the backdrop for the dish. There are different themes which you can use
like Rustic, Modern, White, Colorful, Event based etc. I choose my theme based on my mood.
Here are the sample pictures for few themes.
Rustic:
Authentic Bengali dessert with rustic look. Usually Mishti Doi
is served in the pot. in that case to give both authentic and rustic look, the
dish is in the pot and the environment is rustic.

Modern:


White based:
Since the dish is very colorful I choose to keep the base as
white, so that the dish would standout.

Colorful:
According to the complimentary color scheme in the color
wheel, opposite colors makes a perfect couple, so in that case Green background
and the color of cranberry makes a beautiful color contrast here. When I was in school, I read my aunt's home science record book which contained information about the basics of color, color scheme etc. Those information really helped me with my color compositions.
Contrast colors, if you see


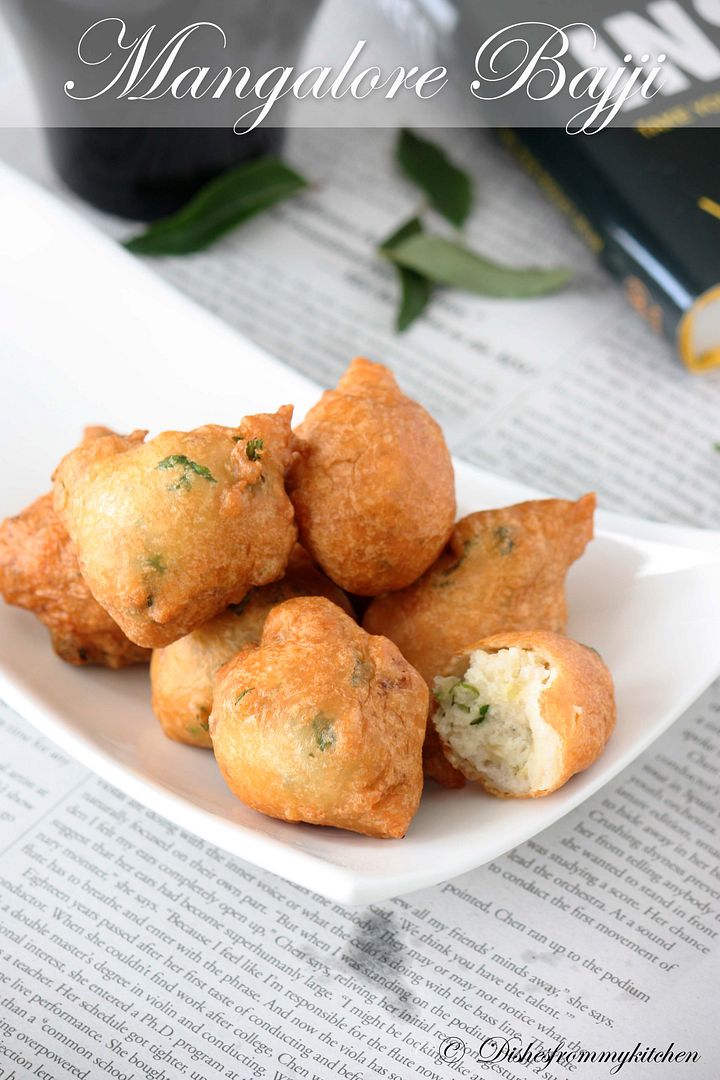
Casual dish – a tea time snack:
Here is an example for casual snacking; the picture itself
shows it’s a tea time snack. By keeping
a book, tea cup and a newspaper BG it tells us the story that is it casual
appetizer...

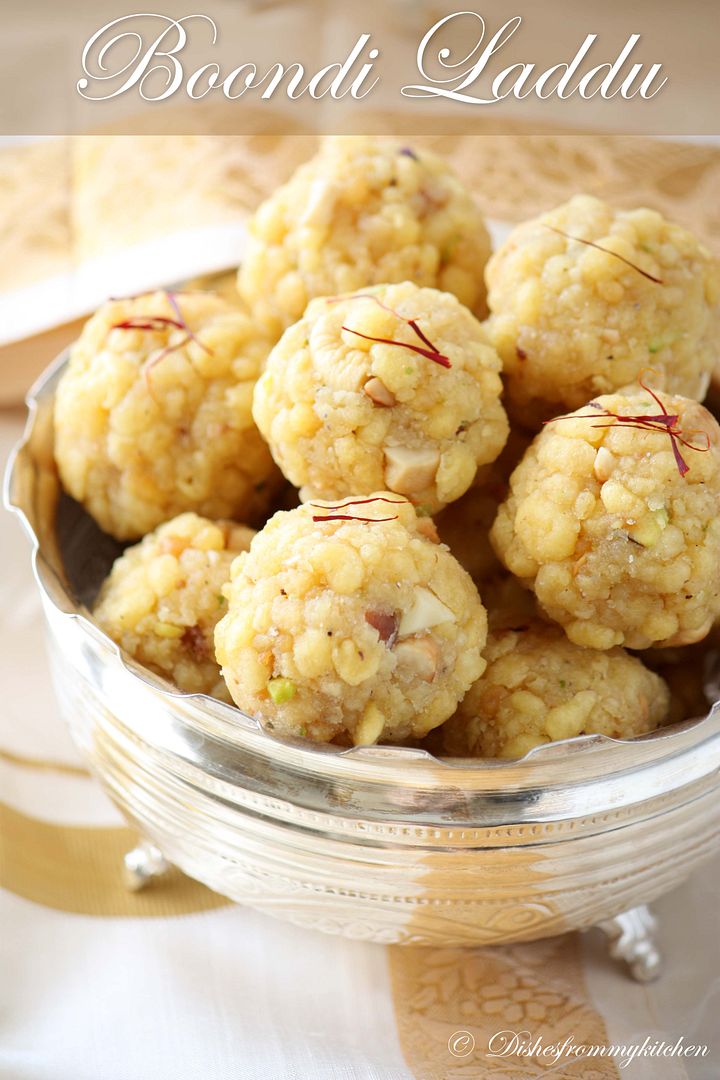
Authentic look to the picture:
This is traditional sweet, to show it authenticity, the
background and the bowl is choosing in the way to make the dish looks
traditional.

3. Props:
Props refer to the utensils, cutleries, Flowers, Fabrics, decorative
stuff etc which you are going to use in the picture. Choose your props based on the theme which
you are using. This also works the other
way. Back home, I am big into props for
a long time even before I started my food blog. Have been collecting props and
using it for decoration in the house.
But all these things are back home and when I started my blog I did not
have any of it with me.
When it comes to Props anything works, imagination is the
limit. I have become a Karung guni http://en.wikipedia.org/wiki/Karung_guni],
my Singapore friends will start laughing reading this. Don’t get me wrong, I have not gone to that
extent of going from house to house.


5. Tips and Tricks:
I am sharing some of my tips and tricks with you.
a.Show the vegetables fresh by sprinkling some water.
b.When using Herbs for shooting, after sometime the Herbs
will loose its freshness. At the point
of time replace with new herbs, so that the it will be fresh. (Follow this for
food as well)
c.Don’t the dump the plate or bowl with truck load of food.
d.I always make it a point to shoot a picture which shows
the texture of the food. This is really
important for the audience to know the texture of the food.
e.When presenting dishes which has vegetables pull a few of
the vegetables and place it on the top of the dish to me it visible and
appealing.
f. A little messiness like bite taken from the bowl,
crackers etc , the empty messy plate gives a beautiful touch to the photograph and makes others mouth water J
Inspiration of food photograph is everywhere so keep it in
mind and create your own unique style. Practice
in different ways J Practice makes perfect … Hope you all enjoy my
food photography post. Do drop me an
email if you have any questions…


Very informative Pavithra!!! thanx for sharing!!! Amazing Clicks yaar!!!
I thoroughly loved this post! Very enjoyable post that also makes a good read to those interested in photography.
Thanks a lot for sharing such useful tips about photography.
Deepa
Hamaree Rasoi
This is such a wonderful post..Thanks for posting it..Bookmarked..
Aarthi
http://www.yummytummyaarthi.com/
Wonderful post ! bookmarked for future references :)
love the post. very helpful and informational
SPICE UP THE CURRY
Really good tips. However, sadly no DSLR, but maybe someday and I will come back here again.
Awesome photography tips..thk u very much
Very nice post Pavithra. I am frequent visitor to your blog and you have never failed to impress me with your posts and pictures. I hardly comment - but today I wanted to appreciate your love for photography and cooking. Keep it coming!!
http://www.snapilyeverafter.blogspot.com/
Wonderful tips.. Thanks for sharing.
Thats a good informative one..
lovely post pavi..thanks for sharing..very informative ...:)
Thats really great,pavithra..It is useful to read ur views and experiences in food photography..Wonderful post.
first time here ... glad to follow you ..very great tips ...thanks for sharing ..visit my blog
www.sriyafood.blogspot.com
very useful post pavithra thank you for sharing. some behind the scene pics would have been very useful too :-)
Thanks a lot Pavitra. I wanted to buy a camera and the prices of DSLR had me swooning now thanks to you post i dont have to postpone buying a camera.
You are a genius Pavithra! :)
It was good reading your post. Very useful. Can u also tell us what you use as a base to keep your plates. I see some wooden board and some colored bases. Looks cool. It ll be very useful if u share. Thanks.
I thoroughly enjoyed reading your post, Pavithra, thanks for sharing your tricks, as your photography is absolutely gorgeous!
I am printing this out...not just pointers Pavithra, very detailed and well explained!
Wonderful post Pavi. Thanks for knowledge sharing. You are one of the few bloggers with truly excellent pictures! Keep up the awesome work and join that elite club of food stylists soon. I'll be so proud that you are in there!
very informative.thanks for the post.
Awesome post - your photography is oming along really brilliantly must confess am envious of it :)))) do u shoot in raw mode ?
Your pictures are always an inspiration, but it is nice to know that you are a Karung guni LOLz..well, your creative best is highlighted every where in your pictures. Thanks Pavitra for sharing.
Great post, luv your photography. Thanks for sharing!
The article was up to the point and described the information very effectively. Thanks to blog author for sharing an informative post. natural food color distributors USA