Search This Blog

CHEQUERED SHORTBREAD(Cookies)


Shortbread or Cookie, this is a conversational topic. The majority classifies shortbread as a cookie, but there are some who consider it a biscuit or even a cake. One would be hard pressed, though, to find someone willing to classify it by its given name-bread. First, shortbread calls for a large percentage of shortening thus the name shortbread. Second, short refers to the desired crispness or "shortness" of the final product. Historically, the namesake shortbread was defended by early Scottish bakers who fought to prevent shortbread from being classified as a biscuit to avoid paying a government tax on biscuits.

Shortbread originated in Scotland. In Scotland one can find regional shortbread variations. Shortbread is frequently eaten around Christmas and the New Year; it is consumed year round in many countries. With its centuries old history, it is the "Granddaddy of all butter cookies" and a mainstay in Europe.

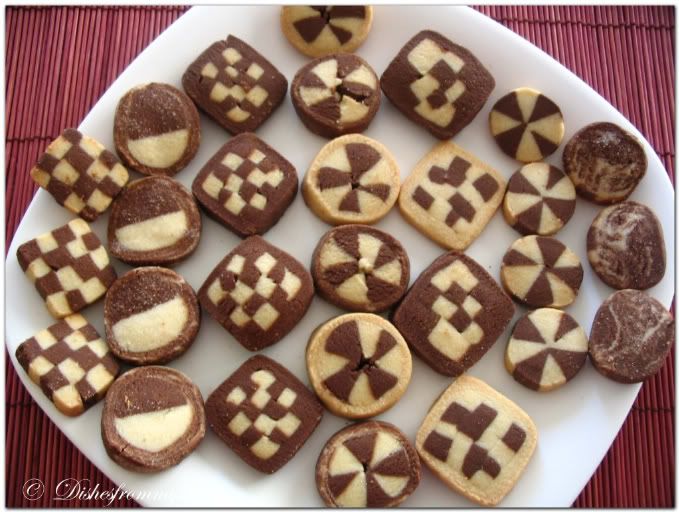
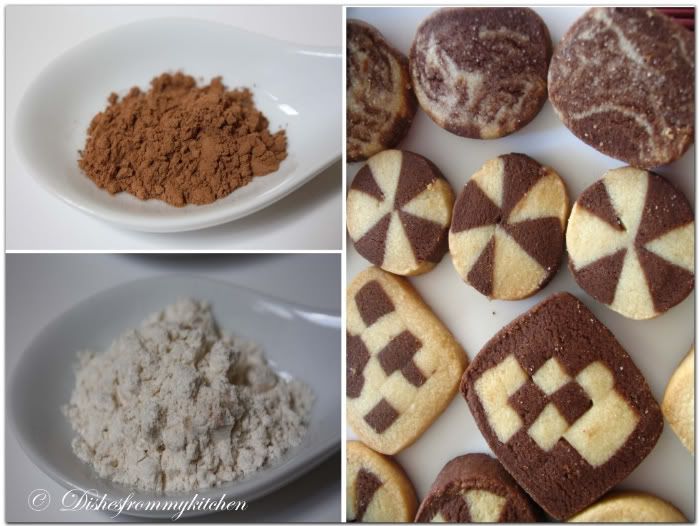
The Shortbread cookies can be made in different patterns using the chocolate and vanilla flavors, you can make different flavors by adding the nuts flour,
zest according to your wish. This is a basic shortbread cookies of chocolate and Vanilla. Have fun in making different patterns with your kids and enjoy.....


CHEQUERED SHORTBREAD

White Dough

Ingredients :

All purpose Flour - 1 1/2 cup
Butter - 3/4 cup
Icing Sugar - 1/3 cup
Egg yolk - 1
Vanilla essence- little


Chocolate Dough

Ingredients :


All purpose Flour - 1 1/4 cup
Cocoa - 1/4 cup
Egg yolk -1
Butter - 3/4 cup
Icing Sugar - 1/3 cup
Pinch of salt


Method :

1. For this cookies its really very important to use cold butter.
2. Mash the butter and sift the icing sugar on top of it.
3. Chop and scrape the butter with a dough scraper until the icing sugar is perfectly mixed in.
4. Add the egg yolk and continue scraping.
5. Sift onto the butter. Mix with the fork or dough scraper like a bread crumbs.
6. Knead the dough gently with your hands and work it into a ball.( Don't give more pressure like chapathi dough)
7. Repeat the above steps for the Cocoa dough.
8. Wrap the 2 doughs in plastic wrap and put them into the fridge for 30 minutes.
9. Make rolls using 100g of dough for each roll. ( This 100g + 100 g is only for one pattern)
10. Also make some rolls with rectangular profile.
11. Put all rolls into the freezer for 30 minutes.
12. For cutting the rolls, the rolls need to be firm enough but not as hard as a stone.
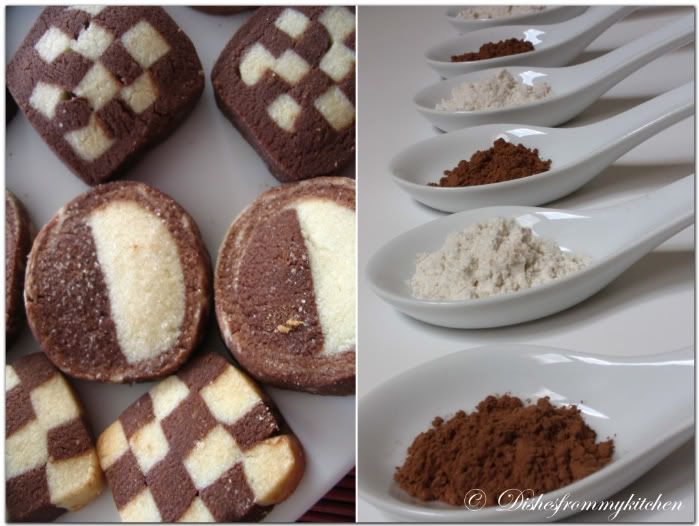
13. Here comes the most interesting and fun part to make the chequered pattern.
14. Cut the frozen rolls into halves, quarters and so on. You should be very care full when cutting it.
15. Brush the sides with water and recombine the pieces to interesting patterns.
16. After combining roll them on the table to make sure that all pieces stick together firmly.
17. Cut the rectangular rolls into four slices. Then cut two slices of each color into four stripes.
18. Recombine the stripes to slices ( four stripes each) with alternating color. After that layer four slices to one rectangular roll.
19. If you need to make make covers for the rolls.
20. Make a sheet of white or black dough with a roll.
21. Brush the sheet with water. Place the roll on the sheet and roll it until full roll is covered with the dough. Cut the excessive part.
22. Put them in freezer for 1 hr. Before baking bring back to room temperature and cut into thick circles.
23. Bake in the baking sheet in 350 f for 13 minutes.


Note :

1. For spiral pattern using the rolling pin just roll them to 1/4" thickness, repeat with another color. Keep one on top of other.
2.Roll it tightly and put in the freezer for 1 hr. Then You can proceed the same procedure from 28 and 29.
3. Mix all the scrap doughs to make marbled cookies.
4. Cut to different patterns and bake.
5. Its really important to put it in the freezer for a while, each and every time you make different patterns.
6. Brush with water when you make patch works and press slightly so that they stick to each other.
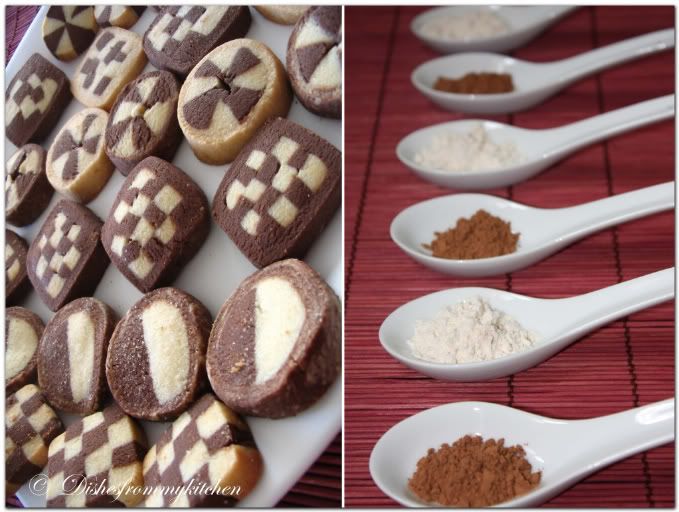
7. For making wheel pattern make cylindrical and cut to quarters, repeat with both colors and fix colors alternatively to form a wheel.
8. The above measurement yields about 200 small cookies. Again this depends on the pattern, size you make.


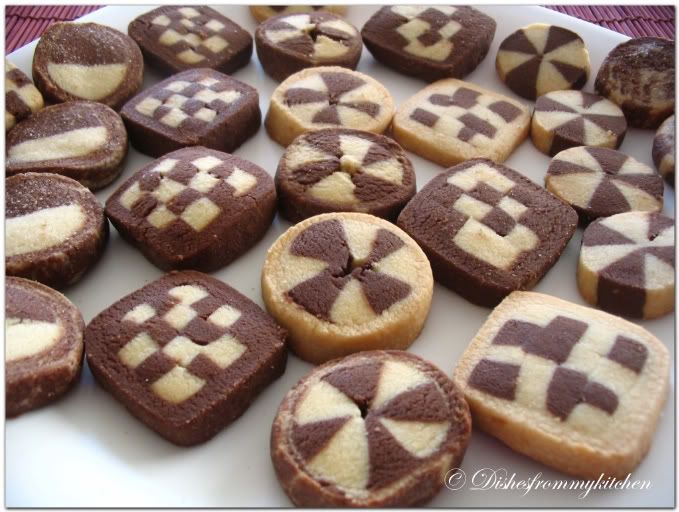
Try different patterns and enjoy the fun.

Read more...

PETIT FOURS AND BAKED ALASKA - DARING BAKERS AUGUST 2010

Nutty and Toasty Meets Cool and Creamy, yah as she says the taste was exactly same. Somehow I managed to do this month challenge amidst my hectic schedule, because I was totally in love with that Baked Alaska. Hurray I had my blow torch in handy too. The brown butter cake was totally awesome. Here is my real challenge.....


The August 2010 Daring Bakers’ challenge was hosted by Elissa of 17 and Baking. For the first time, The Daring Bakers partnered with Sugar High Fridays for a co-event and Elissa was the gracious hostess of both. Using the theme of beurre noisette, or browned butter, Elissa chose to challenge Daring Bakers to make a pound cake to be used in either a Baked Alaska or in Ice Cream Petit Fours. The sources for Elissa’s challenge were Gourmet magazine and David Lebovitz’s “The Perfect Scoop”.


Vanilla Ice Cream

Ingredients:


1 cup (250ml) whole milk
A pinch of salt
3/4 cup (165g) sugar
1 vanilla bean, split lengthwise OR 2 teaspoons (10ml) pure vanilla extract
2 cups (500ml) heavy (approx 35% butterfat) cream
5 large egg yolks
1 teaspoon (5ml) pure vanilla extract


Method :


1. Heat the milk, salt, and sugar in a medium saucepan until the liquid steams. Scrape out the seeds of the vanilla bean with a paring knife and add to the milk, along with the bean pod. Cover, remove from heat, and let infuse for an hour. (If you do not have a vanilla bean, simply heat the milk, salt, and sugar in a medium saucepan until the liquid steams, then let cool to room temperature.)
2. Set up an ice bath by placing a 2-quart (2 litre) bowl inside a large bowl partially filled with water and ice. Put a strainer on top of the smaller bowl and pour in the cream.
3. In another bowl, lightly beat the egg yolks together. Reheat the milk in the medium saucepan until warmed, and then gradually pour ¼ cup warmed milk into the yolks, constantly whisking to keep the eggs from scrambling. Once the yolks are warmed, scrape the yolk and milk mixture back into the saucepan of warmed milk and cook over low heat. Stir constantly and scrape the bottom with a spatula until the mixture thickens into a custard which thinly coats the back of the spatula.
4. Strain the custard into the heavy cream and stir the mixture until cooled. Add the vanilla extract (1 teaspoon [5ml] if you are using a vanilla bean; 3 teaspoons [15ml] if you are not using a vanilla bean) and refrigerate until thoroughly chilled, preferably overnight.
5. Remove the vanilla bean and freeze in an ice cream maker. If you don’t have an ice cream maker, you can make it without a machine.


Brown Butter Pound Cake


Ingredients :

19 tablespoons (9.5 oz) (275g) unsalted (sweet) butter
2 cups (200g) sifted cake flour (not self-rising; sift before measuring) (See “Note” section for cake flour substitution)
1 teaspoon (5g) baking powder
1/2 teaspoon (3g) salt
1/2 cup (110g) packed light brown sugar
1/3 (75g) cup granulated sugar
4 large eggs
1/2 teaspoon pure vanilla extract


Method :


1. Preheat the oven to 325°F/160°C and put a rack in the center. Butter and flour a 9”x9” (23cmx23cm) square pan.
2. Place the butter in a 10” (25cm) skillet over medium heat. Brown the butter until the milk solids are a dark chocolate brown and the butter smells nutty. (Don’t take your eyes off the butter in case it burns.) Pour into a shallow bowl and chill in the freezer until just congealed, 15-30 minutes.
3. Whisk together cake flour, baking powder, and salt.
4. Beat the brown butter, light brown sugar, and granulated sugar in an electric mixer until light and fluffy, about 2 minutes. Beat in the eggs one at a time, mixing well, and then the vanilla extract.
5. Stir in the flour mixture at low speed until just combined.
6. Scrape the batter into the greased and floured 9”x9” (23cmx23cm) square pan. Smooth the top with a rubber spatula and rap the pan on the counter. Bake until golden brown on top and when a toothpick inserted into the center comes out clean, about 25 minutes.
7. Cool in the pan 10 minutes. Run a knife along the edge and invert right-side-up onto a cooling rack to cool completely.


Chocolate Glaze (For the Ice Cream Petit Fours)

Ingredients :

9 ounces (250g) dark chocolate, finely chopped
1 cup (250 ml) heavy (approx 35% butterfat) cream
1 1/2 tablespoons (32g) light corn syrup, Golden syrup, or agave nectar
2 teaspoons (10ml) vanilla extract


Method :

Stir the heavy cream and light corn syrup in a small saucepan over medium heat until it comes to a boil. Remove from heat and add the dark chocolate. Let sit 30 seconds, then stir to completely melt the chocolate. Stir in the vanilla and let cool until tepid before glazing the petit fours.


Meringue (For the Baked Alaska)

Ingredients:

8 large egg whites
½ teaspoon (3g) cream of tartar
½ teaspoon (3g) salt
1 cup (220g) sugar


Method:


Beat the egg whites, cream of tartar, and salt on high speed in an electric mixer until soft peaks form. Beat in the sugar gradually in a slow stream until stiff peaks form.


Assembly Instructions – Ice Cream Petit Fours

1. Line a 9”x9” (23cmx23cm) pan with plastic wrap, so that no sides of the pan are exposed and so there is some extra plastic wrap hanging off the sides. Spread 1 ¾ to 2 cups (450ml to 500ml) ice cream into the pan. Cover with more plastic wrap and freeze several hours.
2. Once the brown butter pound cake has completely cooled, level the top with a cake leveler or a serrated knife. Then split the cake in half horizontally to form two thin layers.
3. Unwrap the frozen ice cream. Flip out onto one of the layers of cake and top with the second layer of cake. Wrap well in plastic wrap and return to the freezer overnight.
4. Make the chocolate glaze (see above.)
5. While the glaze cools, trim ¾” (2cm) off each side of the ice cream cake to leave a perfectly square 7.5” (19cm) ice cream cake. Cut the cake into twenty five petit fours, each 1.5”x1.5” (4cmx4cm).
6. Glaze the petit fours one at a time: place a petit four on a fork and spoon chocolate glaze over it.
7. Place the petit fours on a parchment-lined baking sheet and return to the freezer for one hour.


Assembly Instructions – Baked Alaska

1. Line four 4” (10cm) diameter tea cups with plastic wrap, so that plastic wrap covers all the sides and hangs over the edge. Fill to the top with ice cream. Cover the top with the overhanging plastic wrap and freeze for several hours, or until solid.
2. Level the top of the brown butter pound cake with a serrated knife or with a cake leveler. Cut out four 4” (10cm) diameter circles from the cake. Discard the scraps or use for another purpose.
3. Make the meringue (see above.)
4. Unwrap the ice cream “cups” and invert on top of a cake round. Trim any extra cake if necessary.
5. Pipe the meringue over the ice cream and cake, or smooth it over with a spatula, so that none of the ice cream or cake is exposed. Freeze for one hour or up to a day.
6. Burn the tips of the meringue with a cooking blow torch. Or, bake the meringue-topped Baked Alaskas on a rimmed baking sheet in a 500°F/260°C oven for 5 minutes until lightly golden. Serve immediately.


Read more...

VANKAYA PULUSU(Green Brinjal) , GREENS PEPPER FRY & GIVEAWAY WINNER


 Vankaya pulusu which is quite easy.  This goes very well with rice, idli as well as dosa. This pulusu particularly tastes so good with Green Brinjal(eggplant), Drumstick as well as Potatoes. You can try it with any of your favorite veggie. Along with this recipe I am posting Greens Pepper fry, here I have used Red amaranth(Thandu keerai), you can try it with any greens of your choice. Take a look at my comforting simple lunch menu .....


VANKAYA PULUSU(Green Brinjal)
This recipe has 2 powders as main ingredient. One is Roasted gram dhal powder and coconut coriander powder.


INGREDIENTS:

Green Brinjal - 10 cut to big cubes and put in the water( Replace drumstick or Potatoes of your choice)
Big onion - 1 sliced
Red chillies - 3 or 4
Cummin seeds - 2 tsp
Roasted gram dhal - 1 ( Make to fine powder)
Tamarind Paste - 1 1/2 tbsp ( Use according to your sourness level)
Turmeric - little
Mustard - 1 tsp
Curry leaves - few
Ghee - 1/4 tbsp
Oil - 1/2 tbsp
Coriander for garnishing....


Coconut Coriander powder:
Coconut - 1 tbsp
Coriander seeds - 1 tbsp
Red chillies - 4

Fry all the above ingredients in a tsp of oil and make to fine powder.


METHOD:

1. Heat the ghee and oil in the pan.
2. Splutter Mustard seeds followed by Cummin seeds and Red chillies.
3. Add the Slice onions once it is sauteed until transparent add the Cubed brinjal.
4. Saute for few minutes add the curry leaves, turmeric and tamarind paste.
5.Add 1 1/4 cup of water, let it boil until the veggies are cooked.
6.Now to this mixture add the coconut coriander powder, Roasted Gram dhal powder( mix this in a tbsp of water then add to the above mixture)
7.Let it nicely boil for sometime and it get thickened as we have added the dhal powder.
8.Now garnish with the coriander leaves.


Serve with hot Rice, Idli or Dosa.
Note:
1.Adjust the tamarind according to your taste, and the dhal powder according to your thickness.
2.Follow the same one for other veggies too.
3.You can reduce or increase the red chillies according to your spice level.


GREENS PEPPER FRY
INGREDIENTS :

Any greens of your choice - 1 bunch
Garlic - 10 flakes , peel the skin and slice
Onion - 1 sliced
Red chillies - 3
Urad dhal - 1 1/2 tsp
Mustard - 1 tsp
Pepper powder - as required
Salt as required
Oil - as needed


METHOD :

1. Wash and chop the greens.
2. Add tsp of oil , splutter mustard followed by urad dhal and Redchillies.
3. Add the sliced onion and Garlic.
4. Saute until light brown color. Now add the chopped greens sprinkle some water.
5. Close with a lid 3/4 not fully as it changes the color.
6. Once cooked add the salt and pepper saute for few seconds. Serve hot with rice and Ghee.


Note :

1. Don't over cook the greens. Add water little by little as required.


Read more...

HAPPY INDEPENDENCE DAY !!!!

" Wish you all Happy Independence day "


We had Independence day celebration in our apartment, as a part of the celebration there was a drawing competition. The below is my son's piece of art in the competition. The Topic given was Flag hoisting ceremony or Historical places in India. We all had wonderful 63rd Independence day with some cultural activities too.


Read more...

THAI GREEN CURRY (Gaeng Khao Wan)

There are so many dishes that we love in Thai Cuisine. Thai Green Curry is one of those. Basically all Thai dishes involves few common ingredients you can check the Ingredients here. The Kaffir lime leaves and Galangal is one of the Ingredients. But unfortunately these both are not available for me in near by markets. But anyway you can substitute the Galangal with ginger. Whenever Kaffir lime leaves are available in bulk dry and you can store in the refrigerator too, With that few rind of lemon gives the exact flavor to the curry.

Some brief about the Pea Eggplant. Pea Eggplant which is also called as Makheau Phuang, Bitter balls, Pea Aubergine which is also called as Sundaikkai. These tiny Thai eggplants are quite bitter. They're sold in clusters and look like large green peas. You can find them fresh in Thai markets. Very little of this is also added to Green Curry. But if you don't like the bitter taste, you can totally avoid them or can substitute with Thai Green Eggplants which is very very tasty too.


So coming to the recipe part the important thing in Thai Green curry is Green Curry paste. Here goes the flavors....

GREEN CURRY PASTE

Ingredients :

Lemon Grass - 1 ( Discard the green portion and chop the bottom part)
Galangal - 1 tsp sliced ( can substitute with Ginger too)
Coriander seeds - 1 tsp
Cummin seeds - 1/2 tsp
Shallots - 2
Black pepper - 1/2 tbsp
Kaffir Lime leaves - 4 (If using dried ones add 2 small piece of lime rind)
Cilantro - 5 sprigs
Green Chilli - 3 or If bird's eye chilli you can substitute according to your spice level.
Salt as required


Method :

1. Toast dry seeds in the pan.
2. Powder them in the blender or mortar pestle.
3. Now add the remaining ingredients and make to fine paste.

Note :

If you want to store them in the fridge, you can fry the paste in tbsp of oil, cool and store in air tight container.


THAI GREEN CURRY (GAENG KHAO WAN)
Vegetables that you can use for this Green Curry - Carrots, Red bell pepper, Bok Choy, Pea eggplant , Potato, Napa Cabbage, Zucchini, Bamboo shoots, Baby Corn, Green beans, Fried Tofu or Tofu Puff, Seitan(or you can substitute with chicken too), Snow pea, Mushrooms, Green Egg plant, Broccoli.


Ingredients :

Thick Coconut Milk - 1 can
Any of the above vegetables - few of each
Green Curry paste - 2 tbsp ( or you can use according to your spice level)
Sweet Basil - 5 or 6 ( This is very important)
Kaffir lime leaves - 1 or 2
Oil and Salt

Method :

1. Heat tsp of oil in the pan, add the curry paste.
2. Saute for few minutes until it is nicely cooked.
3. Now add little coconut milk, mix well once it is nicely incorporate, add some more mix well.
4. Now add the remaining milk and add the veggies and lime leaves to it.
5. Once all the veggies are cooked( its important not to overcook the veggies).
6. Add the fresh Basil and serve with Thai jasmine rice!!!!!!!!


Thai Green curry with Fragrant Rice is truly Delicious and enjoy the exotic flavors !!!!!


Note :

Its optional to fry the Tofu in the oil, you can add the cubed firm Tofu too. Add after all the veggies are cooked.

Read more...

THAI TAPIOCA PUDDING


Thailand as well as throughout Southeast Asia, tapioca is a common dessert. Fabulous Thai Tapioca dessert is so exotic and scrumptious tasting. Tapioca is a natural root vegetable that looks like a grain when processed, but is completely gluten-free. It is very tropical tasting, yet also light and healthy with all the good nutrients of fruits which is perfect for hot summer nights. Tropical Thai treat that is truly unforgettable!

Lychee is one of our favorite fruit and I will never miss if it is available while shopping. Lychee fruit is high in the Antioxidant , Vitamin C , Essential Minerals, Potassium. Lychee is a rare sub tropical fruit originating in South China where the lychee is very important in their culture and is famed as "the King of Fruits" and it is also throughout Thailand, North Vietnam and northern India.


THAI TAPIOCA PUDDING

Ingredients :

Tapioca pearls - 1/2 cup ( big one)
Sugar - 1/2 cup ( I used brown sugar, u can use both white or brown)
Thick coconut - 1/2 cup ( If you are using the coconut cream reduce to 1/4 cup)
Fruits - 1 cup You can use young coconut, jack fruit, longan, lychee, Rambutaan, mango,Papaya, banana etc
Fresh mint sprigs for garnish (optional)
Shaved Ice for topping - (optional)


Directions:

1. Wash and soak the Tapioca for minimum 3 hrs or whole night in 1 cup of water.
2. Add 1 1/2 cups water. When water is boiling add the tapioca which is soaked.
3. Reduce the heat so that the tapioca simmers and cook, stirring occasionally, until the tapioca turns translucent and is tender when tasted, about 15 to 30 minutes( careful not to make mushy and the tapioca changes to transparent).
4.Remove from the heat. Now stir the Coconut milk into the warm pudding and set aside to cool to room temperature refrigerate until chilled. To serve, stir the fruits into the pudding, then spoon into 4 individual dishes and garnish with mint leaves.


Note :

1. Drain the water in soaked tapioca.
2. Usually in singapore this pudding is served with shaved ice.. and it tastes wonderful too.
3. Add fruits only at the time of serving.
4. If the pudding gets thickened while refrigeration, dilute it with coconut milk or water if necessary.


Read more...


Page copy protected against web site content infringement by Copyscape

Visit Great Cooks Community
All recipes are on Petitchef