Search This Blog

PINEAPPLE GINGER LEMONADE !!! FOR HEALTHY DIGESTIVE SYSTEM !!!


Raw pineapple juice contains almost all vitamins and minerals essential for the digestive system.  Enjoy the refreshing juice for maintaining a healthy body.  

Click here to see more Juice/Smoothie


PINEAPPLE GINGER LEMONADE

Yields 6 to 7 cups of juice

Ingredients:

Pineapple - 1 chopped to big chunks
Ginger - 1/2 inch piece
Lemon juice - 2 tbsp
Honey - 2 to 3 tbsp
Water - 3 cup
Few ice cubes for serving


Method:

1. Throw all the above ingredients in the tall blender with a cup of water. 
2. Blend until they become smooth. 
3. Strain them using the strainer, dilute with reserved 2 cups of water.
4. Serve chilled.


Note:

Lemon juice and honey can be added according to your taste preference.

Read more...

LUSCIOUS TROPICAL FRUIT DESSERT !!! DESSERT IN A JAR !!!

Tropical fruits with Vanilla pastry cream, Whipped cream, Dulce de leche/caramel sauce, pecans and graham cracker crumbs when all the good things are put together in a jar then it should be called as Luscious dessert right :)  Do you agree with me??? Each and every layer is my favorite one and they are tasty on its own.  When they are combined together and served as a dessert... sorry I cannot say no for this kind of dessert :)  We enjoyed this royal treat by licking the jar..Enjoy :)

Here is another dessert idea using Vanilla Pastry cream

CREPE WITH PASTRY CREAM


LUSCIOUS TROPICAL FRUIT DESSERT IN A JAR

The below measurement yields 3 to 4 dessert jars (medium size)

Ingredients you need for assembling :


1. Graham cracker crumb
2. Vanilla pastry cream
3. Whipped cream
4. Dulce de leche or any good caramel sauce
5. Pecans - few chopped
6. Mango - 1 chopped
7. Banana - 1 sliced


GRAHAM CRACKER CRUMB

Ingredients:

Graham cracker - 3 crackers
Sugar - 3/4 tbsp
Butter - 2 tbsp melted

Method:

1. Roughly powder the graham cracker.
2. Mix all the above ingredients in a bowl.
3. Saute the mixture in a dry pan until they are slightly hot, crispy and golden brown in color.
4. If you do not want to sauté, you can also bake the mixture in 350f oven for just 10 minutes until they are crispy and slightly golden brown in color.
5. When they are done keep it aside and let them cool.


Vanilla pastry filling (Vanilla custard):

Egg yolk - 4
Flour - 2 tbsp
Vanilla paste or bean (1 scrapped) - 1/2 tbsp
Sugar - 1/3 cup
Whole Milk - 1 cup

Method:

1. In a bowl whisk yolks and sugar. Add the vanilla and flour. Whisk again.
2. Simmer the whole milk, it should be hot to touch Now add half of the milk to egg mixture, whisk until they are blended
3. Stir the egg milk mixture back to the boiling milk and stir them until it thickens.
4. Remove from heat, transfer to a bowl. Cover with cling wrap and refrigerate them.


Whipped cream

Ingredients:

Cream - 3/4 cup
Powdered sugar(Icing sugar) - 1 tbsp
Vanilla extract - 1/2 tsp

Method:

1. Whip all the above ingredients and keep them refrigerated until they are ready to use.


Assembling the dessert:
1.  Bottom the jars with the graham cracker crumbs evenly.
2. Next layer with Vanilla pastry cream (each 1 to 1 1/4 tbsp cream).
3. Follow the cream with whipped cream; you can pipe the whipped cream in the jar.
4. Arrange the sliced banana followed by few chopped pecans. Drizzle some caramel or Dulce de leche.
5. Its again time for vanilla pastry cream, chopped mango, Whipped cream.
6. Top it of with the Dulce de leche drizzle, chopped pecans and slice of banana.  Garnish with the fresh mint leaf. 


Note:

1. If your Dulce de leche is very thick, in a small bowl take a tbsp of Dulce de leche; add 1/4 tsp of water and microwave for just 15 seconds to loosen them for drizzling consistency.

2. You can make this dessert as an eggless version also,  Substitute vanilla pastry cream with the plain custard made using custard pudding powder.
3. Instead of graham cracker you can use any cookie or digestive biscuits.

Read more...

CINNAMON PARATHA(LAYERED INDIAN BREAD) !!! FLAKY,TASTY AND HEALTHY !!!


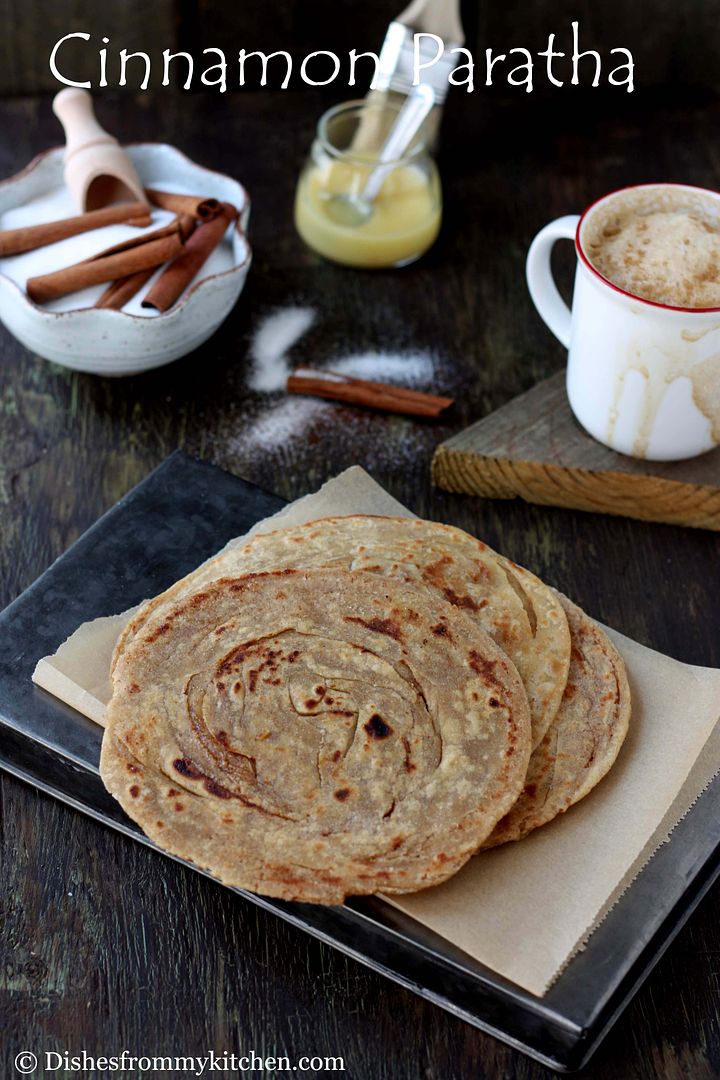
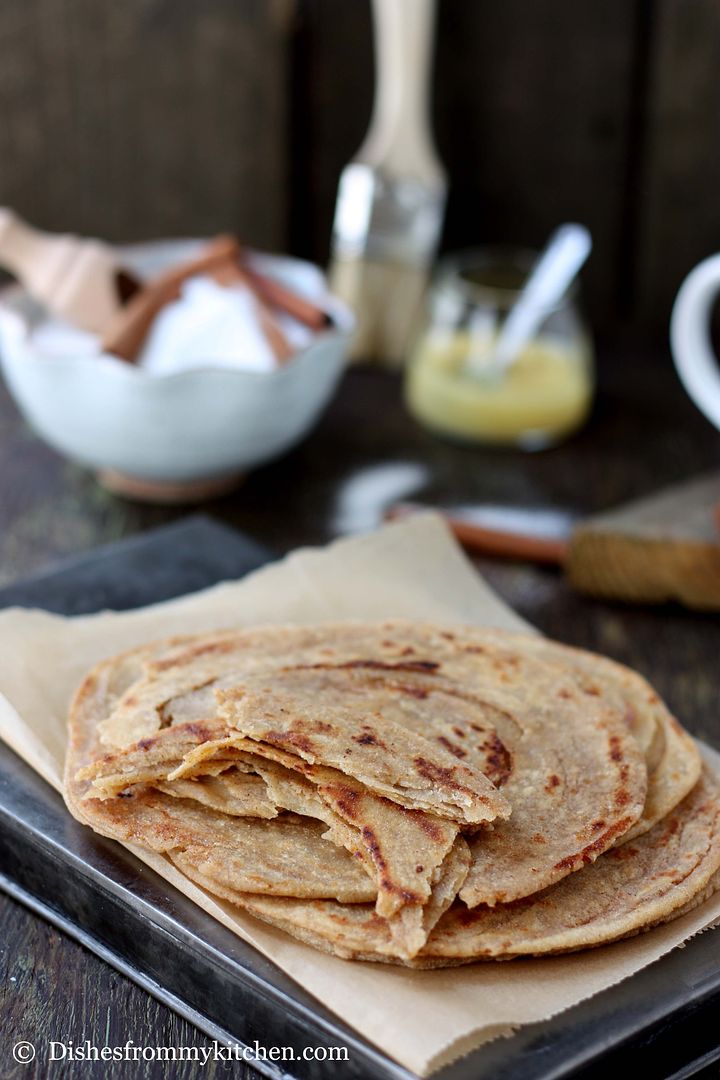
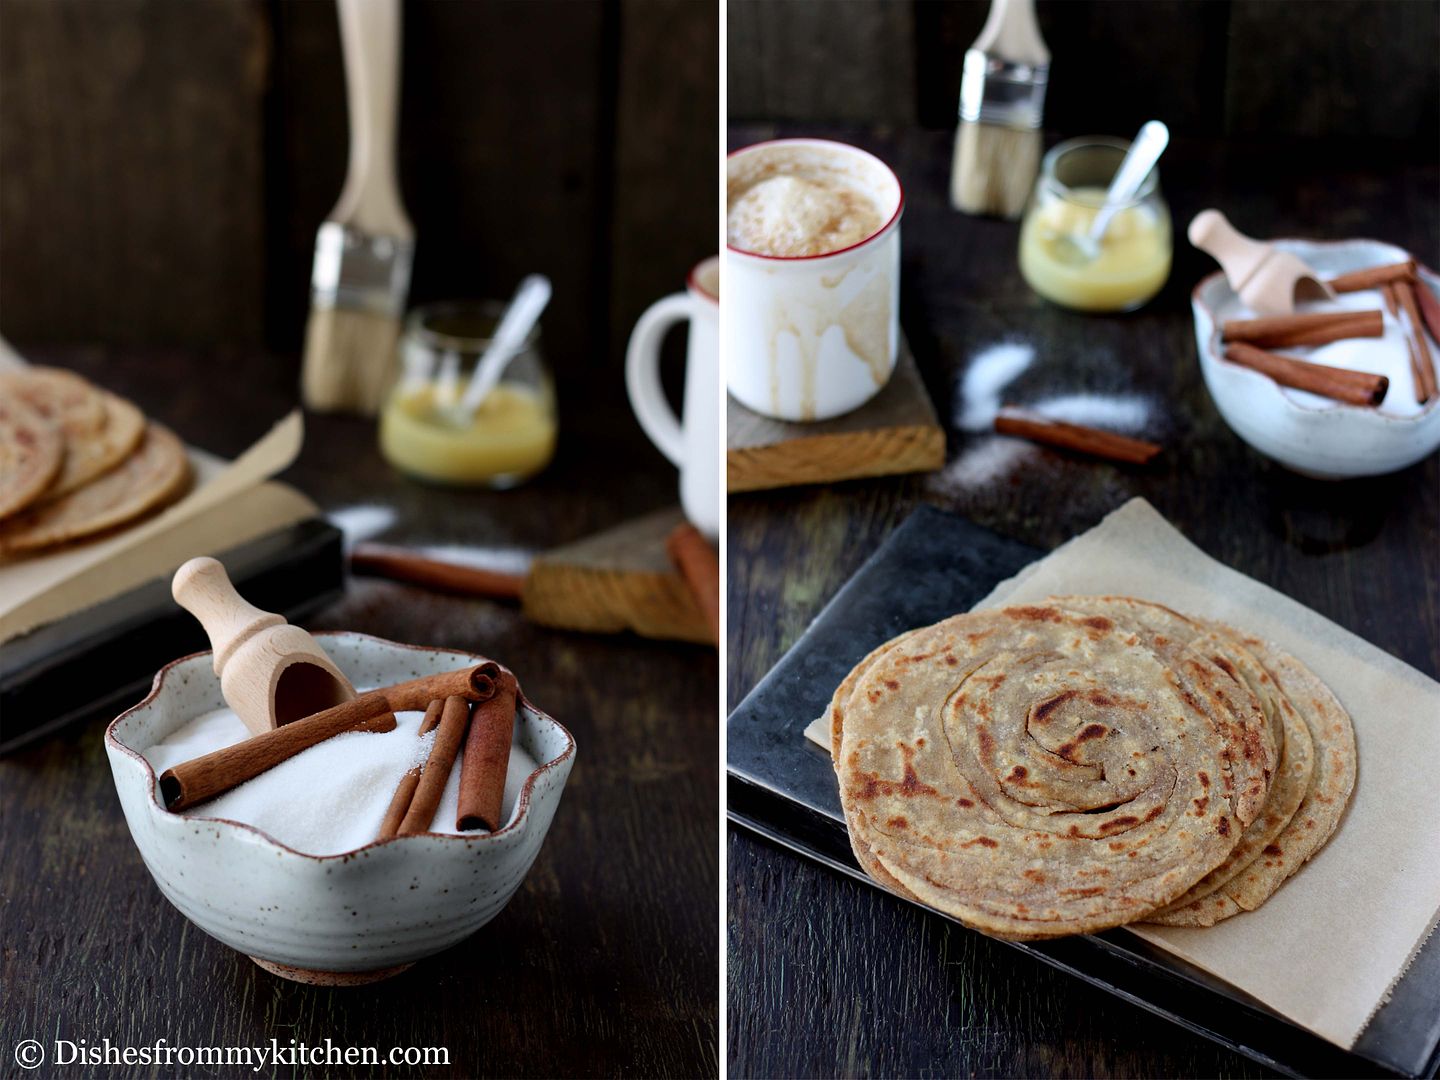
 This post is more attached with my childhood memories.  Yes whenever my mom makes savory (spices mixed with the dough) paratha we used to enjoy them with atleast one sweet paratha.   The same way when I make paratha my son would demand for one sweet paratha.  Back home my mom would just use sugar and clarified butter for making sweet paratha.  Since we love cinnamon and especially my kiddo, I use to make paratha using cinnamon sugar.  If you are cinnamon lover I bet you will certainly love this and make it very often.  This paratha is wonderful Tea time snack and a healthier snack for kids.  If you are craving for sweet that too cinnamoooony, here you go...best and healthier way to satisfy your sweet craving.  The nutty whole wheat flour, fresh clarified butter, sweet cinnamon flavor mmmm it is yummmm:)   This paratha is very flaky and tasty.  You can also pack them for kid’s lunch box with some salad as well.


Before we move on to the recipe and brief about paratha, do check the below links of my previous posts for

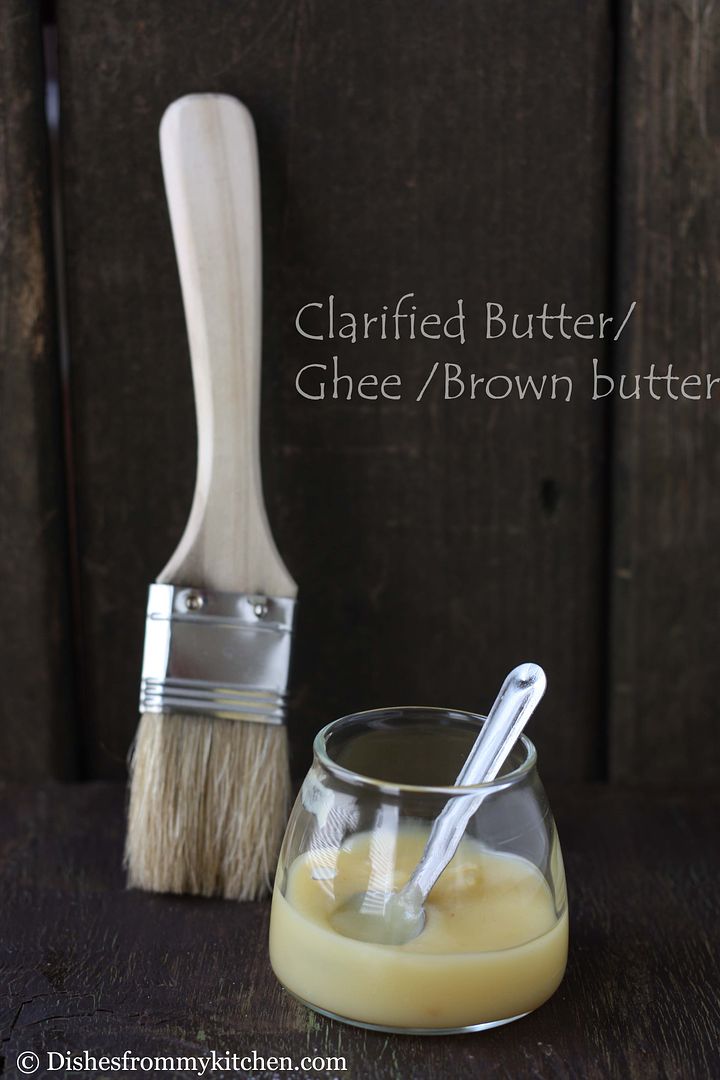
1. The Clarified butter/ghee/brown butter procedure
2. Phulka - Indian Bread cooked on open flame (has stepwise pictures for preparing the dough) 

I have also included the stepwise details for pleating and rolling the Cinnamon paratha with this post which will be helpful for understanding.  Do write to me if you have any queries.  Also see the notes/tips for making good paratha's before you proceed.

A Paratha/Parantha/Paratta is an Indian flat-bread that originated in the Indian subcontinent.  Paratha is a combination of the words Parat (layer) and Atta (flour) which literally means layers of cooked dough.  It is one of the most popular unleavened flat-breads in Indian cuisine.  The Paratha dough usually contains clarified butter or cooking oil and it is also applied in the layers of the Paratha.  Up to 2 tbsp of clarified butter or oil per cup of flour may be added (Using clarified butter or oil is purely according to your preference).  More the fat content more the tenderness/flakier and taste.  You can make it healthy by not adding more fat content and instead mix the dough using yogurt, milk or even warm water. As I make them regularly, I add less fat and just plain water for mixing the dough, which comes out good always :)


The Paratha/Paratta can be done in various shapes and methods.  

Method 1: Layered Paratha

The Layered Paratha can be done in two styles.
Style 1: In this method, the dough is rolled first and clarified butter or oil is brushed and folded.  Then the folded dough is rolled again and cooked/toasted in the Pan/Tawa.  While cooking it puffs up separating the layers and it becomes flaky.   The folded dough can be rolled into any shapes like triangle, square or round. 

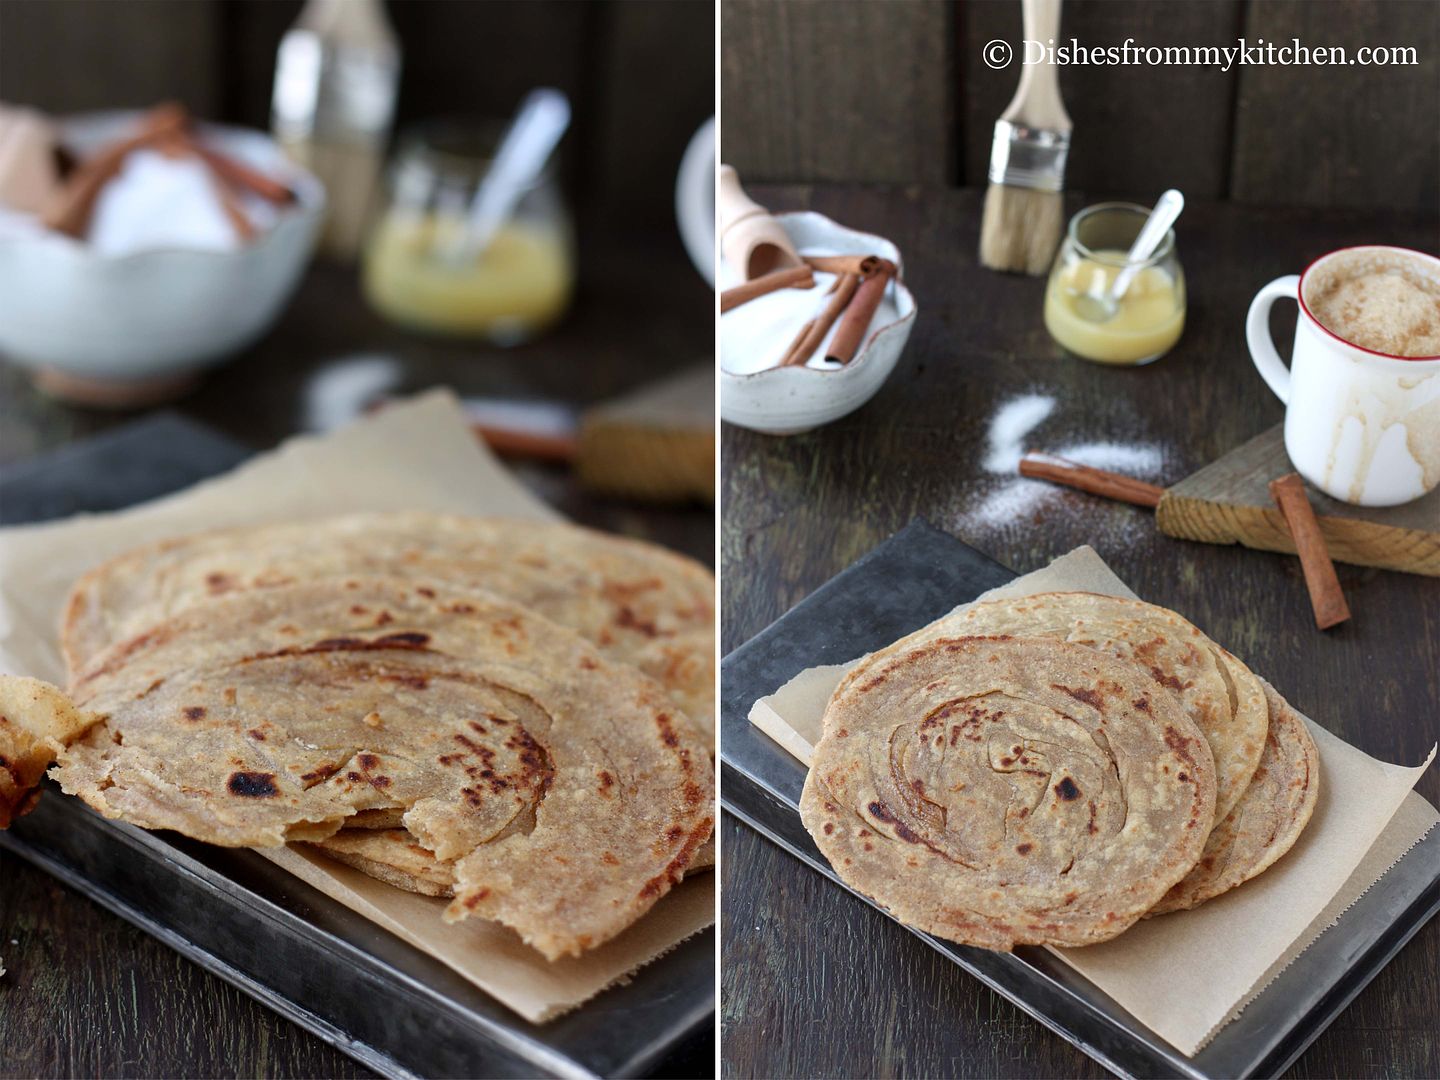
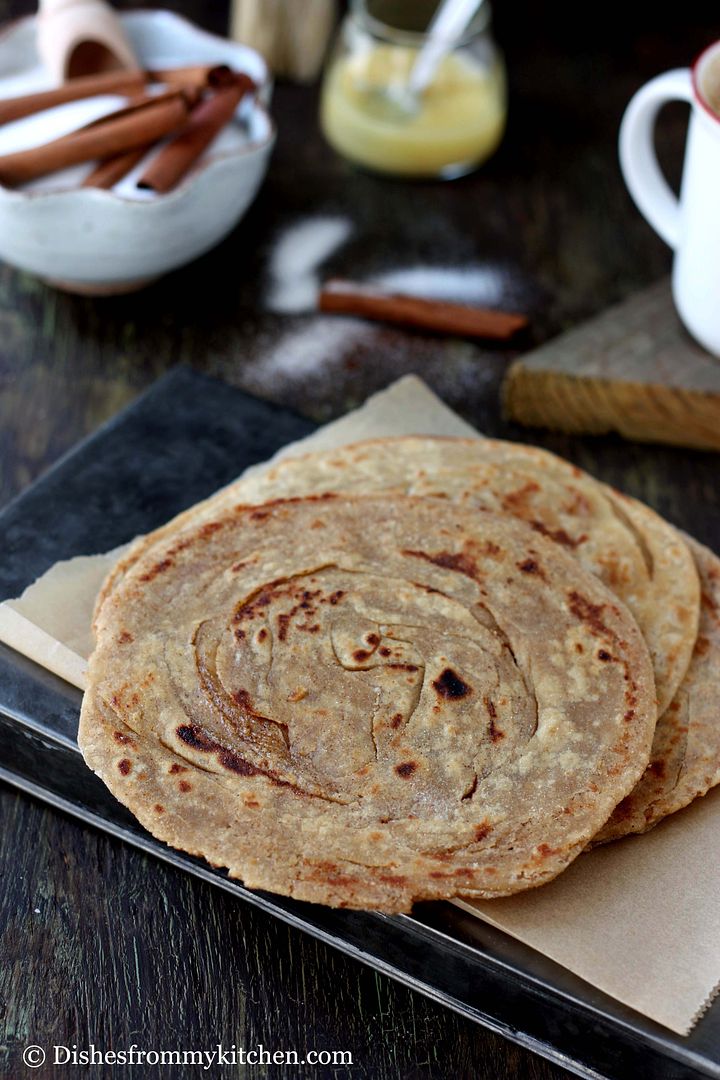
Style 2: Instead of folding method, we can also make pleats and roll the dough.  I have posted this style today.  These are Spiral Paratha which are nice and flaky. These are also called as Lachha paratha (Round in shape with multiple layers traditionally prepared in a tandoor) but it can also be made in the pan/Tawa too.

Method 2: Layered Paratha with Flavors

You can incorporate any flavors like spices or herbs when you mix the dough and prepare it based on the above styles.  Usually the paratha is served with some accompaniments like curry, pickle, raita or chutneys.  But layered paratha with flavors is tasty by itself.

Method 3: Stuffed Paratha

Apart from the different folding and spicing method there is another one which is called stuffed paratha.  The stuffed paratha is not layered. The vegetable of your choice can be prepared by adding some spices and it is stuffed into the dough balls.  The dough balls are rolled and toasted/cooked in the pan by smearing oil, butter or clarified butter.  When it’s cooked, it forms layers naturally.

You can make the paratha with whole wheat flour, all purpose flour or the combination of both.  I usually add less fat when mixing the dough.  It’s again your preference to use either ghee or oil.  So here you go how the sweet Paratha is made.  You can follow the same procedure for making plain Paratha without adding Cinnamon Sugar.


CINNAMON SUGAR PARATHA


Ingredients for the dough:
This yields - 5 to 6 Paratha

Whole wheat flour - 2 cups (I use Ashirvaad or Swarna which is available in Indian groceries)
Oil/Clarified Butter/Melted Butter - 1 tbsp (You can also add 2 tbsp ghee if you are not calorie conscious)
Water - 3/4 cup (depending on the quality of flour increase or decrease the amount of water, you can always substitute water with milk as well)
Salt - 1 tsp
Clarified butter - 1 1/2 tsp (1/4 tsp each for brushing the rolled dough)
Extra flour for dusting and sprinkling
Extra clarified butter or oil for smearing while cooking or toasting in the pan

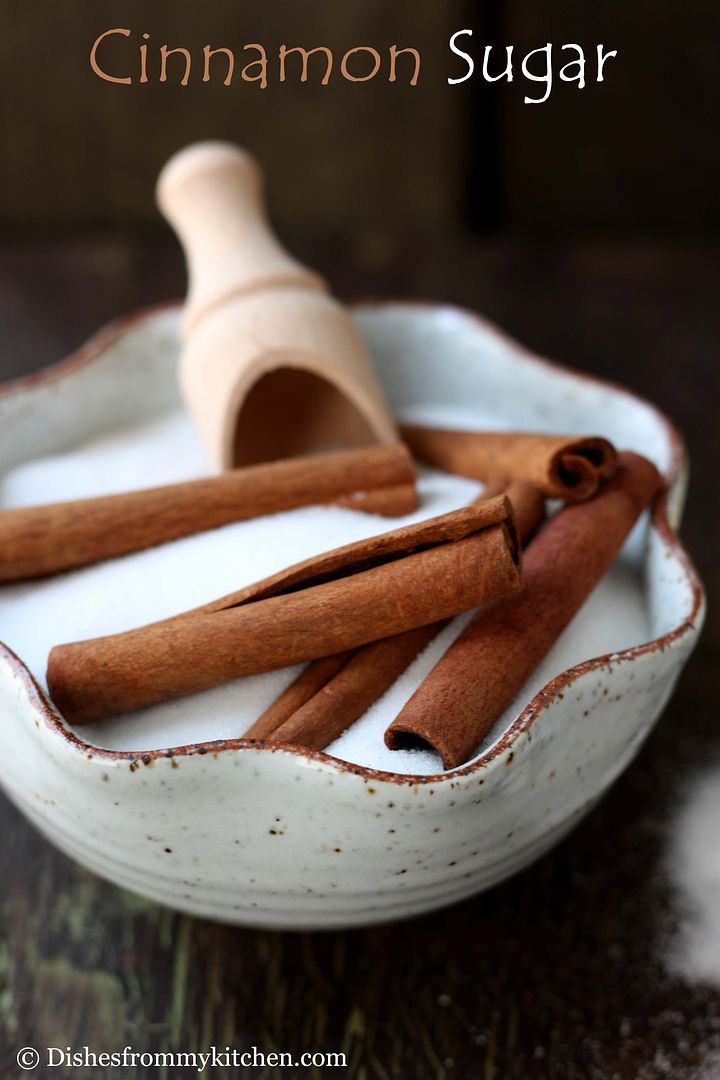
Ingredients for Cinnamon Sugar:

The measurement of sugar which I am giving is enough for our sweet level.  If you want them very sweet you can always sprinkle more before rolling.  You can always increase or decrease the cinnamon powder according to your preference.  

Fine granulated sugar - 3 tbsp (1/2 tbsp for each paratha)
Cinnamon powder - 1/2 tbsp

Mix both sugar and cinnamon powder well and keep it aside. 


Kneading the dough:
Look at my earlier post "Phulka - Indian bread cooked on open flame" for stepwise instructions. 

Method:

1. Take Flour, clarified butter and salt in a big bowl.  Rub with your fingers until they are mixed well.
2. Add water little by little to make soft pliable dough.
See here for Tips and Tricks and details for MIXING THE DOUGH.
3. Cover with a damp kitchen towel and allow the dough to rest for atleast an hour.

Pleating the dough:

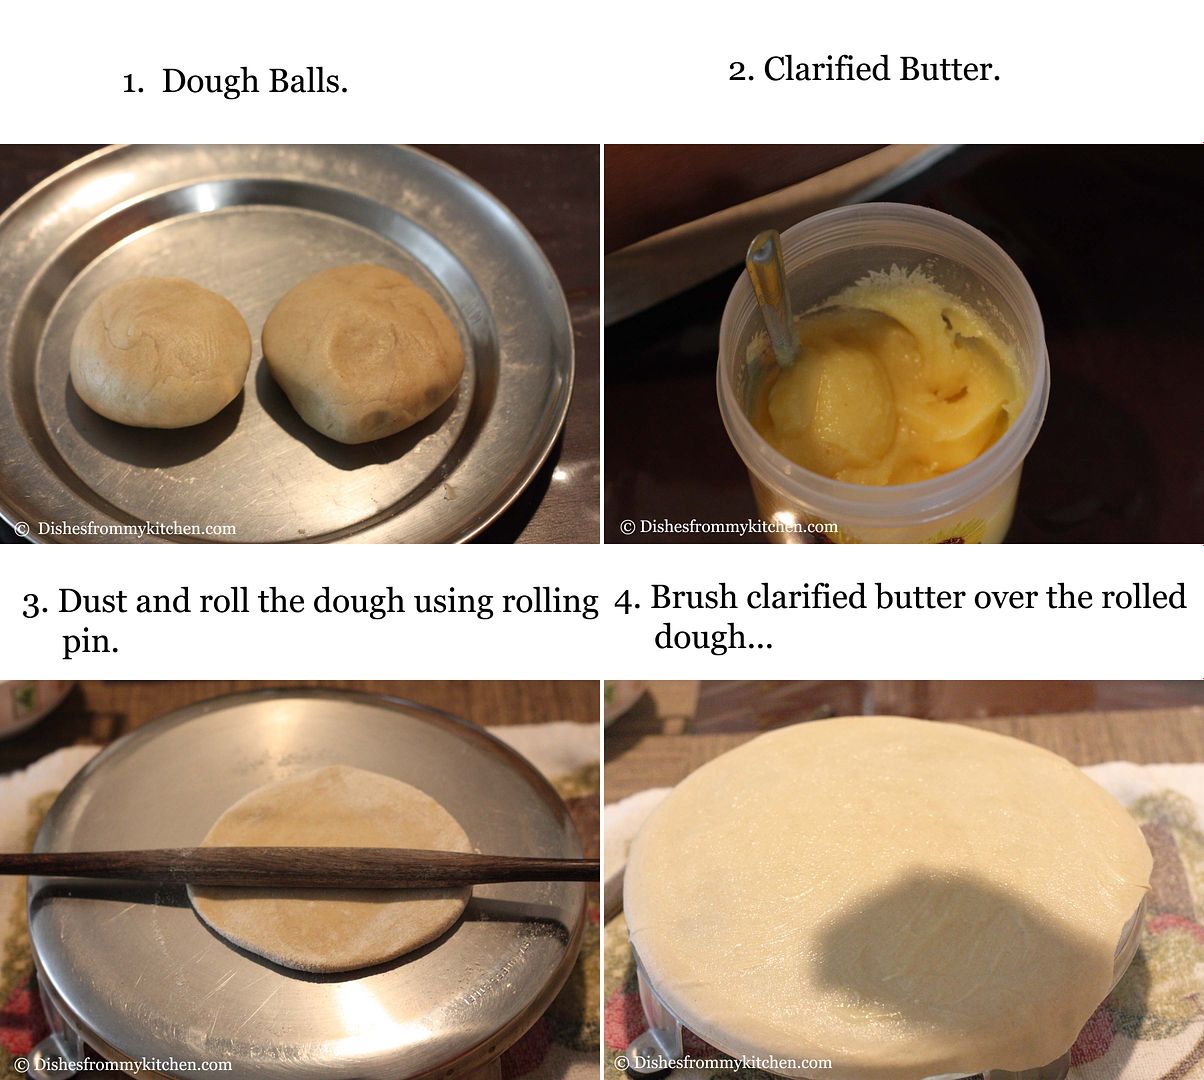
1. Divide the dough to equal size balls.
2. Dust a ball with the flour and roll it for about 9" inch circle.
3. Brush the whole surface with 1/4 tsp of clarified butter using the brush.
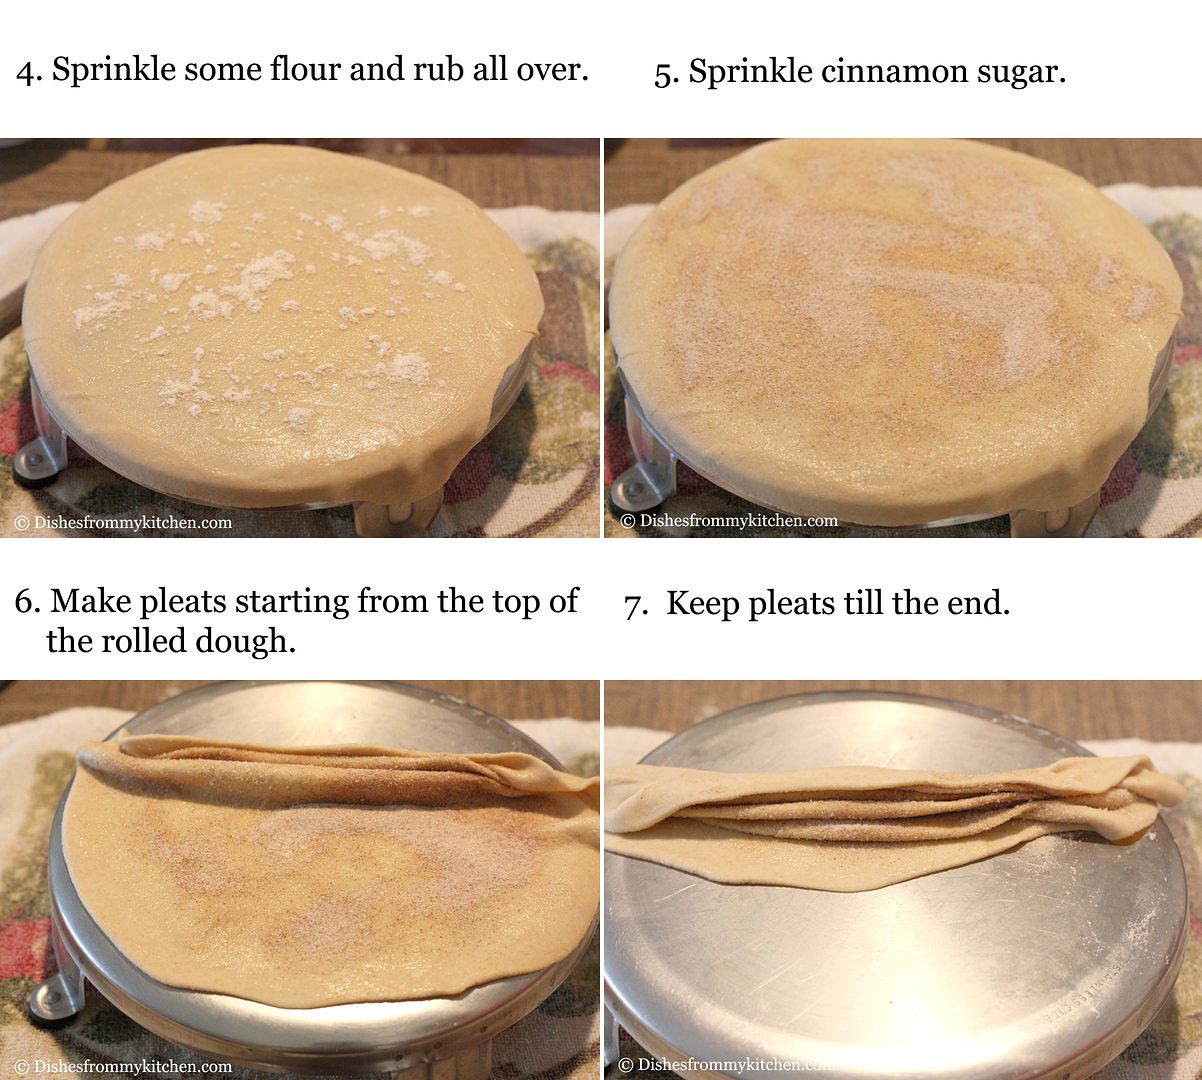
4. Sprinkle little flour and rub with your finger and sprinkle cinnamon sugar all over the rolled dough.
5. Now starting from one end make pleats until you reach other end.
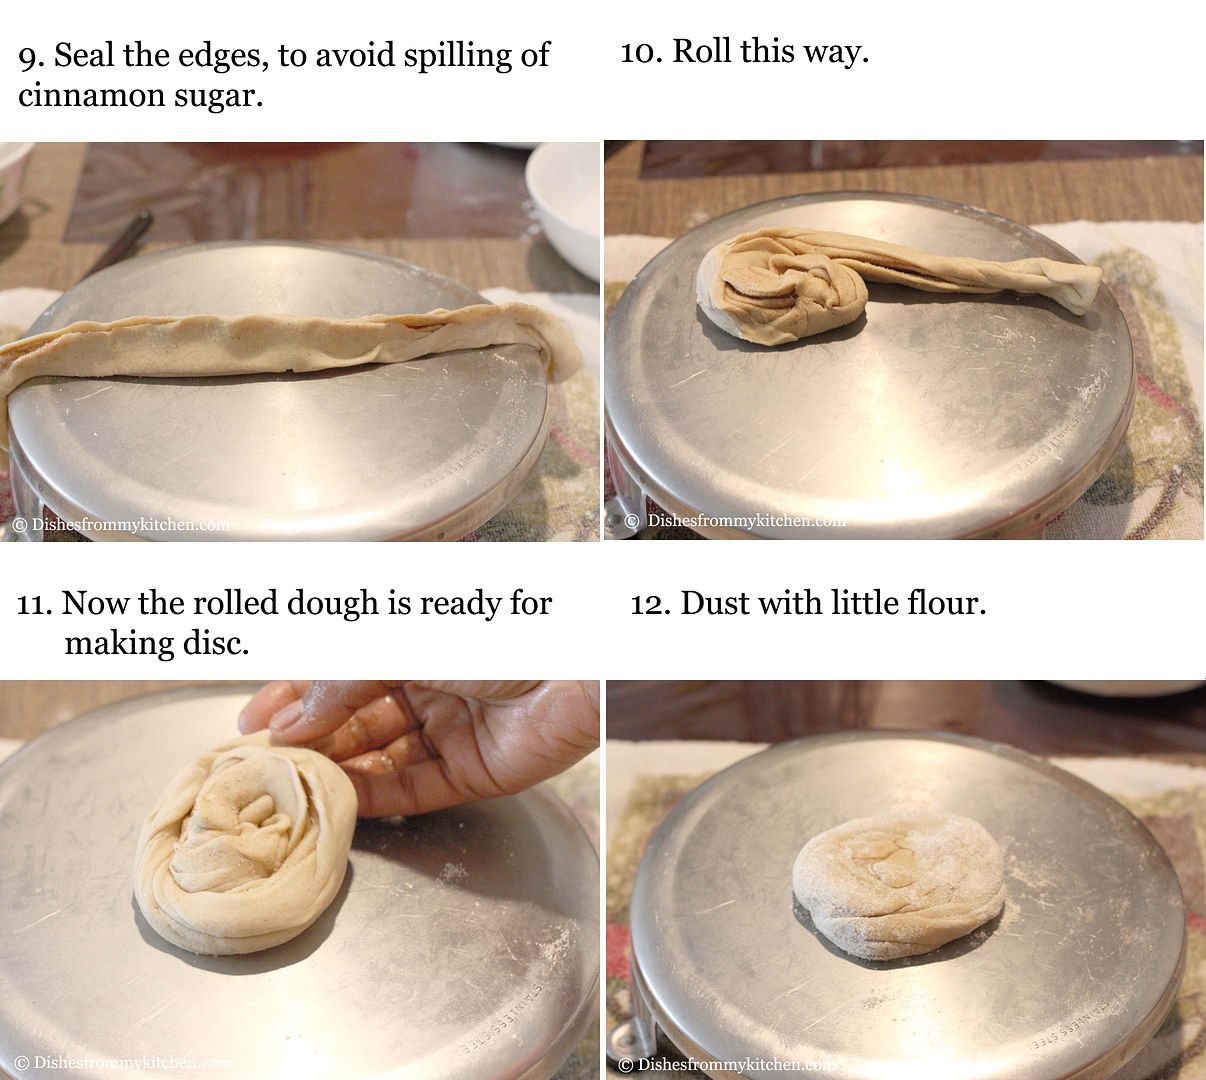
6. Since we are using cinnamon sugar it may spill before you start rolling like a tail.  To avoid this, seal the starting pleat and end pleat.  Start rolling as shown in the picture, give it a press and keep it aside.
7. Do the same for all the dough balls.


Rolling and toasting the pleated dough:

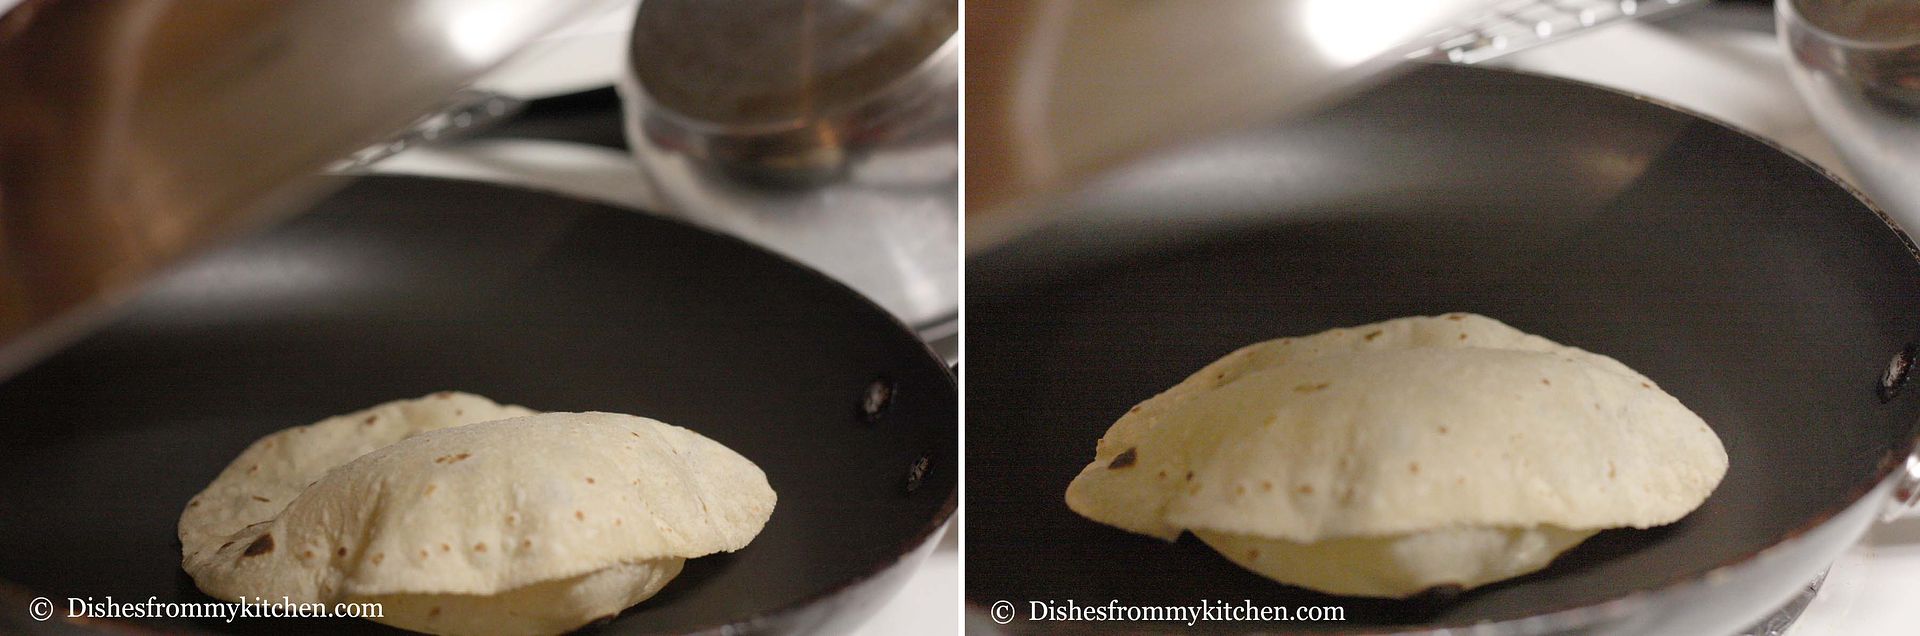
1. Take the rolled dough dust with little flour, using the rolling pin with slight pressure (don't give so much pressure) make 6 1/2 " circle (discs).  The thickness of the discs from the center to end has to be even.
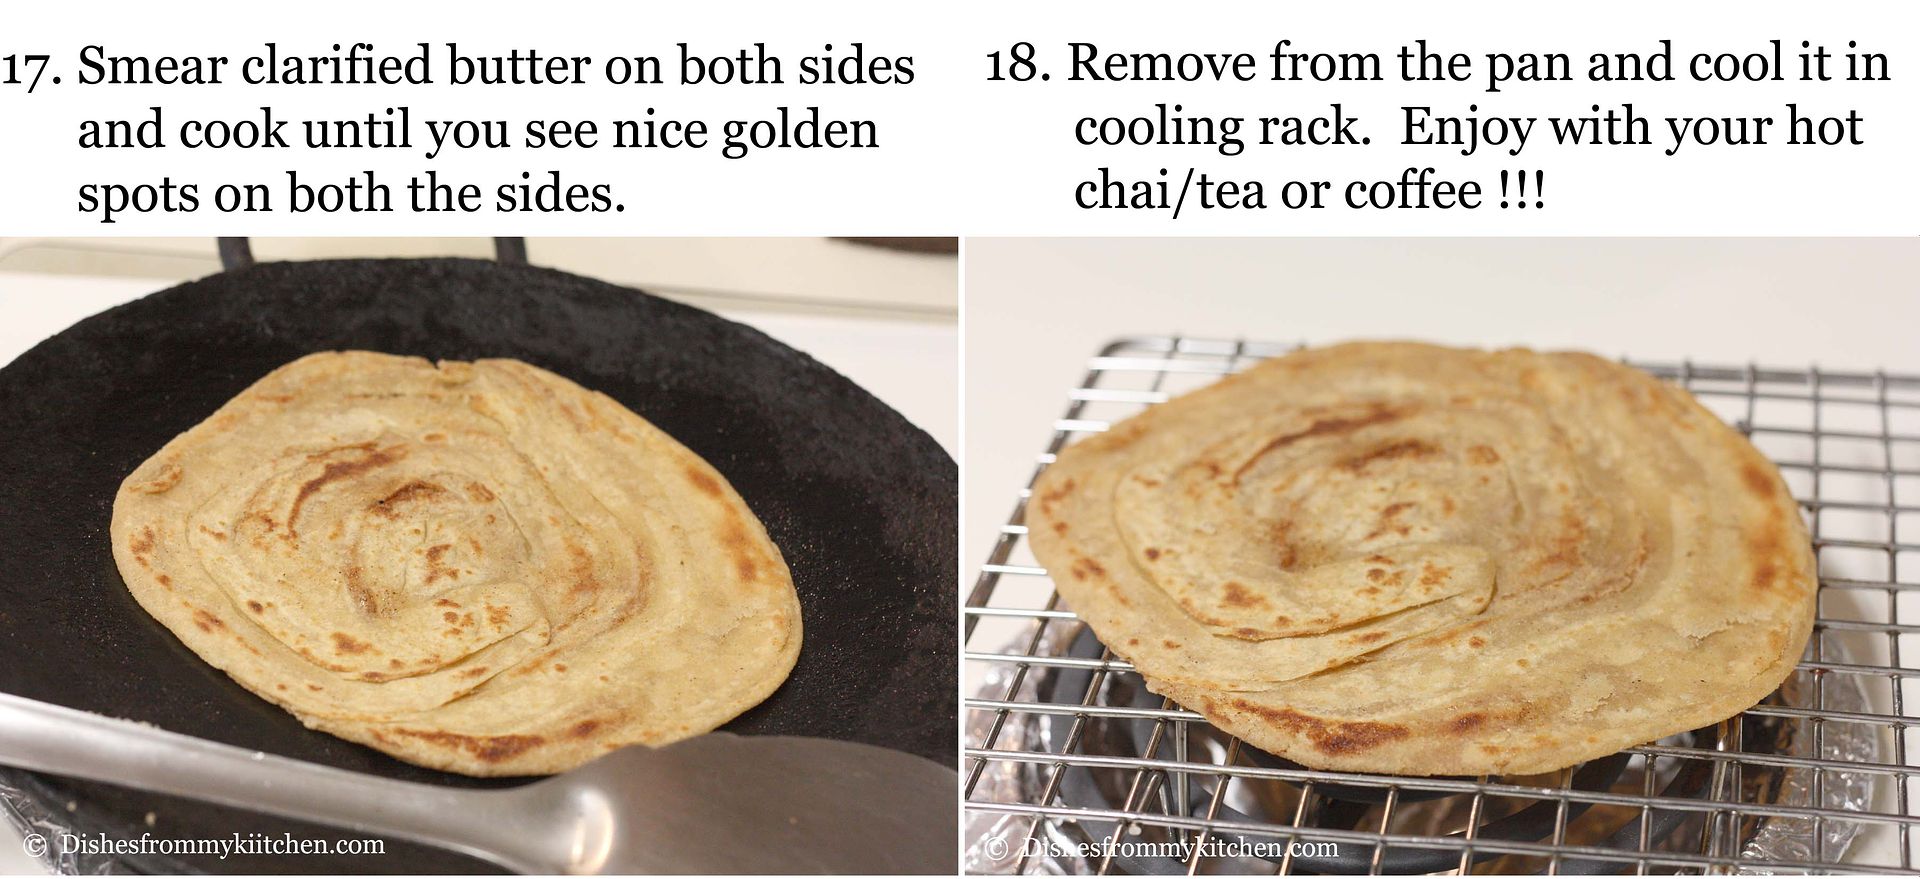
2. In a heated pan, put the rolled paratha.  When bubbles start to appear, smear some clarified butter or oil and flip to the other side.  Now smear some more clarified butter or oil (Always cook them in medium flame so that it does not burn the sugar).
3. Cook until it turns light golden brown on both the sides; this takes approximately 30 to 40 seconds on each side.  Once they are cooked keep them on a plate or cooling rack.
4. Repeat the same for all the dough.
5. Serve hot by smearing little ghee on the top or you can serve in room temperature.


This tastes good even the next day :)


Note/Tips:

1. Using the clarified butter or oil is according to your preference.  I suggest using oil while making the dough and clarified butter while toasting the paratha, if you are health or calorie conscious.
2. You can also use melted butter in the place of oil or clarified butter.
3. For making the plain paratha do follow the same procedure without the cinnamon sugar.
4. Always cook Paratha in medium flame for even cooking.
5. If you like it little crispy cook for few more seconds until it turns nice golden brown on both the sides.
6. The Paratha should be little thick, crispy on outside and soft inside, so do not roll the dough into thin discs.
7. If you are making plain Paratha, make it little bigger.  Instead of dividing the dough into 6 balls divide to 4, roll them little bigger and thicker. This kind of paratha is called Lachha paratha.

Enjoyyyyyyyyyyy the Cinnamon sugar paratha at all times!!!!


Read more...

PHULKAS - MASTER THE ART OF MAKING PERFECT PHULKA - INDIAN BREAD COOKED ON OPEN FLAME !!!!


Many of my friends requested for the Phulka recipe, so I came up with the stepwise method for making Phulkas.  I have tried my best to give more tips and tricks for making a perfect phulka.  Do try and write to me if you have any questions.

The traditional flat bread that is originated from the Indian subcontinent is commonly known as roti.  "Roti" is the universal term for all Indian breads.  Making a perfect roti is an art.  By practice you can make soft and fluffiest ones with ease.  There are lots of Indian breads like Naan, kulcha, Romali roti, Paratha, Phulka, Puri/poori, Chapatti and Tandoori Roti etc.  All breads are made either with whole wheat flour or all purpose flour or the combination of both.  It is usually accompanied with cooked vegetable curries or curries with meat.  Rotis with accompaniments is such a comforting meal.   


Is Phulka and Chapatti same???
No they are different, see below to get to know the difference.

Phulka is a thin roti, which is grease free.  The dough is made with whole wheat flour/atta, water and salt.  Then the portion of dough is rolled and made into thin discs.  The discs are cooked (toasted) on a tawa and on the open flame.  The phulka puffs up like a ball, and it is removed from heat and served as it is or you can brush slightly with Clarified Brown Butter.  Literally the swollen or puffed roti is called as Phulka.

Chapatti can be thin or thick and it is traditionally made by patting the dough balls between the palms of the hands and flattening it.  This requires little skill and practice, you can use the rolling pin for flattening the dough which makes it easier.  It is completely cooked in the flat pan which is called as Tawa by smearing oil on both the sides.  


Here is the recipe and step wise picture for making perfect for FRIED INDIAN BREAD (POORI/PURI)

PHULKA

The secret of making good phulkas boils down to 2 things, mixing the dough and rolling.  Use good atta/flour to make your dough.  The dough that is rolled thickly and kept in the open flame will puff up for sure like a balloon,  but that does not mean that is good one, it will end up with thick roti which we don't want.  As I said earlier phulka is a thin roti which stays soft even after couple of days.  The swollen roti after taking out from the open fire/flame should remain thin and soft which means that you have done perfect phulkas. 

What all you need for making Phulka?

Here in US since I don't have open flame burner in most of the places, I use the mesh directly to the coil or hot plate to keep the phulka to blow up.  You need a flat non stick pan/tawa, a tong, mesh (if you have coil or hot plate).  Open flame does not need a mesh.  off course you need the dough :)


Ingredients:

This yields approximately 30 to 32 phulkas

Whole wheat atta - 4 cups (I use Ashirvaad or Swarna brand Atta which is available in Indian groceries)
Water - 1 3/4 to 2 (The water depends upon the quality of flour)
Salt - 2 tsp 

Clarified Brown Butter(Ghee) - to smear on the top (This is absolutely optional)

Extra flour for dusting.

Method:

For making the dough:


1. Take the flour in a big bowl; add salt and half the amount of water in the flour first.
2. Try to wet all the flour.  Then start gathering the flour together and keep adding more water as needed.
3. After the dough gets together, using your knuckles that is lower palm give a slight pressure to the gathered dough.
4. Add little water while kneading if you find it hard to handle the dough. 
5. Knead until you get soft and pliable dough.  This approximately takes 5 to 8 minutes.
6. If you feel the dough is very sticky you can add more dry flour, mostly this will not happen because we try to sprinkle water little by little.
7. The softer the dough, the better results.  Keep kneading and punching the whole dough with hands few times this makes the dough very soft and pliable.
8. Now close them in the tight container and keep it aside for at least an hour.  It makes the dough very soft and workable. 


Rolling the dough:

1. Make about 30 to 32 equal size balls out of the dough and always keep them closed, as it tends to dry if it is exposed to air which we don't want.
2. The size of the ball should be a little less than the size of Meyer lemon.
3. Now take a ball give it a slight pressure between the palm to flatten it and dust them in the dry flour.
4. Using the rolling pin make 6 to 6 1/4 " inch disc.
Uniform thickness of the rolled out balls is the key to it being puffed up later, so try to roll out away from the center of the ball.  Make sure that the edges are of the same thickness as the center or little less than the center thickness after they are rolled out completely. But make sure the center of the disc is not thin which ends up with flat phulkas.
5. Proceed the same for all the balls or also you can do it in batches.  But make sure to keep the rolled discs closed until you finish with all the balls; otherwise it dries out easily if it is kept open.


Making Phulkas:

If your mesh is square shape then you need 2 burners, one for the mesh and another for the pan.  But if you have the circle mesh then you can keep the mesh on the coil, above the mesh you can stack the pan.  The point is you have to get heat for both the mesh and pan even when they are kept above each other.  When you start rolling the dough, you can start heating the mesh and non stick pan in the coil/hot plate or open flame.  Use medium to high for pan and high flame for the mesh.

1. Now put the rolled dough in the pan/tawa you will start seeing few bubbles, now flip them and after you see few more bubbles.
2. Put them in the hot mesh or directly to the open flame using a tong.
3. Wait for few seconds you will see the magic that it starts to puff up like balloon.  Once it puffs or swollen up do not wait for long time.
4. Remove from the flame and keep it in the plate lined with kitchen towel, smear with little clarified brown butter on the top.  Keep it closed.
5. Follow the same procedure with other balls and stack phulkas in the same plate until you are done with everything.  This way it keeps the phulkas moist and soft.  


Note:

Since we are using the dry pan, after 4 to 5 rotis, the pan may get very dry and the dough starts to stick, in this case add a drop of oil and using tissue just clean the pan.

What, if you don't have open flame burner and the mesh???
1. Once you put the rolled dough in the pan when you start seeing small bubbles, flip them and wait few more bubbles on other side too.
2. Now increase the heat to high and close with the lid as shown in the picture.  Now you can see the phulkas are puffed up.  Don't keep this for long time after you increase the flame as it burns the phulka :(


Do write to me if you have any queries about the procedure, I would be happy to help you :)

Read more...


Page copy protected against web site content infringement by Copyscape

Visit Great Cooks Community
All recipes are on Petitchef