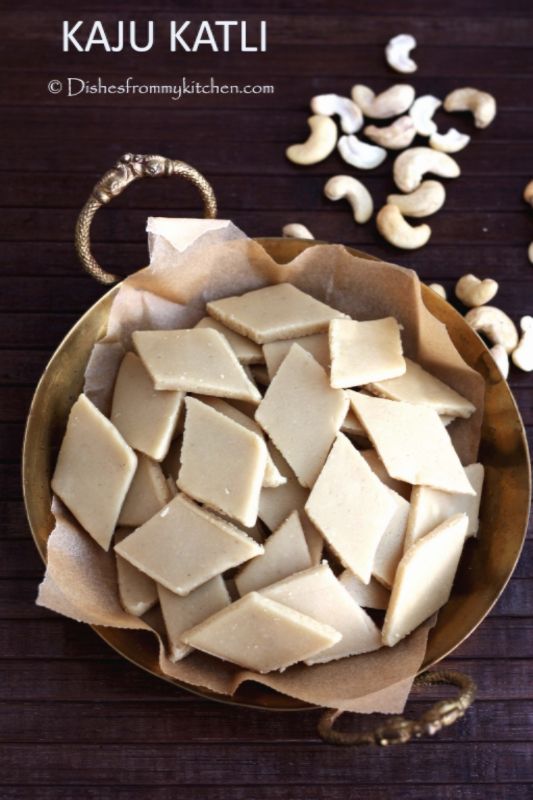
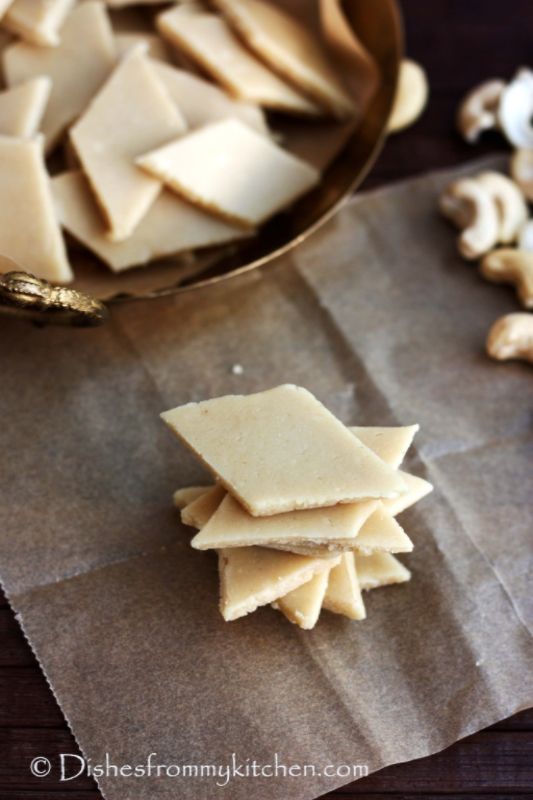
Search This Blog

KAJU KATLI

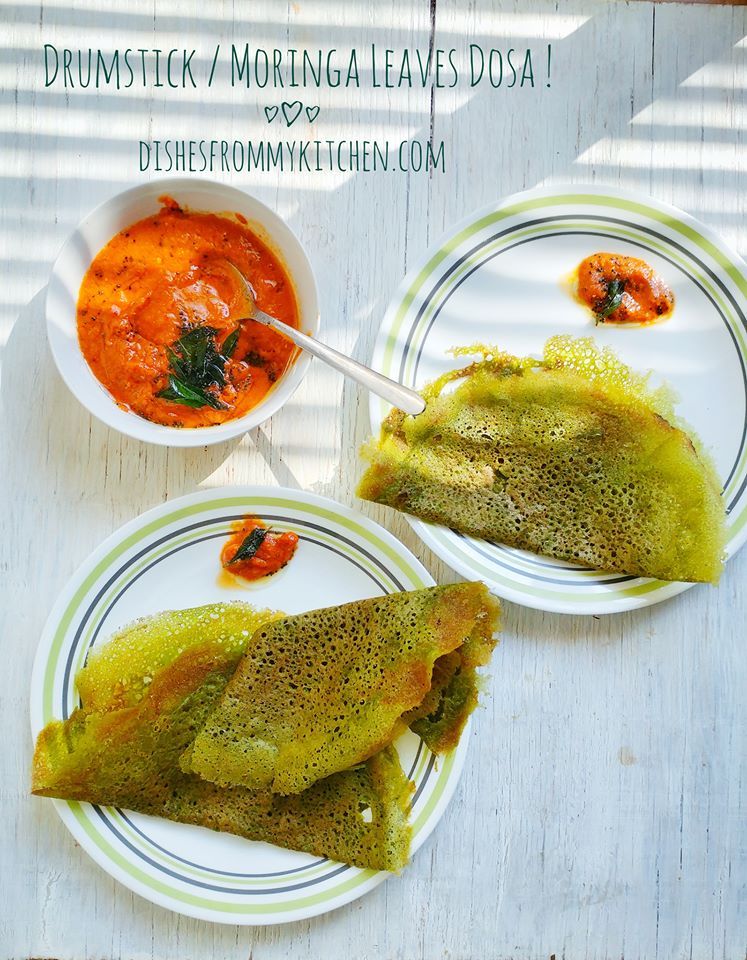
Kaju Katli/ Cashew nut fudge is very easy to make, with few ingredients. It’s one of the most popular sweets and almost every one's Favorite.  Its perfect dessert/sweet which can be gifted to friends and family for any occasion. Enjoy this yummy rich dessert !

Kaju Katli

 
Ingredients :


Cashewnut - 1 cup
Sugar - 1/2 cup
Water - 1/4 cup
Ghee - for greasing

I did not use any flavoring as we like katlis as is. 
If you want you can use either use Kewra Essence (1 drop) or Cardamom (1 pinch).


Method :

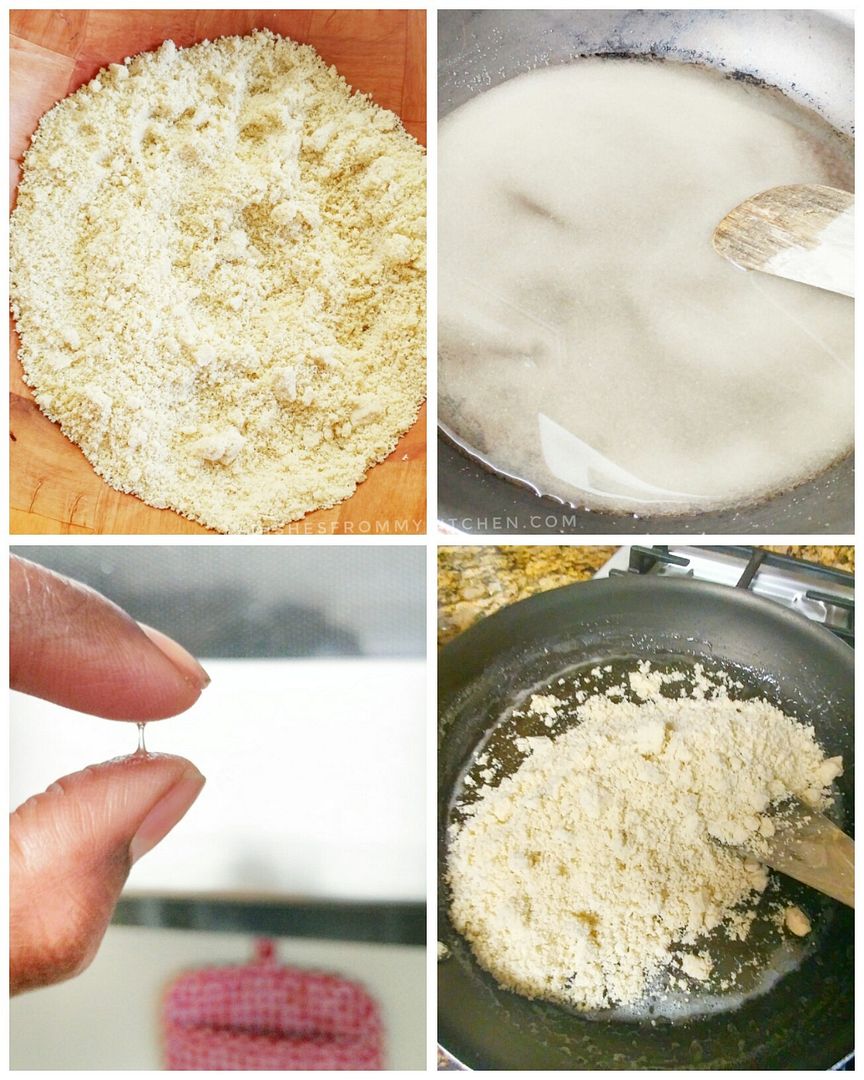
1. Powder the cashew nut finely in a dry mixie/blender jar.
2. Mix sugar and water in a pan using a spatula.  Once the sugar slightly dissolves switch on the flame, always keep the flame in low to medium.
3. At first the sugar starts to dissolve and you can see slight bubbles, after that sugar syrup starts to thicken. 
4. Now we need to check the syrup for 1 string/thread consistency. One string/thread Consistency is when a thin string is formed between the tip of thumb and forefinger, When pulled apart gently it should not break.
5. Immediately put the flame to low and add the powdered cashew nuts.  Instead of spatula you can also use whisk here.  Mix well without any lumps.  

 6. Keep stirring in low flame using a spatula.  Now we need to cook Cashew nut powder with the sugar syrup. First you can see the gooey dough as shown in the picture. Keep mixing.
7. At one stage you can see the mixture starts to leave the sides of the pan and starts to form a ball,  at this stage take little amount of cashewnut mixture. Using your 2 fingers check to see if it forms a non sticky ball as shown in the picture.If it forms a ball immediately switch off the flame and pour the mixture in the plate greased with ghee.

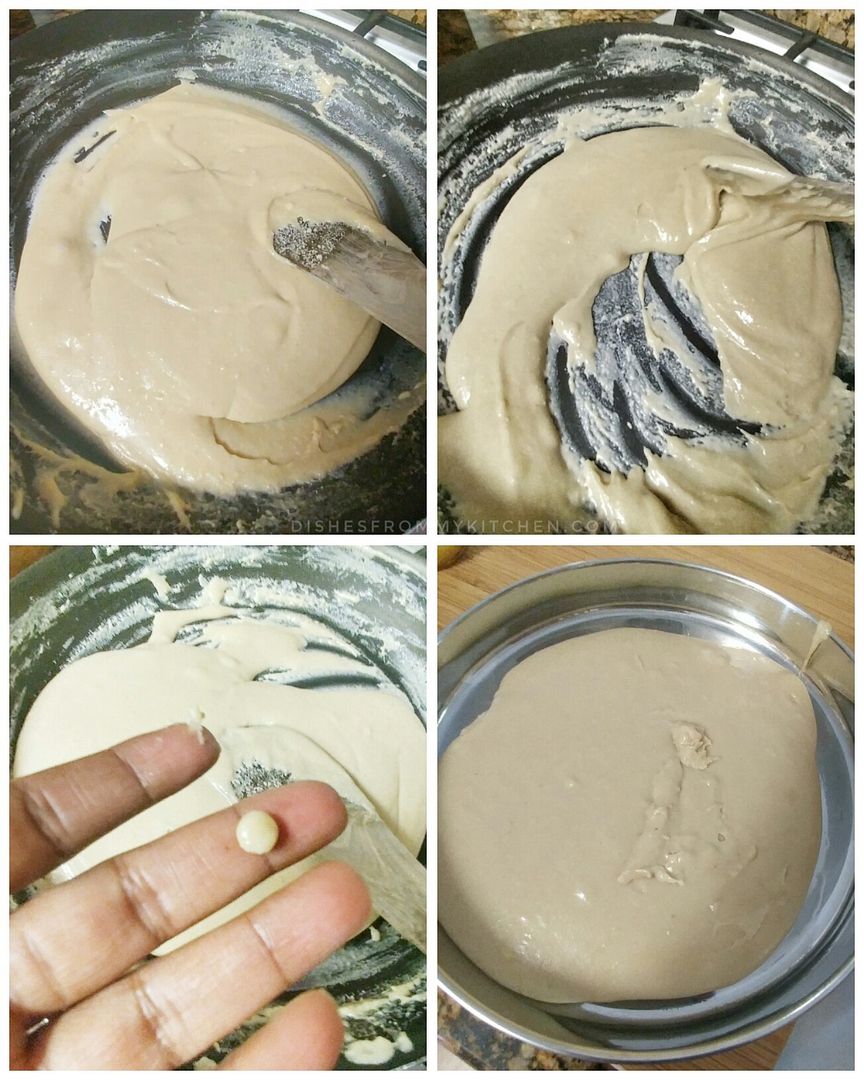
 8. Using a fork mix it well couple of times. It will be super hot so we can not work with it immediately.
9. When you are able to handle the heat, start kneading the dough without giving so much pressure. You will get a smooth dough as shown in the picture. It should be nice and Pliable.


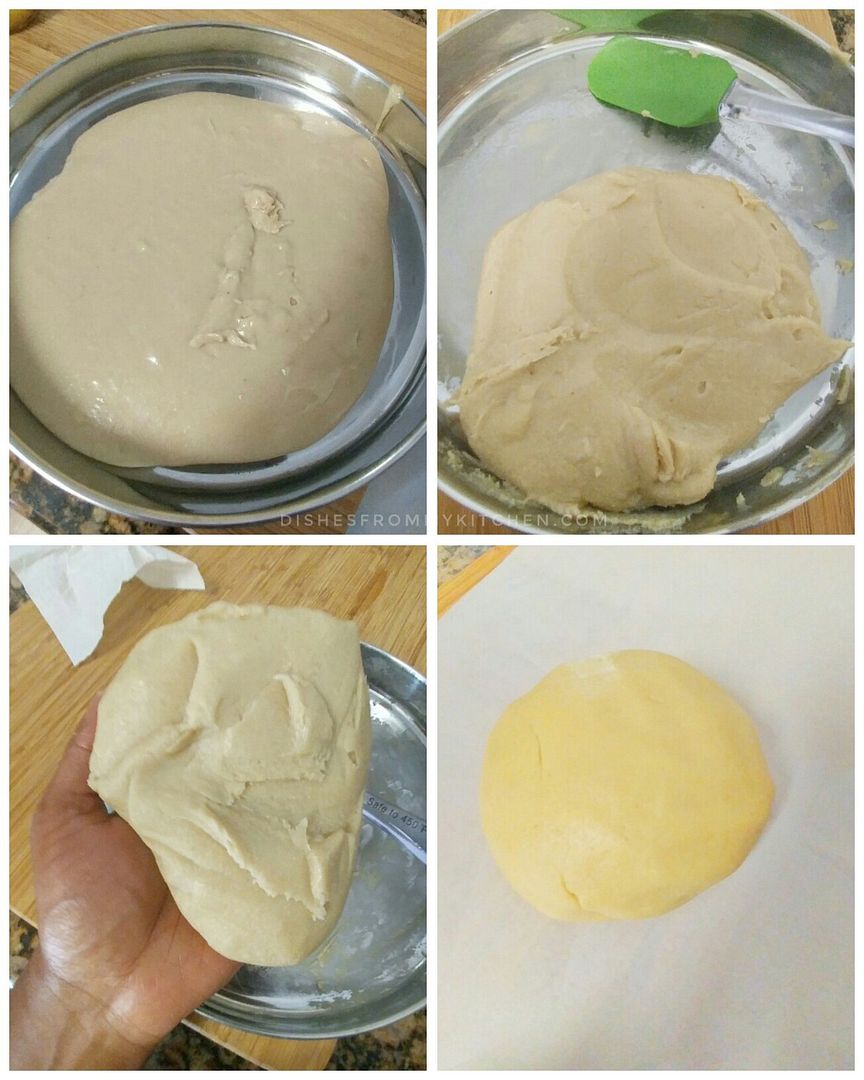
10. Keep the dough in between 2 parchment paper and roll it using a rolling pin for about 4mm thick..Choosing the thickness is absolutely your choice. Mine is thin the way we like.


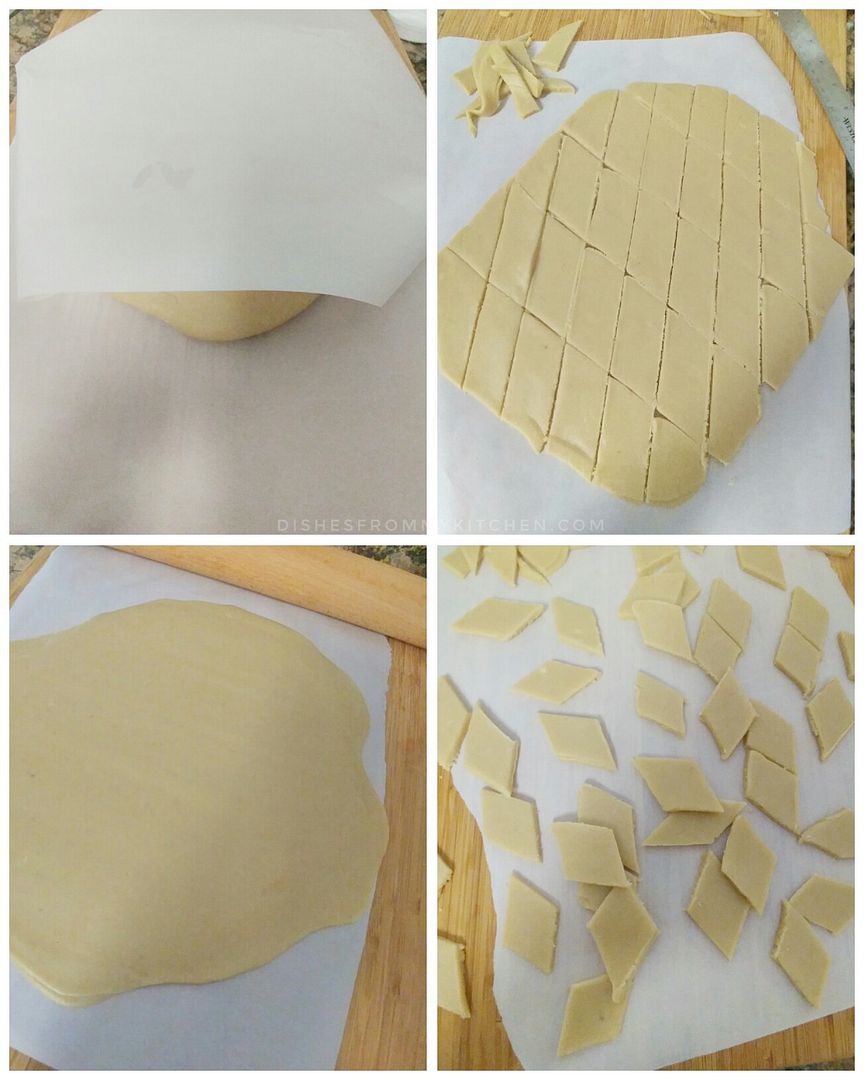
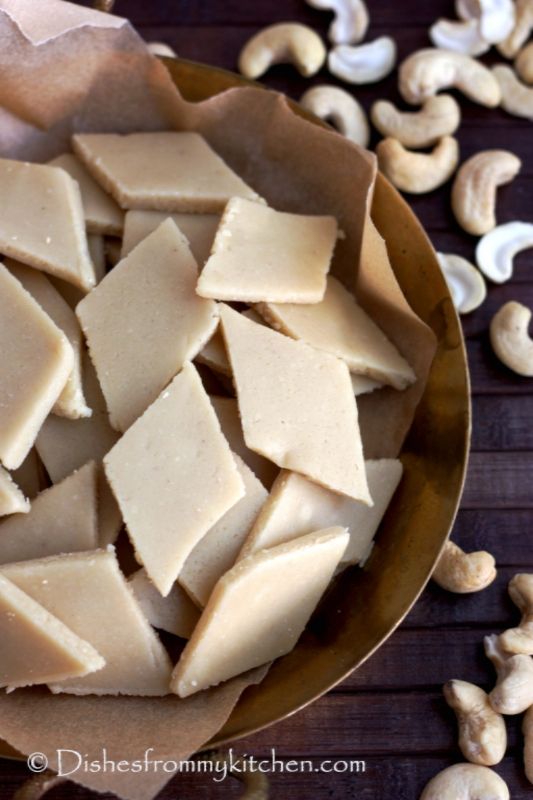
11. Now using a knife cut diagonally. Let it cool completely.  Store in an airtight container.


Note :

1. Powder the Cashew nut when it is in the room temperature. Make sure you the Blender jar is completely dry.
2. Like any other sweet, string consistency is very important.  If the consistency is more than 1 string, then the katlis becomes brittle or you will not be able to form smooth dough.
2. Once the cashewnut and sugar mixture starts to leave the pan and forms a soft non sticky ball, stop cooking.  If you continue to cook longer it will make the dough very dry.
3. As soon as you are able to handle the heat, start kneading the dough to a smooth ball immediately.  If you wait longer, it will become dry soon and difficult to roll.
4. If everything is done correctly you will get smooth and Pliable dough, if you feel it is dry add little warm milk and knead again to get smooth dough. If milk is added the shelf life for katlis will be less if kept at room temperature, you need to keep it in the fridge after couple of days.


Hope I have given you all the tips that was in the top of my head.  Do let me know if you have any doubts.

DISCLAIMER :

PLEASE DO NOT COPY THE RECIPE OR PICTURE.  YOU ARE MOST WELCOME TO USE THIS RECIPE WITH THE DUE CREDIT.

Read more...

ADHIRASAM / ATHIRASAM

Wishing you All Advance Happy Deepavali

To kick start the festival of lights I started with Adhirasam.  I have planned to do couple of sweets and savories for Diwali.  Not sure I can share the recipe for those before Diwali.  Anyways I will share the picture here after I make and later I will share the recipe.  Do check some of my other Sweet and savories which I have in blog my already.

Sweets :

Apple Jalebi
Adhirasam/Athirasam
Badam Halwa
Besan Ladoo
Boondhi Ladoo
Obattu/puran poli
Suruttai poli
Easy Paalkova
Rasmalai
Karjikai/Kajjikai
Karjikai/Kajjikai 1
Kaju Katli

Savories :

Butter Murukku
Ginger Pakoda
Puluppu Murukku
Lychee Sandesh in Rabri/Rabdi
Mung dhal Murukku Ver1
Mung dhal Murukku ver2
Onion Murukku

Vadai / Bonda 

Punnugulu/Bonda using Dosa batter
Mangalore bajji/Golibaje
Masal Vadai/Paruppu Vadai


Adhirasam/ Athirasam

Yields - 10 to 12 Adhirasam


Ingredients :

Rice - 1 cup
Jaggery - 3/4 cup
Water - 1/4 cup
Cardamom - 1/4  tsp
Dry ginger Powder - 1 pinch (optional)
Sesame Seeds - 1/2 tbsp
Oil for deep frying
Ghee/ oil for greasing 
Polythene sheet 

Note :  You can use Maavu Pacharisi or any raw rice. I used Sona masoori.  Also it’s good to use Paagu vellam (Jaggery) for making Adhirasam. As I don't have all these where I live. I used regular Jaggery.  


Method :

1. Clean and Wash the rice thoroughly. Let it soak for atleast 1 to 2 hours. But don't soak more than that. 
2. Drain the water completely and spread in the clean kitchen cloth towel until the rice is 3/4th dried. (Make sure the rice is not completely dry, it should still retain moisture/Damp enough)
3. Now powder the rice in the Mixer.  The texture of the powder should not be very fine, it should be like fine Sooji/ Rawa.  Make sure it’s not coarse too.  If you still have doubt, you can sieve it. 
4. Once it is sieved, immediately transfer it to a container.  Keep the flour covered as it has to retain moisture throughout the process which is very important. 


5. Now in a pan heat Jaggery with 1/4 cup of water, once it is dissolved completely.. filter it to remove all the impurities.
6. Heat the Jaggery again (Always keep in Medium to low flame), stirring occasionally. Now the syrup will thicken and you will be getting nice bubbles (this happens very faster as we added little amount of water) this is tricky part so keep a close watch.  Take a small plate or bowl filled with little water.  Keep checking the sugar consistency by pouring little syrup in water. At first the syrup will dissolve in the water (you can check couple of times frequently. At one stage the syrup will settle in the bottom and when you gather in your fingers you should be able to gather and make a soft ball.  At this stage switch of the flame.
7. Add Sesame seeds, cardamom and ginger powder to the powdered flour. Keep this ready.
8. Add the hot syrup to the flour and keep mixing with the whisk or any ladle. 
9. Very loose and sticky dough will be formed which is the right consistency.  Later it gets stiff when the dough cools down.  

10. Now transfer the dough in airtight container for resting. The dough has to rest atleast 24 hrs before we make Athirasam/Adhirasam.  
11. When making Adhirasam, equally divide the dough to small lemon sized balls. 
12. Heat Oil in the kadai, Oil should not be too less for frying. Once oil is hot, put the flame in low. 
13. Take a Polythene sheet or any Ziploc cover.  Grease it with ghee or oil. Flatten the ball using your greased fingers.
14. The discs has to be thick (Do not make it thin). Now carefully drop it in the oil.  The flame has to be low throughout the frying process. 

15. Like doing poori, slightly pour oil on the top of the Adhirasam slowly. It rises up, immediately flip to other side gently and let it cook for couple of seconds and take it out immediately. Using another ladle give it a press to take out extra oil. Don't press too much as it has to retain little oil to keep it soft and moist inside and little crispy outside. 
16. Keep it in a slanted plate like I have kept, don’t stack. So that extra oil drains out. Make all the Adhirasam.

17. Once all Adhirasam are made store in the air tight container lined with kitchen tissue.

Some of the things has to be Noted Before you attempt Adhirasam :

1. The texture of flour is very important.. Which should be like Very fine Sooji and moisture should be retained in the flour until it is added to Jaggery.  So keep it covered.
2. The Jaggery should have soft ball consistency.
3. The consistency of the dough should be very loose/ Sticky dough.
4. Always cook it in low flame. Don't cook too long after Flipping. It makes Adhirasam harder because even if you take the Adhirasam out of the oil it will be still cooking from Inside because of Jaggery content, Jaggery takes time to cool.
5. The amount of Jaggery or flour can't be altered. If you follow everything correctly the ratio for rice flour and Jaggery I have mentioned, it will work exactly.  But you can always make extra Jaggery syrup (that is instead of 3/4th cup make syrup you can make syrup with 1 cup of Jaggery but we may not be using all the syrup. when you add syrup to the flour keep mixing the dough with whisk or Laddle.  When the sticky dough is formed stop adding the syrup. 
6. The Dough gets stiff after it cools down. But not very hard.  Even after 2 days the dough has to be pliable.
If you think the dough is very hard you can add little milk and knead.
7. You can make dough and make Adhirasam after giving atleast 24 hrs of resting time.  You can also keep the dough in room temperature for 2 to 3 days.  If you are not going to use it immediately.. you can store it in freezer or keep it in fridge.  Use when needed, after it is thawed or gets to room temperature.


Read more...

TAWA PULAO ! KIDS LUNCHBOX !

Lunch Box : Tawa Pulao, Cucumber and Avarekaalu (Fried field Beans snacks) !
Snack Box : Seasoned Black Channa and Peaches !

 Do check my Facebook Page for More lunch box ideas and also click this link for more Lunchbox recipes Click this Link Lunchboxes.


Tawa Pulao


Ingredients :

Basmati Rice - 1 cup
Onion - 1 small (Finely Chopped)
Tomato - 2 small (Finely Chopped)
Carrot - 1/2 cup (Chop lengthwise)
Beans - 1/2 cup ( Chop lengthwise)
Potato - 1/2 cup (Chop to small cubes)
Green Peas - 1/4 cup
Green Bell pepper - 1 small (chop to small cubes)
Cumin seeds - 1/2 tsp
Pav Bhaji Masala - 1 1/2 tsp
Chilli Powder - 1/4 tsp
Kasoori Methi - 1 generous pinch
Garlic - 3
Ginger - small piece
Juice of Half Lemon 
Salt as Needed
Coriander few Chopped 
Oil - 1 tbsp
Butter - 1 tbsp


Method :

1. Clean and Wash Basmati rice.  Soak them for 20 minutes and cook rice with 1 1/2 cups of water. Cool them and make sure the grains are separated. If you are going to make this recipe for lunch box in the morning. You can Cook the rice and refrigerate night before.  Left in the fridge overnight, the rice grains will firm up, making it easier to separate and decreasing the chances of Tawa pulao turning out mushy. 
2. Steam all the vegetables and Keep it aside.  Make sure vegetable are nice and crisp. Don't over cook them.Its enough if you cook 3/4th.
2.Heat oil and butter in the pan. Add Cumin seeds.
3.Add finely chopped onions when it become translucent, add Ginger + garlic paste. Saute till raw Aroma disappears.
4.Add chopped tomato and little salt.  Add spice powders. Saute until tomato becomes Mushy.
5. Now add all the vegetables and crushed Kasoori Methi. Stir them couple of minutes and add cooked rice.
6.Add salt and squeeze Lemon juice. Toss the rice until everything is mixed well and rice is nicely coated with the vegetable Masala Mixture. When Rice becomes hot enough switch off the flame.
7. Garnish with Chopped coriander.

DISCLAIMER :

PLEASE DO NOT COPY THE RECIPE OR PICTURE.  YOU ARE MOST WELCOME TO USE THIS RECIPE WITH THE DUE CREDIT.


Read more...

PUDINA / MINT POHA ! KIDS LUNCHBOX !

Posting Lunchbox here in my blog after a long time. Since I am getting lots of recipe requests I will try to post lunchbox recipes whenever possible.  Do check my Facebook page for More lunch box ideas and also click this link for more Lunchbox recipes

Lunchbox : Pudina/Mint Poha, Radish Raita, Boiled egg !
Snack Box : Pomegranate, Cucumber, walnut and Dates !


Pudina/Mint Poha (Beaten or Flattened rice)

Serves 4 to 5

Ingredients :

Thick Poha - 3 cups
Red Onion - 1 sliced
Tomato - 2 small
Mustard seeds - 1/2 tsp
Urad dhal - 1 tsp
Oil - 5 tbsp
Ghee - 1 tbsp (optional)
Green peas - 1/2 cup (this is optional)
Salt as needed

Mint/Pudina Paste :

Mint - 2 Handful
Coriander - 2 Handful
Coconut - 1/4 cup
Lemon - Juice from 1 1/2 lemon
Green Chillies - 20 (mine is not super spicy)
Salt as needed
Oil - 1 tbsp (This is optional, adding tbsp of oil avoids discoloration. Color of green will be vibrant)

Grind all the above ingredients to smooth Paste.If you are using this for lunchbox you can always make this ahead of time and keep it in the fridge. We will not be using the whole paste only 3/4th of this paste will be used.   


Method :

1. Clean and wash poha very well.  Since I used very thick poha this has to be soaked for 3 to 4 hrs. Add water and little salt, pour just enough water to cover it. Don't add more than that. ( Do this procedure in the night and keep it in the fridge if you are preparing and packing lunch)

If you are using less thick variety of Poha follow this. Wash poha thorougly atleast 2 to 3 times. Drain water and keep it aside for 10 minutes. Then follow the same procedure as below.

2. Heat oil in the pan.  Add Mustard and urad dhal.  
3. Add Sliced onion when it is translucent add Tomato and little salt.
4. When tomato becomes mushy add 3/4 th of the ground paste and Green peas. Saute well until it starts oozing oil.
5.Now add the poha and saute in the low to medium flame until poha is cooked (4 to 5 minutes).  Be gentle while you stir the poha in between.  Add tbsp of ghee.
6. Now switch of the flame and cover the pan tightly with a lid for couple of minutes.

Serve hot or pack it for lunch with Raita or any snacks !

Note :

Variations you can make 

* You can also add vegetable of your choice. Like mixed vegetables (carrot, beans, green peas and potato).  Only aloo and matar, only aloo, I some time add Eggplants alone.  Everything tastes great. 

* If you like ginger and garlic you can add couple of garlic and piece of ginger while grinding the pudina paste.  But I want to keep it simple for lunchbox also aroma of mint to be dominating.  

* You can add whole spices like clove, cinnamon and cardamom instead of Mustard and urad dhal.


DISCLAIMER :

PLEASE DO NOT COPY THE RECIPE OR PICTURE.  YOU ARE MOST WELCOME TO USE THIS RECIPE WITH THE DUE CREDIT.

Read more...

DRUMSTICK LEAVES / MORINGA LEAVES DOSA !

Hi all ,I am Blogging after so many months ...No no after a year.  Yes I been busy with so many things, so my blog has taken a back-seat.  I got a lot of messages from so many friends asking whether I stopped blogging.  Definitely I don’t want to stop blogging.  Priorities change all the times, so I took a big break from blogging.  I used to spend hours together every week for daily cooking, shooting and posting in blog.  I really miss those days and feel guilty of not doing those now.  That being said, does not mean I am not cooking and taking pictures, I am very active on FACEBOOK and INSTAGRAM.  I do cook a lot and take pictures (Using my phone) .. During the time of the day when I shoot pictures, I don’t have the luxury and time to take pictures with my camera :(.  When I post pictures in social media, I get lots of recipe requests, which is a one thing that made me comeback to blogging.  I should thank my wonderful friends and followers who encouraged me to do my blog again. 

I want to bring to all of your kind attention, I have been tired of hearing people writing my relative or school friend taught me or gave me this recipe and end up taking an other person's recipe and do very slight change to the recipe.  You are most welcome to use this recipe with due credits. I have done my home work and have not found any recipe in the Internet, that is remotely close to what I have. 
To start off with I will post recipes requested by so many friends and followers in FB and Instagram.  I am going to use the pictures taken with my phone, I don’t want to redo the dishes again just for taking the picture.  Let me post whatever picture I have and try to update them with DSLR pictures when I do them in future.  Hope to see you all regularly here ..  Stay tuned. 
Here is the recipe for superfood Moringa Dosa/ Drumstick Leaves Dosa. 

I usually don't get Moringa leaves in Indian grocery store where I live.  But off late I am getting these leaves.  These are one of my favorite greens. I have been making so many dishes using this leaves, which I have been missing all these years.  So I am putting them into full use :) :) Moringa/ Drumstick leaves which is commonly touted as a superfood since it is rich in nutrients, antioxidants and other beneficial compounds. Back home in India Moringa leaves / drumstick leaves are given to new moms which helps in improving and boosting Lactation.


Sharing one of my favorite dosa.  It is so flavorful and its wonderful combo with Spicy garlic chutney.  Even though seperating each leaves from the stem is a tedious process.. it’s always worth it and you will feel the amazing aroma of the green goodness.  Let me know if you are interested in more Moringa/ drumstick leaves recipes.... Do comment below. 

MORINGA / DRUMSTICK LEAVES DOSA 


INGREDIENTS :

Idli rice - 1 cup
Fresh Moringa/ drumstick leaves - 1 1/2 cup (Remove the leaves from the stem and use leaves alone)
Salt as needed
Here is the Recipe for Spicy Garlic Chutney 


Method :

1. Wash and soak rice for 3 to 4 hrs.
2. Grind the leaves and soaked rice smoothly with required salt.
3. Ferment the batter overnight. 
4. While making dosa dilute it with water. Batter has to be like Rava Dosa consistency.
5. Heat the skillet. Pour a ladle full of batter starting from the edges of the skillet in a circular way.
6.Since the batter is loose it auomatically fills the middle part , unfilled part can be filled with the batter using the ladle.
6. Add 1 tsp oil , when it turns slightly brown on the edges flip it over and make crisp on other side too.
7. Serve with Spicy Garlic chutney. Dosa tastes great with Idli spice powder, tomato chutney , onion chutney or coconut chutney as well. 

Enjoy the yummy aromatic and healthy Dosa !!!  

Read more...


Page copy protected against web site content infringement by Copyscape

Visit Great Cooks Community
All recipes are on Petitchef