Search This Blog

Showing posts with label appetizer. Show all posts

VEGETABLE ROLLS / VEGETABLE CIGARS !


Vegetable Cigars/Rolls 

Yields : 18 rolls



Ingredients :

Fillo/ Phyllo pastry sheets - 18 sheets (Thawed)
Potato - 2 medium sized (Boiled and cut to small cubes)
Beans - 1/2 cup very finely chopped
Carrot - 1/2 cup Grated
Green peas - 1/2 cup 
Onion - 1 very finely chopped
Garlic - 2 
Ginger - 1/2 inch 
Green chilli - 1 
Garam masala - 1 tsp
Chilli powder - 1 tsp
Tomato sauce - 1/2 tbsp
Lemon juice - from 1/2 lemon
Coriander - 3 tbsp finely chopped
Kosher salt - 1 1/2 tsp
Oil - 1/2 tbsp 

Brushing :

Butter - 1 tbsp
Oil - 1 tbsp

Melt the butter and mix with the oil. Keep it aside in a small bowl.



Stuffing :

1.Heat oil in a pan add finely chopped onion saute till they are slightly brown, now add Ginger+garlic+Green paste. 
2.Once raw aroma disappears add finely chopped beans for few minutes until  it is cooked 3/4th. Now add grated carrot, green peas.  Saute for few minutes until they are half cooked. (Do not overcook the vegetables)
3.Add all the spice powders, ketchup, boiled potatoes and salt.  Toss until everything is blended well. 
4.Squeeze juice of half lemon.  Finish it with chopped cilantro.  Let the stuffing cools completely.


Making Rolls :

1.Take a sheet and gently brush with
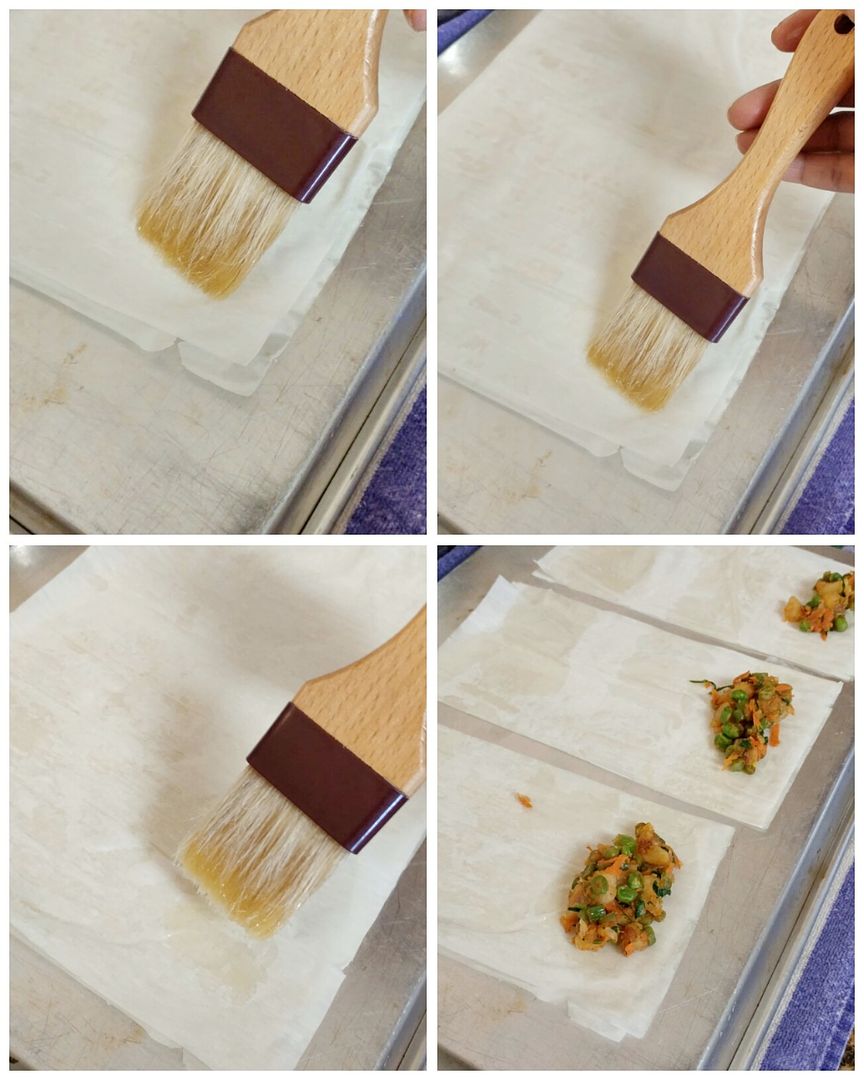
 the melted butter and oil mixture.  Place another sheet on top of the brushed sheet, again brush with the butter and oil mixture, similarly do it with one more sheet and brush with butter mixture. (Totally 3 sheets - > 1 sheet - Brush with butter mixture - 1 sheet - brush with butter mixture - 1 sheet - butter and oil mixture) Use pastry brush for brushing, do not over brush with butter mixture it makes the sheet soggy. Do it gently and slightly. 
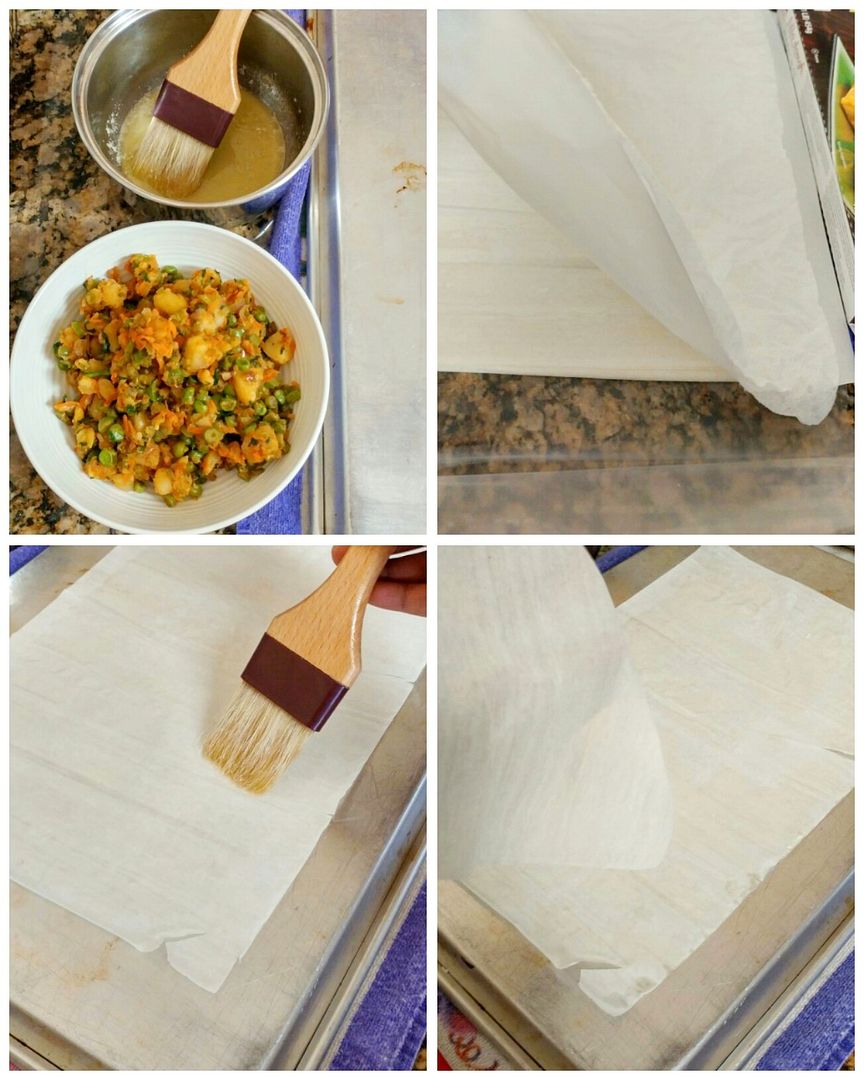

2.Using a knife cut the sheet to 3 equal columns as shown in the picture.
3.Take a tbsp of masala stuffing keep it in one edge and start rolling.
4.Once you roll 1/4 way through tuck in the sides as shown in the picture and roll till the end gently.
5.Similarly make all the rolls and keep it in the baking tray facing seam side down (Keep it closed using damp kitchen towel)
6.Once all the sheets are filled and rolled.
7.Brush the rolls slightly with the remaining butter mixture on top of the rolls and sprinkle sesame seeds.
8.Bake it in the 375F preheated oven for 25 - 30 minutes until they are nice golden brown in color.
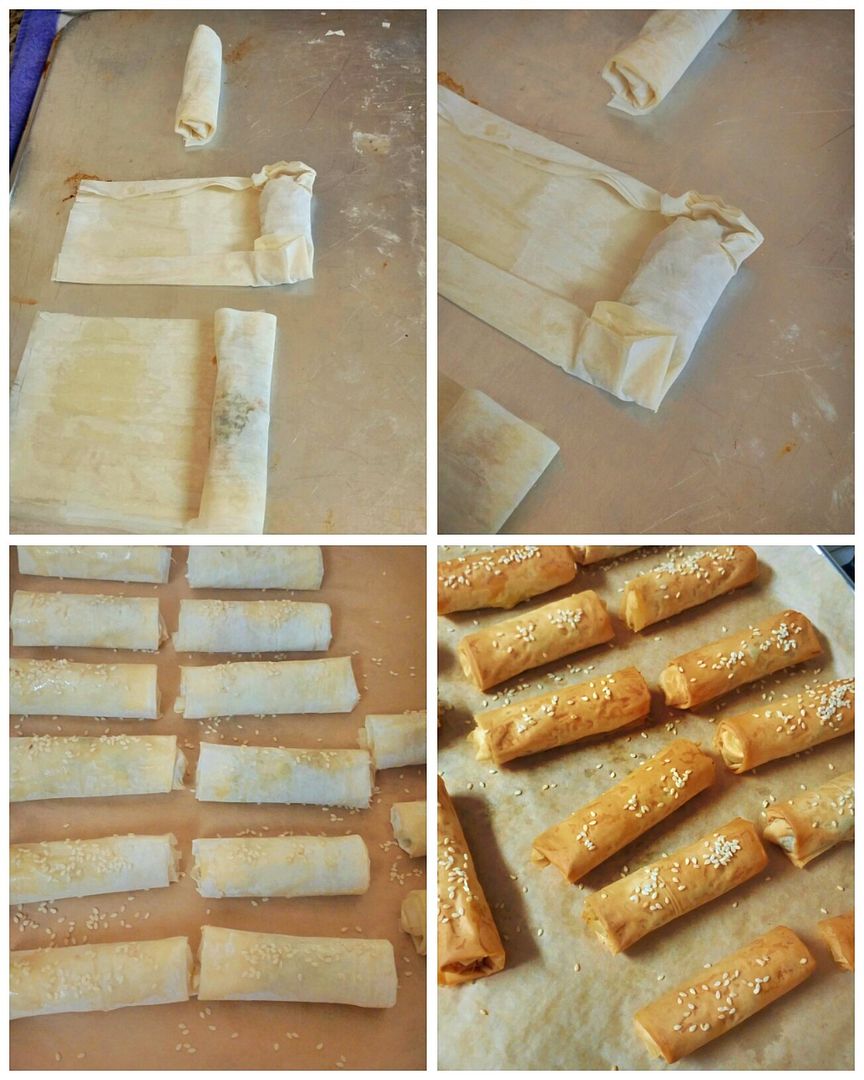
9.Serve with Ketchup and Green chilli sauce.



Note :

1. Always Keep the Fillo/Phyllo pastry sheets closed with damp kitchen towel to avoid drying.
2. For variation you can add finely chopped soya chunks, boiled corn, baby corn, mushrooms etc.


Read more...

CURRY LEAVES GARLIC BREAD - DARING BAKERS 2014

 Who knew breads could look as great as they taste?  Yes this month’s challenge is to take bread making a step further. Not only making make bread from scratch but to form it into beautiful forms.  I missed doing DB challenge for past few months due to my hectic schedule. I badly wanted to do this month's challenge. Due to time constraints, I was not able to do other designs which I had in my plan for doing in this challenge. I am happy that I am able to participate :):) The recipe for the challenge is sweet bread but with slight variation I made it into savory bread which came really well with beautiful aroma when baking.  I made curry leaves garlic bread, it tasted very flavorful and you can look at the pictures and virtually enjoy the taste.  Here is the recipe I did for this fun and delicious challenge. This is basic dough for any savory bread, you can substitute the flavors of your choice.


Beauty surrounded the Daring Bakers this month as our host, Sawsan, of chef in disguise, challenged us to make beautiful, filled breads.  Without any delay here goes the Recipe.... Do enjoy this flavorful and yummy bread !!!


CURRY LEAVES GARLIC BREAD

Ingredients:

For the dough

All purpose flour - 3 1/4 cups approximately
Warm water - 1/4 cup
Warm milk - 3/4 cup
Egg - 1 large
Butter, softened - 1/4 cup
Sugar - 1 tbsp
Salt - 2 tsp
Dry yeast - 2 tsp


Between the layers:
Butter - 2 tbsp
Curry leaves - 2 tbsp finely chopped
Garlic - 2 tbsp grated
Salt - 1 tsp (increase or decrease the salt depending on your spice powder)
Spicy Curry leaves powder - approximately 1 to 2 tbsp for sprinkling in between the layers ( This is absolutely optional, u can only use Curry leaves or any dried herbs etc. along with garlic and omit this Curry leaf powder, I wanted to do this flavor since I had it my Pantry)

For Garlic curry leaves spread:

Melt the butter in a small pan, add chopped curry leaves followed by grated garlic and switch of the flame.  Add tsp of salt and keep this butter mixture aside for brushing in between the layers.


Directions:

1. In a bowl whisk the egg with milk, water, sugar, butter and yeast. Set aside
2. In another bowl sift the flour with the salt.
3. Add the liquid ingredients to the dry ingredients and knead until you get a smooth dough.
Note: This recipe requires between 3-1/4 and 3-1/2 cups of flour depending on the weather, humidity and the flour brand. Start with 3-1/4 cups and if you feel that the dough is too soft, add the extra 1/4 cup
4. Place the dough in a bowl you have brushed with some oil and cover it with a wet cloth and leave it in a warm place to double
(If you are tight on time you can heat your oven to 390°F/200°C then turn it off and place your dough in a glass bowl and place it in the warm oven with the wet cloth covering the bowl)
5. Turn the dough out onto a lightly floured surface.
6. Divide the dough into 4 parts
7. Roll each part into a circle at least 20 cm (8 inch) in diameter
8. Brush the first layer with Garlic and curry leaves spread then sprinkle with Spicy curry leaves powder.
9. Place the second layer on the first layer repeat the brushing and sprinkling and then do the same with the third layer.


 10. Top with the fourth layer.
11. Using a knife make cuts that divide the dough circles into 8 triangles.
12. Make cuts that go 2/3 of the way in the middle of each triangle. The cuts should not reach the base of the triangle nor the tip as you can see in the picture.
13. Take the tip of each triangle and insert it into the cut you made and pull it from the underside.
14. Arrange the triangles on your baking sheet.
15. Pinch the two angles at the base of the triangle together.
Note: If you would like to add the little bread coil that you see in the center of the baked bread in the first picture, simply roll a piece of dough into a rope then form it into a little coil and place it in the center where the heads of the triangles meet
16. Brush the dough with milk.
17. Allow to rest for 15 minutes during which you would heat your oven to very hot 500°F/240°C/gas mark 9 (rack in the middle). (Go for the hottest your oven will do).
18. Bake for 5 minutes on very hot 460°F/240°C/gas mark 9, then lower the temperature to moderately hot 390°F/200°C/gas mark 6 and bake for 15-20 more minutes
19. Take it out of the oven and allow to cool for 5 minutes then transfer to a wire rick.


Note:

I made a wrong decision of baking my bread, based on the temperature specified in the recipe.  My oven turned out to be too hot for that temperature.  For my oven the right temperature is to bake at 350 F for about 30 to 40 minutes or until nice golden brown color. Ovens do differ greatly, so the time may differ. What you have to do is to bake it until, the under side is golden brown and the bread is baked all the way to the center. If on the other hand if the top is getting too dark, consider lowering the oven temperature and covering the top of the bread with foil to stop it from over browning  :( :(  But atleast I realized and reduced the temperature to low in the middle of my baking and ended up with delicious mouthwatering bread. Bake this bread the way you bake other breads. 

Read more...


Page copy protected against web site content infringement by Copyscape

Visit Great Cooks Community
All recipes are on Petitchef