Search This Blog

GOBI 65 - A POPULAR CRISPY SNACK !!! STEPWISE DETAILED POST

Chicken 65 is one of the most popular dish in South India.  The vegetarian versions are with Gobi (Cauliflower), Aloo, Mushroom and Paneer are equally popular in almost all restaurants. These are crispy snack made by dipping the main ingredient in the yogurt cornflour batter and adding some spices to make them very very tasty.  This is basically a kind of spicy fritters. Whatever it is Gobi (Cauliflower) 65, Paneer 65, Chicken 65, Aloo 65, Mushroom 65; all 65's are most favorite appetizer from adults to Kids.  This is also one of the requested and wanted recipes from many of my friends.  This is absolutely crispy, tongue tickling appetizer and offcourse appealing to eyes as well.  I think nobody needs much introduction about this anymore.. Without any further delay lets have a Visual treat for this exotic dish.


GOBI 65

Ingredients :

Cauliflower - 1 medium
Thick yogurt/curd - 1 cup
Good quality red food color - less then 1/4 tsp
Garam masala - 2 tsp
Red chilli powder - 3 tsp ( Mine is less spicy chilli powder so please add according to your taste)
Lemon juice - 2 tsp
Garlic - 7 pods
Ginger - 1 inch piece
Cornflour - Approximately you need 350 gm cornflour for the whole cauliflower, 3 to 4 tbsp approximately for each batch of florets.
Salt - 3 tsp approximately
Curry leaves - for garnishing
Chaat masala - To sprinkle at the end
Oil for deep frying


Method :

We really want thick yogurt, if you think the yogurt is loose just tie them in the muslin cloth so the water drips away.
Make a paste out of garlic and ginger. Wash the curry leaves and keep it dry.

Here comes the Step wise detailed instructions...
1.  Cut and clean the cauliflower, drain without any water. Add the curd in the bowl.


2. Add Ginger garlic paste, color and garam masala.


3. Followed by chilli powder, Salt and lime juice.


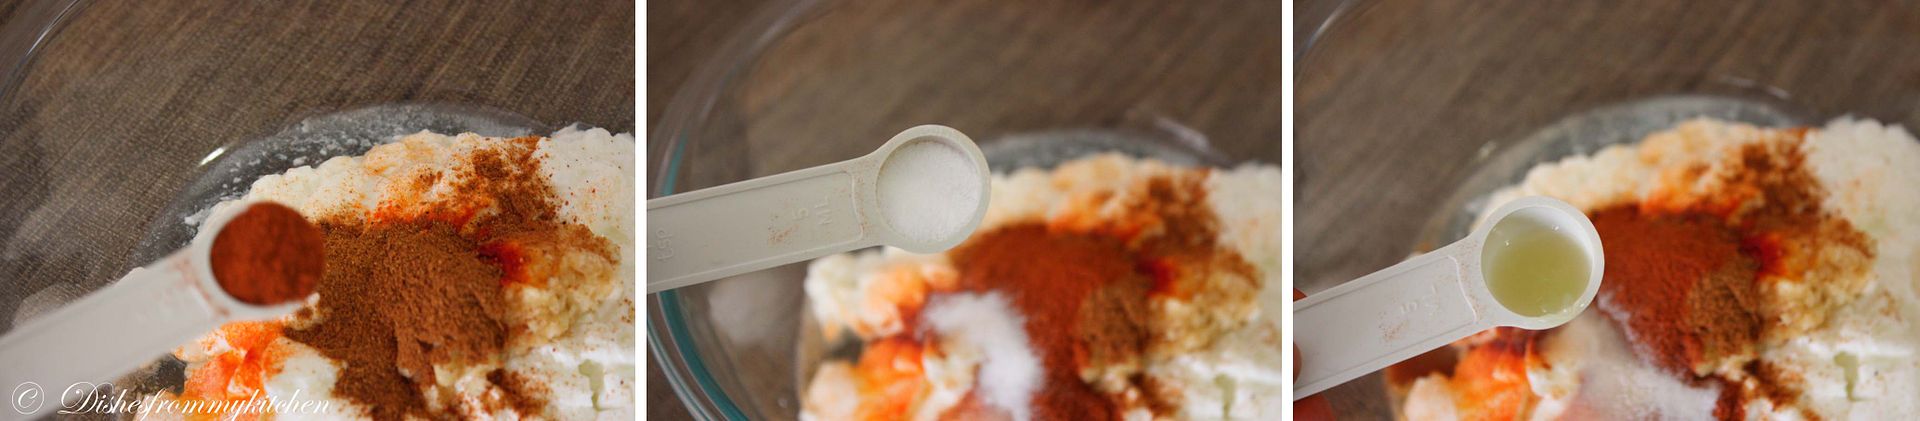
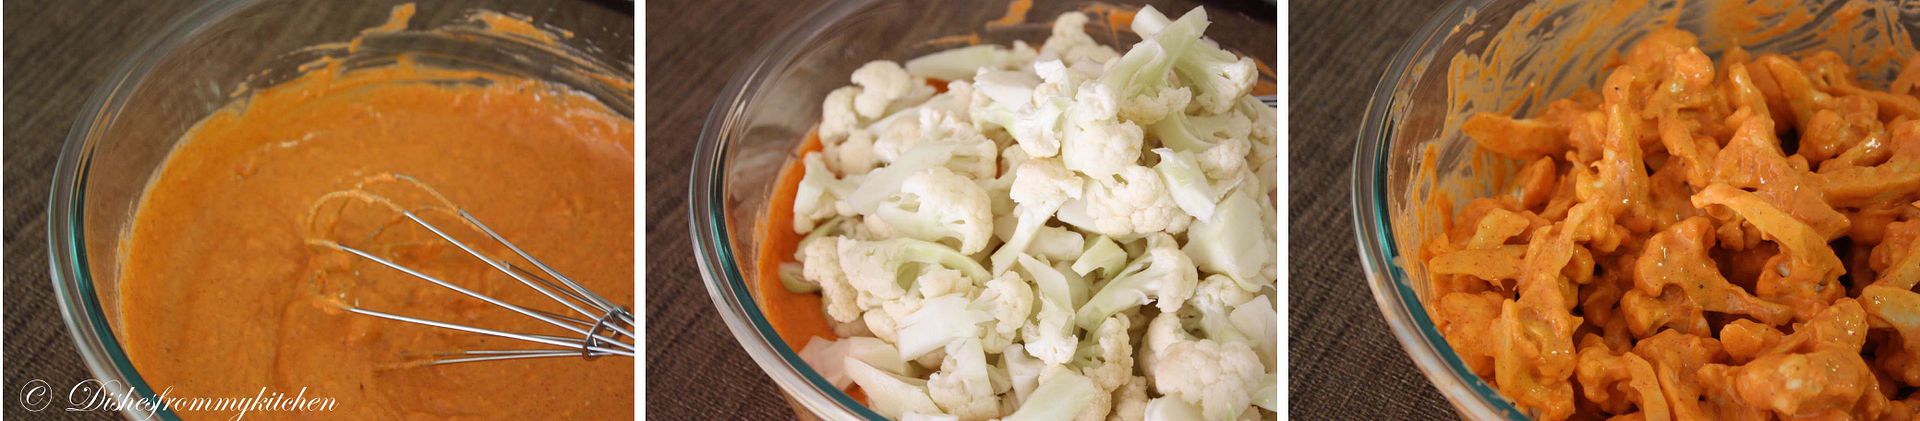
4. Whisk the batter, add the florets, mix well.


5. Check for salt, sourness and spice level in this stage.
6. While this ready.  Parallely heat oil in the deep pan.
7. Now add handful of cauliflower in bowl add 3 tbsp of cornflour mix well.. the whole florets has to be nicely coated with flour.


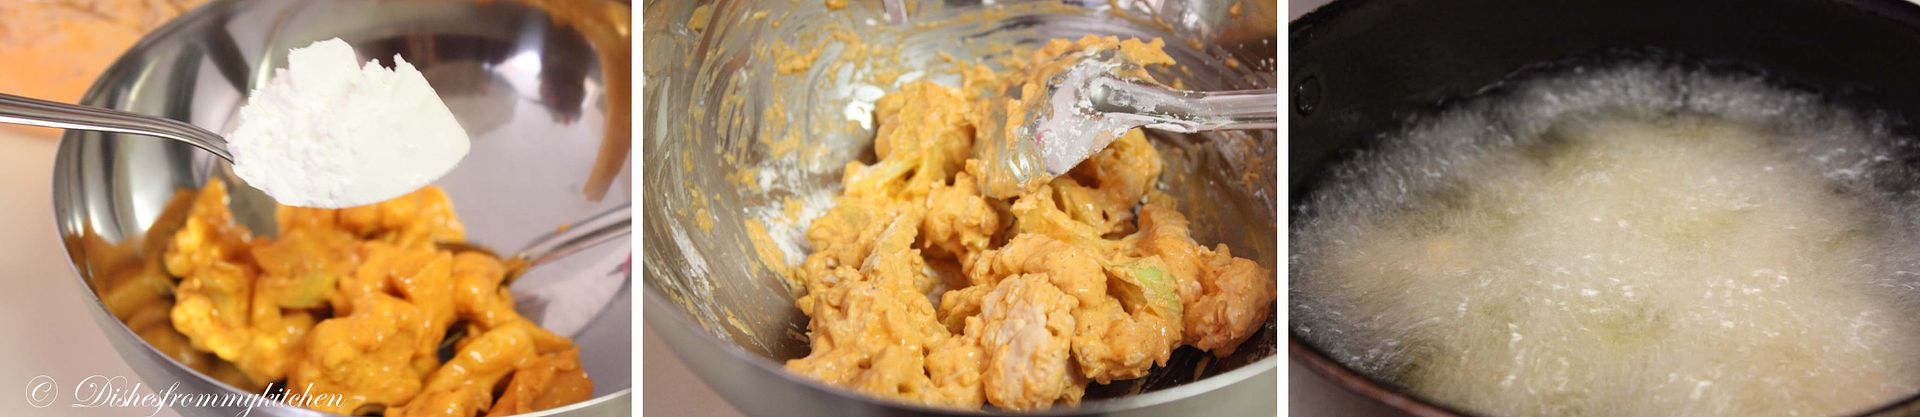
8. Add the florets in the oil ,  just add one by one, you can see the bubbles.   when it starts to disappear at this stage add few curry leaves.


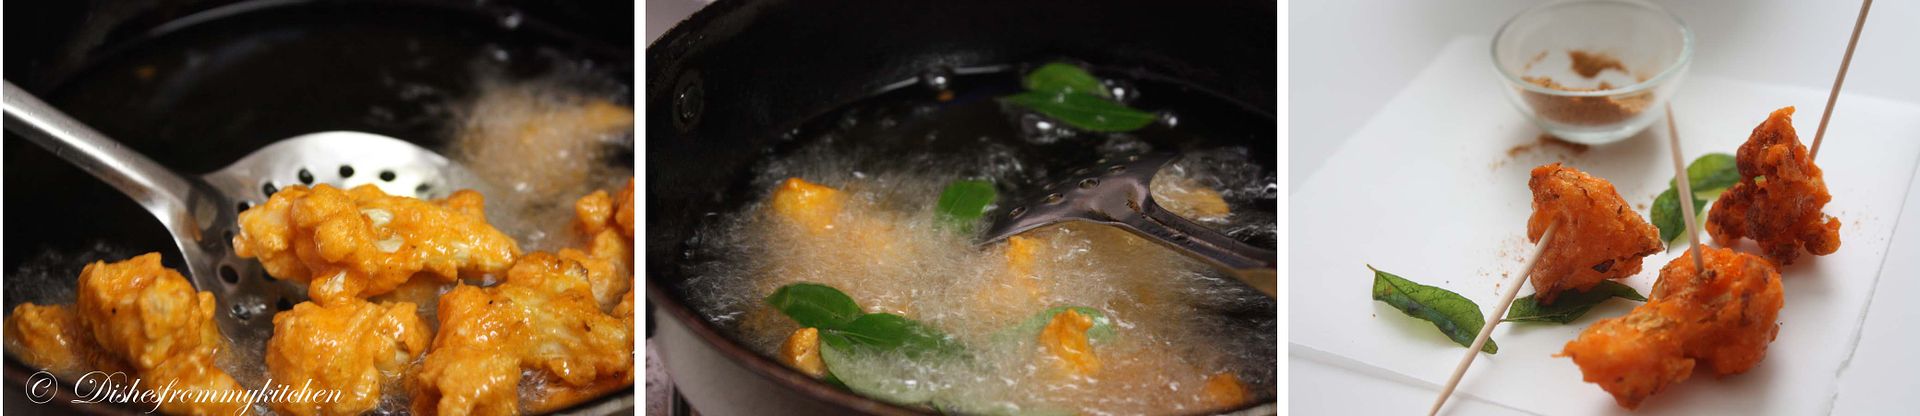
9. Remove from the oil drain them and put it in the kitchen towel.
10. Serve hot sprinkling chaat masala and ketchup.


Note:

1.  When coating the florets with cornflour don't do for whole batch.  Dust them in batches.
2. The cornflour measurement is approximate, add less or more as you need.
3. The sourness , spice level all depends on your taste buds.
4. You can follow this below procedure for mushroom, paneer, Aloo and even with cauliflower . Instead of mixing them with the curd mixture first , make the batter by mixing the curd mixture and cornflour with the pinch of baking soda.  Mix like Bajji batter consistency and dip the mushroom or paneer or Aloo sticks in the batter and Deep fry them in the oil.  I do not prefer this method when making with cauliflower, as Cauliflower in US has so much of water content so I used to dust it with the cornflour to make more crispy.  If you are in India always parboil the cauliflower and aloo dip it in the cornflour ,curd batter and deep fry them.
5. After mixing the cauliflower in the yogurt mixture don't keep them for long time as it leaves water and the whole thing becomes watery.
6.If you want to do this for party, just keep the yogurt mixture ready, mix with florets and flour the next day.
7. The deep fried one will retain its crispiness at least for 1hr, you can also reheat in the preheated oven when needed. 

Read more...

JOCONDE IMPRIME/ENTREMETS - DARING BAKERS JAN 2011 CHALLENGE

The January 2011 Daring Bakers’ challenge was hosted by Astheroshe of the blog accro. She chose to challenge everyone to make a Biscuit Joconde Imprime to wrap around an Entremets dessert.


Very interesting and delicious challenge.  I just wanted to keep very simple design and simple filling,  as this month we are loaded with too many sweets. So I filled with strawberry Bavarian cream  which is our favorite.  Hope you all enjoy my Joconde Entremets.


Ok...What is Joconde imprime/entremets ? - Joconde imprime /entremets. A joconde imprime (French Baking term) is a decorative design baked into a light sponge cake providing an elegant finish to desserts/torts/entremets/ formed in ring molds. A joconde batter is used because it bakes into a moist, flexible cake. The cake batter may be tinted or marbleized for a further decorative effect. 

This Joconde/spongecake requires attentive baking so that it remains flexible to easily conform to the molds. If under baked it will stick to the baking mat. It over baked it will dry out and crack. Once cooled, the sponge may be cut into strips to line any shape ring mold.
Entremets (French baking term)- an ornate dessert with many different layers of cake and pastry creams in a mold, usually served cold. Think Trifle in a mold vs. a glass bowl. 


Joconde Sponge


I just halved this recipe.

YIELD: Two ½ size sheet pans or a 13” x 18” (33 x 46 cm) jelly roll pan


Ingredients:

Almond flour/meal -  ¾ cup *You can also use hazelnut flour, just omit the butter
Confectioners' (icing) sugar - ½ cup plus 2 tablespoons
Cake flour - ¼ cup
Eggs - 3 large
Egg whites - 3 large
White granulated sugar or superfine (caster) sugar - 2½ teaspoons
Unsalted butter, melted - 2 tablespoons


Directions:

   1. In a clean mixing bowl whip the egg whites and white granulated sugar to firm, glossy peeks. Reserve in a separate clean bowl to use later.
   2. Sift almond flour, confectioner’s sugar, cake flour. (This can be done into your dirty egg white bowl)
   3. On medium speed, add the eggs a little at a time. Mix well after each addition. Mix until smooth and light. (If using a stand mixer use blade attachment. If hand held a whisk attachment is fine, or by hand. )
   4. Fold in one third reserved whipped egg whites to almond mixture to lighten the batter. Fold in remaining whipped egg whites. Do not over mix.
   5. Fold in melted butter.
   6. Reserve batter to be used later.


Patterned Joconde-Décor Paste

I just quatered this recipe and made 2 different colors green and Red.

YIELD: Two ½ size sheet pans or a 13” x 18” (33 x 46 cm) jelly roll pan


Ingredients :

Unsalted butter, softened - 4 tablespoons
Confectioners' (icing) sugar - 1½ cups
Egg whites - 7 large
Cake flour - 1¾ cup
Food coloring gel, paste or liquid

COCOA Décor Paste Variation: Reduce cake flour to 6 oz / 170g. Add 2 oz/ 60 g cocoa powder. Sift the flour and cocoa powder together before adding to creamed mixture.


Directions:

   1. Cream butter and sugar until light and fluffy (use stand mixer with blade, hand held mixer, or by hand)
   2. Gradually add egg whites. Beat continuously.
   3. Fold in sifted flour.
   4. Tint batter with coloring to desired color, if not making cocoa variation.


Preparing the Joconde- How to make the pattern:
 
   1. Spread a thin even layer of décor paste approximately 1/4 inch (5 millimeter) thick onto silicone baking mat with a spatula, or flat knife. Place mat on an upside down baking sheet. The upside down sheet makes spreading easier with no lip from the pan.
   2. Pattern the décor paste – Here is where you can be creative. Make horizontal /vertical lines (you can use a knife, spatula, cake/pastry comb). Squiggles with your fingers, zig zags, wood grains. Be creative whatever you have at home to make a design can be used. OR use a piping bag. Pipe letters, or polka dots, or a piped design. If you do not have a piping bag. Fill a ziplock bag and snip off corner for a homemade version of one.
   3. Slide the baking sheet with paste into the freezer. Freeze hard. Approx 15 minutes.
   4. Remove from freezer. Quickly pour the Joconde batter over the design. Spread evenly to completely cover the pattern of the Décor paste.
   5. Bake at 475ºF /250ºC until the joconde bounces back when slightly pressed, approx. 15 minutes. You can bake it as is on the upside down pan. Yes, it is a very quick bake, so watch carefully.
   6. Cool. Do not leave too long, or you will have difficulty removing it from mat.
   7. Flip cooled cake on to a powdered sugared parchment paper. Remove silpat. Cake should be right side up, and pattern showing! (The powdered sugar helps the cake from sticking when cutting.)

Preparing the MOLD for entremets:

You can use any type of mold.

   1. Start with a large piece of parchment paper laid on a very flat baking sheet. Then a large piece of cling wrap over the parchment paper. Place a spring form pan ring, with the base removed, over the cling wrap and pull the cling wrap tightly up on the outside of the mold. Line the inside of the ring with a curled piece of parchment paper overlapping top edge by ½ inch. CUT the parchment paper to the TOP OF THE MOLD. It will be easier to smooth the top of the cake.
   2. A biscuit cutter/ cookie cutter- using cling wrap pulled tightly as the base and the cling covering the outside of the mold, placed on a parchment lined very flat baking sheet. Line the inside with a curled piece of parchment paper overlapping.
   3. Cut PVC pipe from your local hardware store. Very cheap! These can be cut into any height you wish to make a mold. 2 to 3 inches is good. My store will cut them for me, ask an employee at your store. You can get several for matching individual desserts. Cling wrap and parchment line, as outlined above.
   4. Glass Trifle bowl. You will not have a free standing dessert, but you will have a nice pattern to see your joconde for this layered dessert.


Preparing the Jaconde for Molding:

   1. Trim the cake of any dark crispy edges. You should have a nice rectangle shape.
   2. Decide how thick you want your “Joconde wrapper”. Traditionally, it is ½ the height of your mold. This is done so more layers of the plated dessert can be shown. However, you can make it the full height.
   3. Once your height is measured, then you can cut the cake into equal strips, of height and length. (Use a very sharp paring knife and ruler.)
   4. Make sure your strips are cut cleanly and ends are cut perfectly straight. Press the cake strips inside of the mold, decorative side facing out. Once wrapped inside the mold, overlap your ends slightly. You want your Joconde to fit very tightly pressed up to the sides of the mold. Then gently push and press the ends to meet together to make a seamless cake. The cake is very flexible so you can push it into place. You can use more than one piece to “wrap “your mold, if one cut piece is not long enough.
5. The mold is done, and ready to fill.

*Note: If not ready to use. Lay cake kept whole or already cut into strips, on a flat surface, wrap in parchment and several layers of cling wrap and freeze.

Entremet- Filling Options:

It is nice to have a completed dessert so you can unmold and see the Joconde working. Fill with anything you desire. Layers of different flavors and textures! However, it needs to be something cold that will not fall apart when unmolded.


Suggestions For Filling :

Mousses, pastry creams, Bavarian creams, cheesecakes, puddings, curds, jams, cookie bases, more cake (bake off the remaining sponge and cut to layer inside), nuts, Dacquoise, fresh fruit, chocolates, gelee.

Read more...

VEGETABLE NOODLES !!! STEPWISE DETAILED POST

Hope everyone had wonderful weekend !!! Vegetable Noodles almost every one's favorite which I am posting today is little different from other posts. Yes I am posting it with stepwise pictures.  I am not much interested in posting step pictures, it does not mean that I don't like it ..I love to do so.  Sure it will be helpful for others.  But more than that I love to play with food styling and photography.  So if I want to concentrate in both step pictures and styling it is surely time consuming process.  Since some friends requested for step pictures for few dishes.   I am going post stepwise only for those dishes.  Ok coming to the recipe I always use ching's Noodles particularly for making vegetable noodles and chopsuey.  Always my fridge will be filled with few ching's sauces like Dark soy, chilli vinegar, Green chilli sauce. This Noodles and sauces are my very very favorite one  and I am using this for so many years and always keep them in stock :)


The most important thing while making this noodles is the vegetable should be Julienned evenly it should not be so thin or so thick.  Sauteing the vegetable plays important role..Don't over fry it.  It should be crisp and the color should not be changed in the end product. Adding Ajinomoto is absolutely optional.  It enhances the taste as well as maintain the color of the veggies.  But I did not add.  Here comes the recipe...

VEGETABLE NOODLES

Ingredients :

Noodles - 1 packet (Egg/Vegetarian)
Water - 6 to 7 cups


Vegetables :

Carrot - 1 big Julienned
Beans - 10 Julienned
Cabbage - 1/2 cup Julienned
Capsicum - 1 medium size Julienned
Celery - 1 stalk Julienned ( absolutely optional but this gives wonderful flavor and aroma)
White onion - 1/2 sliced
Spring onion - 2 stalk sliced


Sauce and spices :

Dark soy sauce- 1 to 2 tsp
Green chilli sauce - 1/2 tsp (If u don't have green chilli sauce increase the amount of pepper powder)
Vinegar - 1/2 tsp

Ajinamoto - 1/4 tsp ( optional)
White pepper powder - 1/2 tsp
Black pepper powder- 1/4 tsp
Salt - as needed
Garlic  - 1 tbsp ( very finely chopped)

Ginger - 1 tbsp (very finely chopped)
Oil - 3 to 4 tbsp

Garnish using
spring onion .


Method :

1.  Cook the noodles in the big pot of boiling water by adding tsp of salt and tsp of oil.
2. Check a noodle by pinching .  If it is hard let it cook for few more minutes.  This will take atleast 6 minutes.
3. Now pour this in the colander.  Show this in the running tap water to remove all the starch. So that they will not stick with each other.


4.  While doing this parallely heat oil in the wok.
5. Add the crushed garlic and follow adding veggies in this way.

6. First add beans, saute for 2 seconds, followed with carrot and onion saute for few seconds.  Keep the flame in high till you finish everything.


7. Now add celery, saute for a second, followed by Capsicum and Cabbage give a nice toss.  If you want to add Ajinomoto add in this stage.


8. Add the cooked noodles, Soy sauce, Vinegar.


9. Add Green chilli sauce, salt and 2 pepper powders.


10.  Now toss it in high flame until everything mixed well and  really hot.
12. Switch off the flame and garnish with the spring onion. 

Serve piping hot  with Green chilli sauce or pickled Green chillies.

Note:

1. Always keep the flame in high from start to end.  Once everything is ready it just takes 5 to 6 minutes for the whole process. So keep an eye in the wok as we are doing the whole thing in high flame.

2. You can always increase the sauce and pepper powder to your taste and spice level. 


Enjoy tasty and delicious hot hot Noodles !!!

Read more...

CULANTRO TOMATILLO SALSA VERDE

First of all my hearty thanks to everyone who wished /Blessed my son on his Birthday.  We had wonderful day !!!  Ok coming to the post I am posting " Culantro Tomatillo Salsa Verde "  Freshness of herb, spiciness and tanginess sure this would be a perfect dip for all kinds of chips, topping for tostadas, Enchilada etc.  Tomatillo verde is one of the dip we like so much.  So I combined this Culantro with tomatillo verde which tasted so fresh and awesome.  But before using this for making Salsa Verde I was using culantro for making chutney which is so yummy and we love it.  I will post that soon. Culantro and cilantro are different.  Here is the brief about culantro and Tomatillo.  Hope you all enjoy reading and offcourse my virtual treat :)


Brief about Culantro :

The appearance of culantro and cilantro are different but the leaf aromas are similar, although culantro is more pungent. Because of this aroma similarity the leaves are used interchangeably in many food preparations and is the major reason for the misnaming of one herb for the other.In Latin America, culantro is mostly associated with the cooking style of Puerto Rico, where recipes common to all Latin countries are enhanced with culantro. The most popular and ubiquitous example is salsa, a spicy sauce prepared from tomatoes, garlic, onion, lemon juice, with liberal amounts of chiles. These constituents are fried and simmered together, mixed to a smooth paste and spiced with fresh herbs including culantro. 


Salsa is usually consumed with tortilla chips as an appetizer. Equally popular is sofrito or recaito, the name given to the mixture of seasonings containing culantro and widely used in rice, stews, and soups.  Culantro is reported to be rich in calcium, iron, carotene, and riboflavin. The plant is used in traditional medicines for fevers and chills, vomiting, diarrhea, and in Jamaica for colds and convulsions in children . The leaves and roots are boiled and the water drunk for pneumonia, flu, diabetes, constipation, and malaria fever. The root can be eaten raw for scorpion stings and in India the root is reportedly used to alleviate stomach pains. The leaves themselves can be eaten in the form of a chutney as an appetite stimulant.

Brief about Tomatillo :

The tomatillo is a plant of the tomato family, related to the cape gooseberry, bearing small, spherical and green or green-purple fruit of the same name. Tomatillos, referred to as green tomato (Spanish: tomate verde) in Mexico, are a staple in Mexican cuisine.
In many areas of Mexico the domesticated tomatillo is called tomate and the wild version called miltomate and what we know as tomato is called jitomate.

The tomatillo fruit is surrounded by a paper-like husk formed from the calyx. As the fruit matures, it fills the husk and can split it open by harvest. The husk turns brown, and the fruit can be any of a number of colors when ripe, including yellow, red, green, or even purple. Tomatillos are the key ingredient in fresh and cooked Latin American green sauces. The freshness and greenness of the husk are quality criteria. Fruit should be firm and bright green, as the green colour and tart flavour are the main culinary contributions of the fruit.


CULANTRO TOMATILLO SALSA VERDE
 
Ingredients :

Tomatillo - 6 to 7 (Remove the husk and wash thoroughly)
Culantro - 15 sprigs
Cilantro - 1 handful
Garlic - 2 pod
Onion - 1 1/2 tbsp
Jalapeno - 2 ( But if you want less spicy then reduce to 1 or 1 1/2)
Salt - as needed
Sugar - 1/2 tbsp (this is to balance the tanginess of the tomatillo, u can also reduce this if u want)


Method :

1.  Quarter the tomatillo and broil it in the oven till the skin is lightly browned and tomatillo is soft. ( it just takes around 15 to 20 minutes)
2. Cool it.
3. Now blend other ingredients to coarse paste.
4. To that add the cooled tomatillo and use pulser to blend to coarse and chunky paste.  Add water if necessary.
5.  Check for salt.  And transfer it in the airtight container.
6.  You can keep this in fridge for upto 10 days.


Dip for chip is ready !!! Enjoy the freshness !!!

Read more...


Page copy protected against web site content infringement by Copyscape

Visit Great Cooks Community
All recipes are on Petitchef