Search This Blog

PUMPKIN MUFFIN WITH STREUSEL TOPPING - HAPPY HALLOWEEN !!!

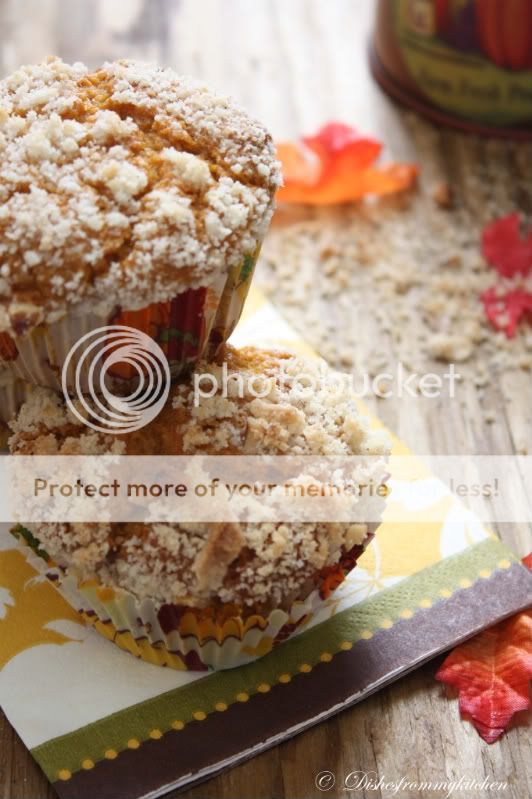
Halloween (or Hallowe’en ... but also known as Samhain, Summer’s End, All Hallow’s Eve, Witches Night, Lamswool, and Snap-Apple), is a holiday that's celebrated annually on the night of October 31.  It's celebrated in a variety of ways and activities including trick-or-treating, ghost tours, bonfires, costume parties, "haunted house" tours, carving pumpkins (Jack-o'-lanterns) and reading / watching scary stories / movies.  Here the children enjoy so much wearing the Halloween costumes, trick-or-treating.  So I thought this would be the right time to post my pumpkin muffins as a Halloween treat, as well as for this wonderful fall season.  By seeing pumpkin everywhere I am so much tempted to bake pumpkin muffin.  Pumpkin muffins with cream cheese topping or with streusel topping are so so delicious and you will not stop eating with just one.  So here is soft, moist and yummilicious pumpkin muffins with crunchy streusel topping. 


Happy Halloween !!!

Pumpkin Muffin


Ingredients :

Yields - 12 to 13 normal size muffins.

Pumpkin puree - 1 can (15oz)
Vanilla Essence - 1/2 tbsp
All purpose Flour - 1 1/2 Cups
Baking Powder - 1 tsp
Baking Soda - 1/2 tsp
Vegetable oil - 1/3 Cup
Eggs - 2 large
Brown sugar - 1/2 cup + 1 tbsp
White sugar - 1/2 cup + 1 tbsp
Cinnamon - 3/4 tsp
Nutmeg - a pinch
Salt - 2 pinch


Streusel Topping :


All-purpose flour - 1/4 cup
Sugar - 2 1/2 tbsp
Walnut or Pecans - Just handful of chopped finely
Uunsalted butter in room temperature  -  1 1/2 tablespoons
Cinnamon - 1/4 tsp


 Method :


1.Mix Softened butter and sugar well.
2.Now add all other ingredients and mix well.  But don't over mix it.
3.It should have the texture of bread crumbs.
4.Keep aside.


Method for Pumpkin Muffin :


1. Whisk egg, sugar, Vegetable oil in a bowl.
2. Sieve all the dry ingredients.
3. Now gradually add all the dry ingredients to wet ingredient. Mix until everything is well combined.
4. Divide the batter in the lined muffin pans equally.  (2/3 full in each Muffin cups)
5. Sprinkle the streusel mixture above the scoped batter.
6. Bake at 350 degrees for 25-30 minutes or until the streusel topping is slightly browned.  You can also check by inserting toothpick.


Note :

1. I love to have this warm.. It tastes so so good as soon as out of the oven.  Very moist and fluffy inside and crunchy on the top.
2. You can store it and have warm when needed.

Read more...

DONUTS OR DOUGHNUTS ??? - DARING BAKERS OCT ' 2010

Donuts or Doughnuts you can spell either way. Whatever it may be we all love this right !!! .  This is my second attempt of making doughnuts at home.  The first attempt was different recipe.  And that was old fashioned buttermilk doughnuts.  So this time I wanted to make Yeast donuts which we love so so much. This recipe is a keeper I must say, I just changed the measurement of sugar and flour from the original recipe remaining other things are same.  Hope you all enjoy this visual treat and let's all go nuts for Donuts. And now your kitchen starts smelling Yummy !!!

The October 2010 Daring Bakers challenge was hosted by Lori of Butter Me Up. Lori chose to challenge DBers to make doughnuts. She used several sources for her recipes including Alton Brown, Nancy Silverton, Kate Neumann and Epicurious.


I choosed Alton Brown's Yeast doughnut recipe. Here it goes...


Yeast Doughnuts

Preparation time:
Hands on prep time - 25 minutes
Rising time - 1.5 hours total
Cooking time - 12 minutes

Yields: 20 to 25 doughnuts of big size and extra 10 if it is small size + Doughnut holes
This is my corrected measurement so everytime I am going to follow this.


Ingredients:

All Purpose Flour - 4 3/4 cups ( Original was 4 2/3 cups)
Milk - 1.5 cup
Vegetable Shortening - 1/3 cup (can substitute butter, margarine)
Active Dry Yeast - 4.5 teaspoon (2 pkgs.)
Warm Water - 1/3 cup
Eggs - 2 Large(Beaten)
White Granulated Sugar -  1/2 cup( Original was 1/4 cup)
Table Salt - 1 tsp
Nutmeg - 1 tsp grated(optional I didn't use this)
Canola Oil - for Deep Frying


Directions:

1. Place the milk in a medium saucepan and heat over medium heat just until warm enough to melt the shortening. (Make sure the shortening is melted so that it incorporates well into the batter.)
2. Place the shortening in a bowl and pour warmed milk over. Set aside.
3. In a small bowl, sprinkle the yeast over the warm water and let dissolve for 5 minutes. It should get foamy. After 5 minutes, pour the yeast mixture into the large bowl of a stand mixer and add the milk and shortening mixture, first making sure the milk and shortening mixture has cooled to lukewarm.
4. Add the eggs, sugar, salt, nutmeg, and half of the flour. Using the paddle attachment of your mixer (if you have one), combine the ingredients on low speed until flour is incorporated and then turn the speed up to medium and beat until well combined.
5. Add the remaining flour, combining on low speed at first, and then increase the speed to medium and beat well.
6. Change to the dough hook attachment of the mixer and beat on medium speed until the dough pulls away from the bowl and becomes smooth, approximately 3 to 4 minutes (for me this only took about two minutes). If you do not have a dough hook/stand mixer – knead until the dough is smooth and not sticky.
7. Transfer to a well-oiled bowl, cover, and let rise for 1 hour or until doubled in size.
8. On a well-floured surface, roll out dough to 3/8-inch (9 mm)thick. (Make sure the surface really is well-floured otherwise your doughnuts will stick to the counter).
9. Cut out dough using a 2 1/2-inch (65 mm) doughnut cutter or pastry ring or drinking glass and using a 7/8-inch (22 mm) ring for the center whole. Set on floured baking sheet, cover lightly with a tea towel, and let rise for 30 minutes.
10. Preheat the oil in a deep fryer or Dutch oven to 365 °F/185°C.
11. Gently place the doughnuts into the oil, 3 to 4 at a time. Cook for 1 minute per side or until golden brown (my doughnuts only took about 30 seconds on each side at this temperature).
12. Transfer to a cooling rack placed in baking pan. Allow to cool for 15 to 20 minutes prior to glazing, if desired.


Chocolate Glaze

This measurement of glaze can be used approximately for 30 small size donuts

Ingredients :

Unsalted butter - 1/4 cup
Whole milk, warmed - 1/3 cup
Light corn syrup - 1/2 tbsp
Vanilla extract - 1 teaspoons
Bittersweet chocolate - 1/4 cup
Confectioners' sugar, sifted -  1 cup

Directions:

Combine butter, milk, corn syrup, and vanilla in medium saucepan and heat over medium heat until butter is melted. Decrease the heat to low, add the chocolate, and whisk until melted. Turn off heat, add the powdered sugar, and whisk until smooth. Place the mixture over a bowl of warm water and dip the doughnuts immediately. Allow glaze to set for 30 minutes before serving.


Vanilla Sugar Glaze

Ingredients:

Whole milk - 1/4 cup
Vanilla extract - 1 tsp
Confectioners' sugar - 2 cup

Directions :

Combine milk and vanilla in a medium saucepan and heat over low heat until warm. Sift confectioners' sugar into milk mixture. Whisk slowly, until well combined. Remove the glaze from the heat and set over a bowl of warm water. Dip doughnuts into the glaze, 1 at a time, and set on a draining rack placed in a half sheet pan for 5 minutes before serving.


 Note:

1.  The dough your are mixing will be very very sticky but don't panic when you keep for rising the flour absorbes more moisture and you get the correct consistency when dusting with flour while rolling.


Read more...

RAW MANGO RICE / MAANGAI SADHAM / MAMIDIKAYA ANNAM


Hope everyone had wonderful Dassara celebration.   The recipe which I am posting today is truly tongue tickling one; yes it is Raw Mango rice, Maangai sadham or Mamidikaya Annam.   I know there are so many Mango and Raw Mango lovers out there; if you are one then surely you gonna like this too.  We make 2 versions of Mango rice.  One is just season; add grated mango and then by adding cooked rice.  This is another version which my mom and grand mom used to do, it tastes so so delicious. The Mango gojju can be prepared ahead of time and it can be stored in fridge for at least 20 days.  The gojju can be used by mixing it with cooked rice whenever needed.  The most important thing in this preparation is the quality of raw Mango.  The raw mango has to be really sour, so it purely depends on the Mango taste.  If the raw Mango has wonderful aroma and sourness then you can go ahead and try this.....


RAW MANGO RICE /  MAANGAI SADHAM / MAAMIDIKAYA ANNAM

MANGO GOJJU


INGREDIENTS:


Raw Mango - 2 peel the skin and cut to big cubes
Cummin seeds - 2 tsp
Red chillies - 12
Asafoetida - 1/2 tsp
Turmeric - 1/2 tsp
Jaggery - 3 tbsp ( Adjust this according to your taste or sourness of Mango)
Gingelly oil - 1/4 cup
Mustard - 1 tsp
Urad dhal - 2 tsp
Bengal gram dhal - 2 tsp
Curry leaves - few
Coriander for garnishing
Cooked rice - 1 cup
Salt as needed


Accompaniment -  Any vadagams, Potato chips or any sundal


Method :


1. First powder the cummin seeds with redchillies along with turmeric and asafoetida.
2. Now add the Mango pieces and grind it to very fine coarse paste adding little salt and water as needed. ( The paste to be little loose)
3. Now heat the gingelly oil in the deep pan.
4. Add mustard once it splutters, add the dhals and curry leaves. 
5. Once the dhals are slight brown in color add the ground paste, put of the flame in medium.
6. Mix everything well and when it starts boiling close with the lid 3/4th otherwise your whole space going to be messy.
7. When the moisture is little absorbed add the jaggery and required salt.  Mix everything well.
8. Now the mixture oozes out oil . At this stage put of the flame and remove from heat.
9. Once it is cooled store in clean bottle and put it in the fridge.


 FOR MIXING RICE

METHOD :


1.  Take the cooked rice in the broad vessel, add the gojju as needed( this depends how spicy or taste you want), add salt , little gingelly oil and salt for rice.
2. Mix everything well. Once everything is well blended garnish with coriander leaves.
3. Tongue tickling Mango rice is ready to serve with vadams or chips.


Note:


1.  You can add the boiled black channa( boil it with little salt).  Mix it with rice. It makes so tasty as well as healthy.

Read more...

BORLOTTI BEAN / CRANBERRY BEAN SUNDAL WITH A SIMPLE MEAL

Borlotti bean which is also called as Cranberry bean  is delicious cooked in soups, stews, Salads, Sundal, Kurma. A firm texture and sweet, nut-like flavor makes this bean a favorite. In US you may find Borlotti/Cranberry beans under a different name depending upon where you live. In India it is also called as Butter Beans, I know here the butter beans are different so somehow, the vegetable names vary from place to place.  


The sundal with this beans particularly this masala  tastes so so delicious and is our favourite too.. A Bean sundal, Paruppu keerai( Greens with dhal), Rasam and Curd.. mmmmmm..... A delicious and very comforting meal.  Here goes the visual treat....


BORLOTTI BEAN SUNDAL

Ingredients:


Borlotti Bean - 2 cups
Onion - 1 chopped finely( Shallots tastes so good)
Tomato - 1 medium sized
Curry leaves - few
Asafoetida - 1/4 tsp
Mustard - 1/4 tsp
Urad dhal - 1/2 tsp
Turmeric - little
Lemon juice - 1/4 tsp ( just for taste)
Coriander - chopped finely for garnishing( more would taste better)
Oil and salt accordingly

For Masala Paste:
Green Chilli - 4 or 5 increase if you need more spicy
Saunf - 1/2 tsp
Ginger - 1 1/2 inch

Grind the above to coarse paste.


Method :
1. Once the beans are removed from the shell, wash it and pressure cook by adding 1/4 water and salt for 4 whistles.( No of whistles depends on your cooker).
2. Now heat oil in the pan, add mustard.  Once it is spluttered, add Urad dhal.
3.Once it is light brown add the onion,  the masala paste, curry leaves, Asafoetida, followed by tomato and Turmeric.
4.After the tomato is cooked well other other ingredients, add the cooked bean.
5. Mix well so that everything has to blended well, add salt and lemon juice.  Mix it well.
6. Switch of the flame and add the coriander leaves.


Note :

You can substitute this bean with any other bean or channa(Black or white) according to your choice. But cooking the Bean or Channa in pressure cooker depends accordingly. 

PARUPPU KEERAI
Ingredients :


I used Amaranth - 2 cups
Toor dhal - 1 handful( pressure cooked with little turmeric)
Mustard - 1/4 tsp
Urad dhal - 1/2 tsp
Red chilli - 5 broken
Coconut - 1 tbsp
Oil and salt


Method :
1. Throughly wash the greens, drain and chop it.
2. Heat the oil in the pan, add mustard and urad dhal.
3. Now add the red chillies.
4. Add the chopped greens sprinkle little water , close with the lid only 3/4th otherwise the color changes.
5. Once the greens is cooked add the cooked dhal, salt and coconut, mix well.
6. Put off the flame, here you for healthy Greens for Your comforting meal!!!
 
Note :
 
You can substitute amaranth with spinach or any Indian greens.

DHAL RASAM(PARUPPU RASAM)

Ingredients :
 
Toor dhal - 1/4 cup cooked with little turmeric
Tamarind pulp - 1 1/2 tbsp ( adjust according to your taste)
Rasam Powder - 1 tbsp
Chilli powder - 1/4 tsp ( my rasam powder has no chilli powder in it so I add seperately)
Tomato - 1 small
Curry leaves - few
Cummin - 1/4 tsp
Mustard - 1/4 tsp
Garlic - 1 crushed
Pepper powder - 2 pinches
Asafoetida - little
Coriander leaves - for garnishing( You can add the stalks of coriander in hot rasam to get nice aroma)
Salt and oil for seasoning


Method :
1. Dilute the cooked dhal with 1 1/2 cup of water.
2. Add the tamarind pulp, tomato, rasam powder, chilli powder, add salt.
3. Let it boil for few minutes and you can see the quantity of rasam is little reduced and the foam is cleared little bit.
4.At this time in a pan heat oil, add mustard, cummin followed by crushed garlic, Asafoetida, curry leaves and pepper powder.
5. Once the garlic is slight brown color add this to the rasam and close with the lid immediately.
6. Now add the coriander leaves that is chopped and some coriander stalks.  This also give nice taste, aroma to the rasam.

Note:

1.  The sourness and spiciness can be adjusted according to your taste.

Hope you all enjoy my simple comforting meal.  Have wonderful Weekend !!!!


Read more...

VEGETARIAN CHILI

It was wonderful weekend but I did not cook much, I am still in the process of screwing and fixing things in our new Place.  So I thought of posting  yummy and flavorful dish which was lying in my draft for so long.  " Vegetarian Chili " which has wonderful flavor that runs around in a single pot.  There are several ways you can have this  chili, please scroll down to know more about the serving suggestions.  Before we go for the recipe and virtual treat.  Here is a brief about Vegetarian Chili.

Chili con carne (literally "Chili with meat", often known simply as chili) is a spicy stew. The name "chili con carne" is taken from Spanish, and means "peppers with meat." Traditional versions are made, minimally, from chili peppers, garlic, onions, and cumin, along with chopped or ground beef. Beans and tomatoes are frequently included.  But since we are Vegetarian here is the Veggie version which is called as Vegetarian chili (also known as chili sin carne, chili without meat, or chili).  To make the chili vegetarian, the cook leaves out the meat or replaces it with a meat analogue, such as textured vegetable protein or tofu, or a complementary vegetable, such as potatoes. These chili's nearly always include beans. Variants may contain corn, squash, mushrooms, potatoes etc.. We have to say this is completely one pot meal rich in protein and very flavorful.  This tastes so so good the next day too.  Here goes the recipe and the virtual treat.........


VEGETARIAN CHILI

Ingredients :

 
Meatless ground - 1 packet ( This is nothing but the soy granules which is cooked already)
If you don't have this just soak 1 1/2 cup of soy granules in hot water for few minutes then drain and squeeze out the excess water, now its ready for making the dish.
Tomato diced - 1 can
Beans of your choice - 1 cup ( I added 1/2 cup of black bean and 1/2 cup of pinto bean)
Peppers diced - 1 cup ( Green, Yellow and Red)
Corn Nibblets - 1/2 cup
Zucchini - 1/2 cup diced
Mushroom - 1/2 chopped finely( Crimini mushroom works great for this)
Onion - 1/4 cup finely chopped
Garlic - 3 flakes very finely chopped
Chilli powder - 1 tbsp (According to your spice level)
Paprika - 1/2 tbsp
Cummin Powder - 1/4 tbsp
Vegetable stock - 1/2 cup( optional)
Mixed Italian dried herbs - 1 tsp crushed
Bay leaf - 1
Canola or Olive oil  as required
Cilantro for garnishing
Sour cream or Mexican cheese - As required for serving


Method :
 
1. Heat oil in the deep pan.  Add the bay leaf, followed by crushed garlic and chopped onion.
2. Saute and then add the Squash, Mushroom and Peppers, drained and squeezed soy granules or the readily cooked meatless ground.
3. Just saute for a while and then add corn and beans.  Now add the seasonings cummin, Chilli powder, Paprika, Herbs seasoning.
4. Add the Tomato diced in the can followed by the vegetable stock and  1 glass of water.
5.Now in this stage the consistency will be lose, simmer the flame and this has to sit for at least half an hour.
6.This simmering is very very important, the flavors are nicely absorbed or incorporated in the soy protein, veggies and the bean.
7. Once the water and stock are absorbed but not full.  The consistency has to be semi solid.
8.Put of the flame, serve in the bowl with a dollop of sour cream or cheese with fresh cilantro.
  
Serving suggestion :

1. You can serve this hot chili in bowl with sour cream and cilantro.  Along with Tortilla chips and Guacamole.
2. You can use this for filling the Tacos.
3. Filling for hot dog buns, slit the bun add some chilli and cheese broil until the cheese melts.
4. Use as filling for sandwich.
5. Topping for Pizza and top it with cheese and bake until cheese melts.


VEGETARIAN CHILI WITH TACOS


Ingredients :


Tacos shells
Vegetarian chili
Lettuce
Peppers julienned
Cilantro
Sour cream
Olive (optional)
Guacamole

Mexican cheese or your choice


Method :

Warm the tacos in the oven, add the chili followed by other ingredients and enjoy !!!


GUACAMOLE

This is other version II.  Here is another version of GUACAMOLE in my mexican feast.


Ingredients :

Avocado - 1 mashed
Jalapeno - 1/2 chopped very finely
Lemon juice - 1/4 tbsp
Garlic - 1/2 crushed finely
Cilantro - 2 tbsp chopped finely
Salt

Method :

Mix all the above ingredients and serve as dip or filling.


Read more...

MOLTEN LAVA CAKE

This month sweet punch was Molten Lava cake.  When I saw this challenge I was so happy cos this is wonderful and irresistible cake for the chocoholic person.  If you are so then don't wait.... more than I say how delicious and say blah blah ....and bore you just scroll to the last picture and understand how it tastes.  It tastes so divine when you serve warm and here you go for the recipe....


Molten Lava Cake


Ingredients:

Semi-Sweet Baking Chocolate – 4 oz (113g)
Butter – 4 oz (113g)
Eggs – 2
Sugar – 1/3 cup (75 g)
All-purpose Flour – 1/4 cup (40g)
Butter – for greasing ramekins


Secret ingredient that goes in the middle of the batter :

Raspberries - 2 for each ramkin (optional)
Chocolate chip - 1/2 tbsp of each ramkin(this is a must)

Mix both the berries and chocolate and keep it aside.


Method:

1. In a double boiler, melt chocolate.
2. In a medium mixing bowl, beat Eggs and Sugar until light and fluffy.
3. Once chocolate is melted, remove pan from heat and add in butter. Mix until the butter melts fully.
4. Add chocolate/butter mixture into the eggs, add all-purpose flour and mix until well incorporated.
5. Butter bottom and sides of ramekins (small glass/porcelain bowls) and pour in mixture about 3/4 way full.

6. Now in the middle of the cake batter spoon raspberry and chocolate mixure and using the skewer push it inside  OR you can also do this way,  Pour little batter in the ramkin, spoon the berry and chocolate mixture in the middle and pour the remaining batter on the top.
6. Place ramekins on a baking tray and bake at 350 degrees Fahrenheit (180 C) for 10 – 15 minutes. 

 7. Serve hot with vanilla ice cream.


Read more...


Page copy protected against web site content infringement by Copyscape

Visit Great Cooks Community
All recipes are on Petitchef