Search This Blog

DARING BAKERS - JUNE 2010 ( CHOCOLATE PAVLOVA WITH CHOCOLATE MASCARPONE MOUSSE)


The June 2010 Daring Bakers’ challenge was hosted by Dawn of Doable and Delicious. Dawn challenged the Daring Bakers’ to make Chocolate Pavlovas and Chocolate Mascarpone Mousse. The challenge recipe is based on a recipe from the book Chocolate Epiphany by Francois Payard.


More About Pavlova :


Pavlova is a meringue-based dessert named after the Russian ballet dancer Anna Pavlova. It is referred as "pav", which is a cake similar to meringue with a crispy crust and soft, light inner.
The dessert is believed to have been created to honour the dancer during or after one of her tours to Australia and New Zealand in the 1920s.
The dessert is a popular dish and an important part of the national cuisine of both countries, and is frequently served during celebratory or holiday meals such as Christmas lunch.
The pavlova a crisp crunchy shell, while the interior remains soft and moist. The pavlova's internal consistency is thus completely different from that normally associated with meringue, having more of a soft marshmallow texture. This difference is due to the addition of cornstarch, the use of which is the defining feature of a pavlova recipe.
Leftover decorated pavlova can be refrigerated overnight, but the dessert will absorb moisture from the air and lose its crispness. Undecorated pavlova can safely be left overnight in the oven in which it was baked, to be decorated in the morning.


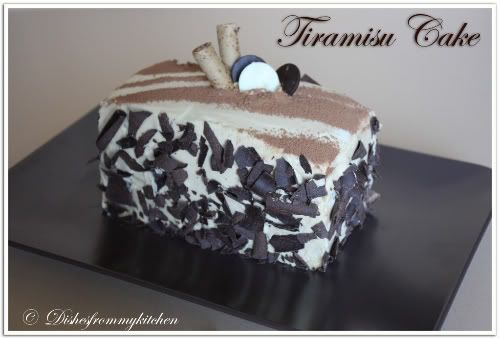
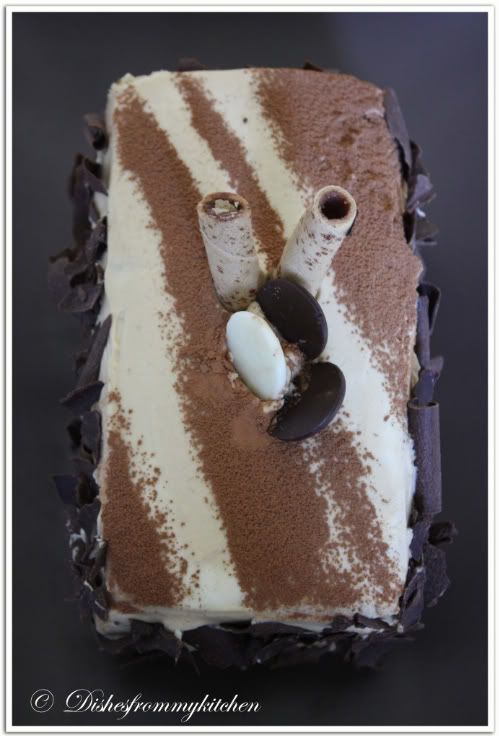
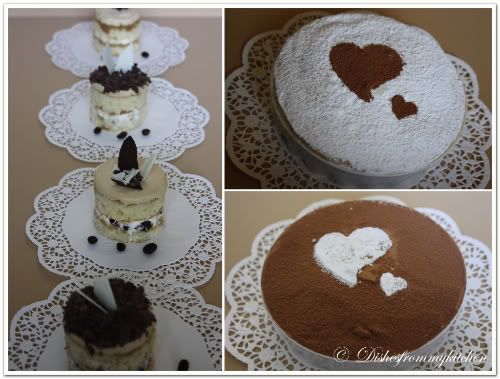
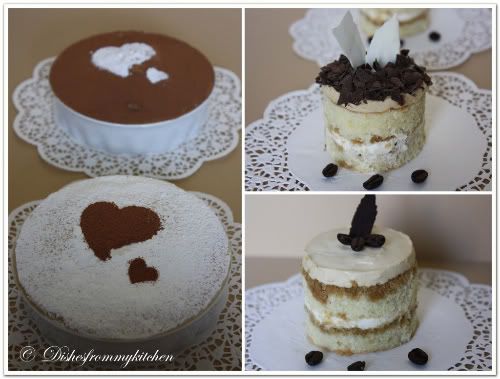
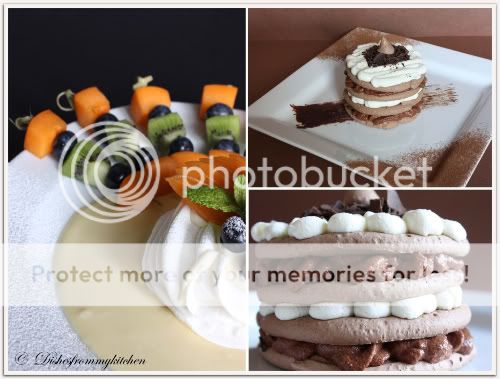
Changes I made for the chocolate Pavlova :
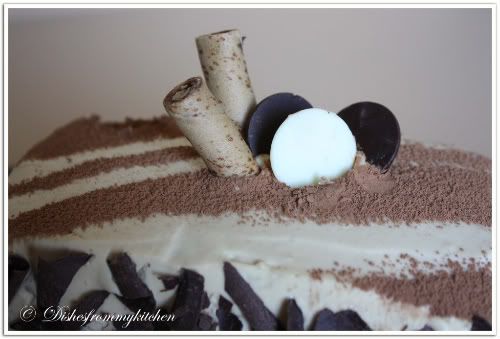
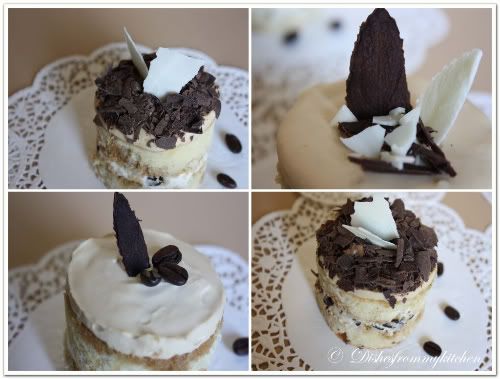
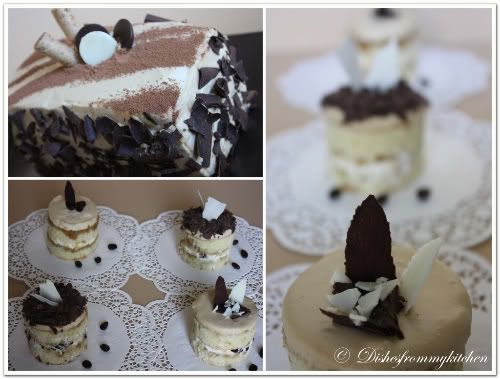
I added 3 tbsp of almond meal to have the nutty flavour and texture to the meringue which taste great though it is not traditional. Layered with chocolate mousse and whipped cream.
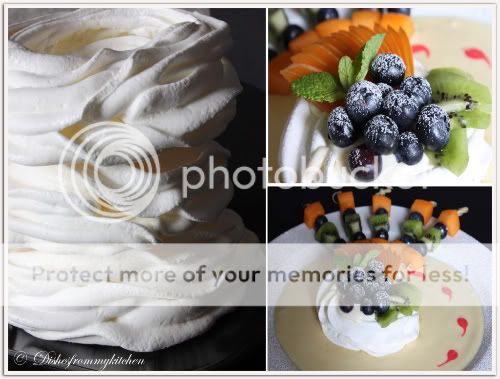
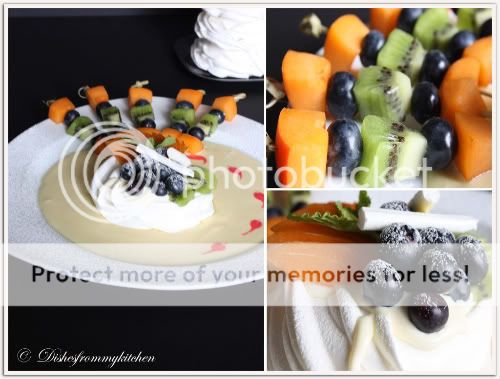
Next is the Vanilla Meringue without the cocoa powder. It is individual servings with Creme Anglaise, whipped cream and Fruits.
We enjoyed both the flavors and the challenge was fun too!!!!
Ok coming to the recipe...

Chocolate Meringue (for the chocolate Pavlova)
Ingredients :
3 large egg whites
½ cup plus 1 tbsp (110 grams) white granulated sugar

¼ cup (30 grams) confectioner’s (icing) sugar

1/3 cup (30 grams) cocoa powder

Directions:
  1. Place a rack in the center of the oven and preheat to 200º F (95º C) degrees. Line two baking sheets with silpat or parchment and set aside.
  2. Put the egg whites in a bowl and whip until soft peaks form. Increase speed to high and gradually add granulated sugar about 1 tbsp at a time until stiff peaks form. (The whites should be firm but moist.)
  3. Sift the confectioner’s sugar and cocoa powder over the egg whites and fold the dry ingredients into the white. (This looks like it will not happen. Fold gently and it will eventually come together.)
  4. Fill a pastry bag with the meringue. Pipe the meringue into whatever shapes you desire. Alternatively, you could just free form your shapes and level them a bit with the back of a spoon. (Class made rounds, hearts, diamonds and an attempt at a clover was made!)
  5. Bake for 2-3 hours until the meringues become dry and crisp. Cool and store in an airtight container for up to 3 days.

Chocolate Mascarpone Mousse (for the top of the Pavlova base)
Ingredients:
1 ½ cups (355 mls) heavy cream (cream with a milk fat content of between 36 and 40 percent)
grated zest of 1 average sized lemon
9 ounces (255 grams) 72% chocolate, chopped
1 2/3 cups (390 mls) mascarpone pinch of nutmeg
2 tbsp (30 mls) Grand Marnier (or orange juice)
Directions:
  1. Place the mascarpone, the remaining cup of cream and nutmeg in a bowl. Whip on low for a minute until the mascarpone is loose. Add the Grand Marnier and whip on medium speed until it holds soft peaks. (DO NOT OVERBEAT AS THE MASCARPONE WILL BREAK.)
  2. Mix about ¼ of the mascarpone mixture into the chocolate to lighten. Fold in the remaining mascarpone until well i
  3. Put ½ cup (120 mls) of the heavy cream and the lemon zest in a saucepan over medium high heat. Once warm, add the chocolate and whisk until melted and smooth. Transfer the mixture to a bowl and let sit at room temperature until cool.
  4. ncorporated. Fill a pastry bag with the mousse. Again, you could just free form mousse on top of the pavlova.
Crème Anglaise
Ingredients :
1 cup (235 mls) whole milk
1 cup (235 mls) heavy cream
1 vanilla bean, split or 1 tsp pure vanilla extract
6 large egg yolks
6 tbsp (75 grams) sugar
Directions:
  1. In a bowl, whisk together the egg yolks and sugar until the mixture turns pale yellow.
  2. Combine the milk, cream and vanilla in a saucepan over medium high heat, bringing the mixture to a boil. Take off the heat.
  3. Pour about ½ cup of the hot liquid into the yolk mixture, whisking constantly to keep from making scrambled eggs. Pour the yolk mixture into the pan with the remaining cream mixture and put the heat back on medium. Stir constantly with a wooden spoon until the mixture thickens enough to lightly coat the back of a wooden spoon. DO NOT OVERCOOK.
  4. Remove the mixture from the heat and strain it through a fine mesh sieve into a bowl. Cover and refrigerate until the mixture is thoroughly chilled, about 2 hours or overnight.


The way I assembled the chocolate Pavlova :


1. Place the chocolate meringue disc in layers filled alternatively with chocolate mousse and whipped cream.


Vanilla Pavlova :


1. Plain meringue filled with Mixture of Creme Anglaise and Whipped cream, served with fruits.


Note :


1. I added 3 tbsp of almond meal to the meringue mixture before baking to get nutty chocolate Meringue, and tsp of corn starch.

Read more...

FROZEN CHOCO BANANA POPSICLES


Does any banana say no if it is loaded with yummy chocolate and nuts ???? Yes you are right they won't say no and off course kids too won't say no to this frozen choco banana Popsicle. Chocolate especially with berries and banana are match made in heaven. This dessert is really healthy too with banana, granola and nuts. So don't wait.. just try this frozen healthy dessert for this hot summer.....it taste's wonderful. As well see how my new guest enjoyed this wonderful treat with my kid ....


FROZEN CHOCO BANANA POPSICLE

Ingredients :

Banana - 2
Semi sweet chocolate chip - 1/2 cup
Any granola (preferably with nuts and honey) - 1 cup (crushed slightly)
Popsicle stick - 4
Aluminium foil - as required


Method :

1. Carefully peel the banana and cut to 2 halves.
2. Insert the Popsicle stick inside the banana. Keep it aside.
3. Now melt the chocolate chip in the microwave until the chocolate is fully melted by stirring every 30 seconds. Take care because they get burnt easily.
4. Once the chocolate is cooled completely.
5. Coat each banana with the chocolate. By pouring with the spoon so that the banana is completely covered.
6. Parallely keep ready of crushed granola in the wide plate.
7. Now roll the chocolate coated banana in the granola and keep it aside in aluminium foil.
8. Proceed the same with other bananas and cover them with the foil. Put it in the freezer for at least 3 hrs until they are firm and set.

Now its time to enjoy...............!!!!


Note :

1. The banana should not be raw as well as so much ripen.
2. Take care while melting the chocolate in the Microwave as it get burnt easily.
3. Before coating the banana with the chocolate , the chocolate should be cooled completely. Stir the chocolate once in a while cooling.
4. You can coat them with granola, nuts drizzle white chocolate, peanut butter anything or your choice.
5.You can store them in the freezer upto 7 days covered with aluminium foil. Enjoy right from your freezer whenever you feel like eating icecream or something cooool :)

Read more...

ZESTY AVOCADO SHERBET

Hi all, I am sorry that I missed all your post for past few days because of my tight schedule. Hope to catch soon.

Who will say no to refreshing dessert in this hot summer ????? Yes today is yummy creamy Zesty Avocado Sherbet. I love all kind of cold desserts, whether it is sorbet, sherbet or Ice cream. The two icy treats Sherbet and Sorbet are very similar in their base ingredients. Sorbets are made with pureed fruits, sugar, and water. Sherbets are made with same ingredients on other hand it has dairy in it. Sorbet uses fruit juice as its base liquid, Sherbets contain milk or other fat, making it similar to ice cream but not very rich as Icecream. But if you want to have both fruit as well as creamy texture to your dessert then your option is sherbet. Many store bought sherbet contains egg in it. Here is my summer treat...


ZESTY AVOCADO SHERBET


INGREDIENTS:

Avocado - 1 (pulp)
Whole milk - 3/4 cup
Cream - 1/2 cup
Sugar - 8 tbsp
Zest of lime - 2 tsp
Lime juice - 1 tbsp


Method :

1.Blend the above ingredients in the blender to the smooth paste.
2.Transfer to the bowl and add the Zest and give a nice whisk.
3.Freeze it over night in the deep plate if you want to serve them as cubes or freeze then in a bowl by covering then using a cling wrap.

Garnish with few fresh zest and mint leaves....


It's ready to serve !!!!! Enjoy this Zesty creamy dessert in this hot summer!!!!


Note :

1. Increase the sugar, Zest and Lime juice according to your preference.
2. If you are more concerned about the diet then you can cut down the cream and use whole milk fully. ( but adding little cream gives extra richness)

Read more...

TIRAMISU CAKE - FIRST SWEET PUNCH


I am very much excited to post my first Sweet Punch challenge hosted by three wonderful girls Ria, Divya and Maria. For the first sweet punch  it is Dorie Greenspan's Tiramisu Cake. I really enjoyed doing this Tiramisu cake which is one of my favourite cake. I exactly followed the same recipe, the outcome was fabulous. I made 1 small block of cake and 4 cakelettes and arranged the leftover sponge and mascarpone in a pie dish dusted with icing sugar and cocoa powder. The mascarpone used in this recipe is home made which I always love more than store bought one. Here comes my First punch !!!!!!!!!!!


TIRAMISU CAKE


Baking: From My Home to Yours by Dorie Greenspan

For the cake layers:


2 cups cake flour
2 teaspoons baking powder
1/8 teaspoon baking soda
1/4 teaspoon salt
1 1/4 sticks (10 tablespoons) unsalted butter, room temperature
1 cup sugar
3 large eggs
1 large egg yolk
1 1/2 teaspoons pure vanilla extract
3/4 cup buttermilk


For the espresso extract:


2 tablespoons instant espresso powder
2 tablespoons boiling water


For the espresso syrup:


1/2 cup water
1/3 cup sugar
1 tablespoon amaretto, Kahlua, or brandy


For the filling and frosting:


1 8-ounce container mascarpone (store-bought or homemade)
1/2 cup confectioners’ sugar, sifted
1 1/2 teaspoons pure vanilla extract
1 tablespoon amaretto, Kahlua, or brandy
1 cup cold heavy cream
2 1/2 ounces bittersweet or semisweet chocolate, finely chopped, or about 1/2 cup store-bought mini chocolate chips
Chocolate-covered espresso beans, for decoration (optional)
Cocoa powder, for dusting


Getting ready:


1. Center a rack in the oven and preheat the oven to 350 degrees F.
2. Butter two 9×2 inch round cake pans, dust the insides with flour, tap out the excess, and line the bottoms of the pans with parchment or wax paper.
3. Put the pans on a baking sheet.


To make the cake:


1. Sift together the cake flour, baking powder, baking soda, and salt.
2. Working with a stand mixer, preferably fitted with a paddle attachment, or with a hand mixer in a large bowl, beat the butter on medium speed until soft and creamy.
3. Add the sugar and beat for another 3 minutes. Add the eggs one by one, and then the yolk, beating for 1 minute after each addition. Beat in the vanilla; don’t be concerned if the mixture looks curdled. Reduce the mixer speed to low and add the dry ingredients alternately with the buttermilk, adding the dry ingredients in 3 additions and the milk in 2 (begin and end with the dry ingredients); scrape down the sides of the bowl as needed and mix only until the ingredients disappear into the batter. Divide the batter evenly between the two pans and smooth the tops with a rubber spatula.
4. Bake for 28 to 30 minutes, rotating the pans at the midway point. When fully baked, the cakes will be golden and springy to the touch and a thin knife inserted into the centers will come out clean. Transfer the cakes to a rack and cool for about 5 minutes, then run a knife around the sides of the cakes, unmold them, and peel off the paper liners. Invert and cool to room temperature right-side up.


To make the extract:


1. Stir the espresso powder and boiling water together in a small cup until blended. Set aside.


To make the syrup:


Stir the water and sugar together in a small saucepan and bring just to a boil. Pour the syrup into a small heatproof bowl and stir in 1 tablespoon of the espresso extract and the liqueur or brandy; set aside.


To make the filling and frosting:


Put the mascarpone, sugar, vanilla, and liqueur in a large bowl and whisk just until blended and smooth.


Working with the stand mixer with the whisk attachment or with a hand mixer, whip the heavy cream until it holds firm peaks. Switch to a rubber spatula and stir about one quarter of the whipped cream into the mascarpone. Fold in the rest of the whipped cream with a light touch.


To assemble the cake:


If the tops of the cake layers have crowned, use a long serrated knife and a gentle sawing motion to even them. Place one layer right-side up on a cardboard round or a cake plate protected with strips of wax or parchment paper. Using a pastry brush or a small spoon, soak the layer with about one third of the espresso syrup. Smooth some of the mascarpone cream over the layer – user about 1 1/4 cups – and gently press the chopped chocolate into the filling. Put the second cake layer on the counter and soak the top of it with half the remaining espresso syrup, then turn the layer over and position it, soaked side down, over the filling. Soak the top of the cake with the remaining syrup.


For the frosting, whisk 1 to 1 1/2 tablespoons of the remaining espresso extract into the remaining mascarpone filling. Taste the frosting as you go to decide how much extract you want to add. If the frosting looks as if it might be a little too soft to spread over the cake, press a piece of plastic wrap against its surface and refrigerate it for 15 minutes or so. Refrigerate the cake too.
With a long metal icing spatula, smooth the frosting around the sides of the cake and over the top. If you want to decorate the cake with chocolate-covered espresso beans, press them into the filling, making concentric circles of beans or just putting some beans in the center of the cake.


NOTE :


Refrigerate the cake for at least 3 hours (or for up to 1 day) before serving – the elements need time to meld.
Just before serving, dust the top of the cake with cocoa.


Home Made Mascarpone

Adapted from Vera's Baking Obsession


Ingredients:

500 ml whipping (36 %) pasteurized (not ultra-pasteurized), preferably organic cream 1 tbsp fresh lemon juice

Preparation:

1. Bring 1 inch of water to a boil in a wide skillet. Reduce the heat to medium-low so the water is barely simmering.
2. Pour the cream into a medium heat-resistant bowl, then place the bowl into the skillet. Heat the cream, stirring often, to 190 F. It will take about 15 minutes of delicate heating.

3. Add the lemon juice and continue heating the mixture, stirring gently, until the cream curdles. Do not expect the same action as you see during ricotta cheese making. All that the whipping cream will do is become thicker, like a well-done crème anglaise. It will cover a back of your wooden spoon thickly. You will see just a few clear whey streaks when you stir.

4. Remove the bowl from the water and let cool for about 20 minutes. Meanwhile, line a sieve with four layers of dampened cheesecloth and set it over a bowl. Transfer the mixture into the lined sieve. Do not squeeze the cheese in the cheesecloth or press on its surface (be patient, it will firm up after refrigeration time).

5. Once cooled completely, cover with plastic wrap and refrigerate (in the sieve) overnight or up to 24 hours.

Read more...

CLAFOUTIS - A BAKED FRENCH DESSERT


Clafoutis
, sometimes in Anglophone countries spelled clafouti, is a baked french dessert of black cherries arranged in a buttered dish and covered with a thick flan like batter. The clafoutis is dusted with powdered sugar and served lukewarm.

This is totally easy and wonderful dessert or breakfast. You can make this clafoutis with any Berries, Pear, Apple or any of your favourite fruits. You can serve this clafoutis hot, in room temperature or even cold. I personally like warm. It is soooooo delicious and one good thing about this is no butter except that we use for greasing the dish. Mmmmmmm go ahead and enjoy my Clafoutis here.....


CLAFOUTIS

Ingredients :

Whole milk - 1 1/4 cups
Sugar - 1/2 cup
Eggs - 3
vanilla Extract - 2 tsp
Flour - 1/3 cup
Almond flour - 3 tbsp
pinch of salt
Cherries Pitted - 2 cups
Melted butter - 1 tbsp for greasing the dish
Icing sugar - Just for dusting


Method :

1) Preheat your oven to 350 f. Butter the inside of a medium-sized baking dish you can use glass or ceramic too. Place the cherries in the dish.
2) Beat the eggs and the 1/3 cup of granulated sugar in the bowl of an electric mixer until light and fluffy.
3) Add the flours and whisk until just combined and no lumps.
4) Pour over cherries and bake at 350 for 30 minutes.
5) Sprinkle remaining sugar over the custard and return to the oven for 10-15 minutes. Serve warm by dusting icing sugar.


Note :


1. The Clafoutis will puff up in the oven and sink back once it is cooled.
2. Since we use cherries in this recipe the water from them oozes out so baking time will be more compared to other fruits.
3.If you are using other fruits like pear reduce the baking time by 10 minutes or bake until the custard is set.
4.You can use cream instead of whole milk for rich taste or half whole milk and half cream. Either ways it taste good.


Read more...


Page copy protected against web site content infringement by Copyscape

Visit Great Cooks Community
All recipes are on Petitchef